Cisco 1601 Hardware Installation Guide - Page 94
Prerequisites for Connecting a T1/FT1 DSU/CSU WIC to a Network, Installing a Cisco Serial WAN
 |
View all Cisco 1601 manuals
Add to My Manuals
Save this manual to your list of manuals |
Page 94 highlights
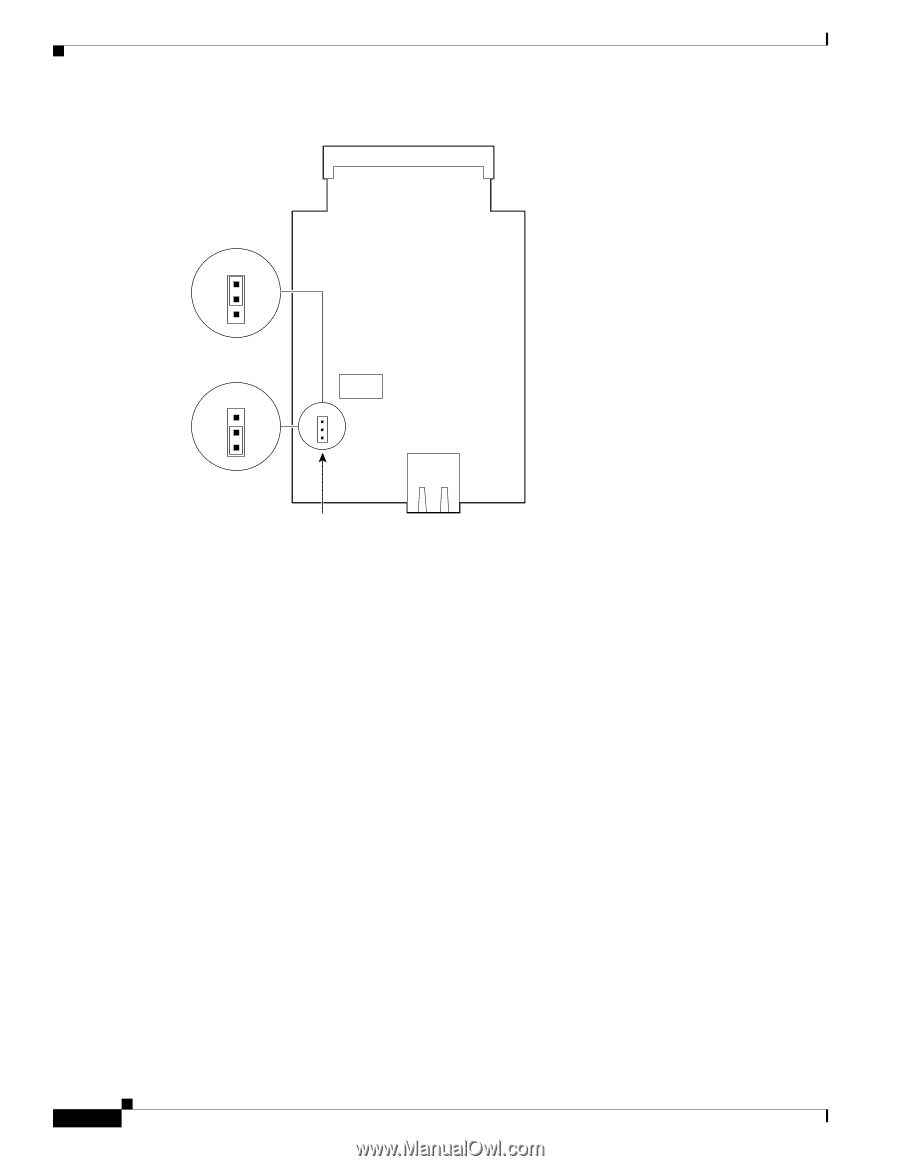
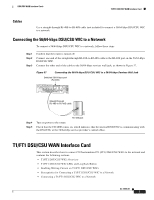
T1/FT1 DSU/CSU WAN Interface Card DSU/CSU WAN Interface Cards Figure 60 Jumper Settings for Controlling Wetting Current on the WIC-1DSU-T1 V2 Card J2 Wetting current enabled J2 J2 88130 Wetting current disabled Wetting current jumper Prerequisites for Connecting a T1/FT1 DSU/CSU WIC to a Network Before connecting a WIC to the network, ensure that the WIC is installed in the router, the equipment is properly grounded, and you have the proper cables for connecting the WIC to the network. This section describes the preparation necessary before connecting a T1/FT1 DSU/CSU WIC to the network. Installing a Cisco Serial WAN Interface Card Install the Cisco serial wan interface card according to the instructions in Installing Cisco Interface Cards in Cisco Access Routers. Grounding Ensure that the equipment you are working with is properly grounded. For instructions on grounding your serial WIC, refer to Installing Cisco Interface Cards in Cisco Access Routers. Cables Use a straight-through RJ-48C-to-RJ-48C cable to connect a T1/FT1 DSU/CSU WIC to a network. OL-12845-01 6
-
 1
1 -
2
-
3
-
4
-
5
-
6
-
7
-
8
-
9
-
10
-
11
-
12
-
13
-
14
-
15
-
16
-
17
-
18
-
19
-
20
-
21
-
22
-
23
-
24
-
25
-
26
-
27
-
28
-
29
-
30
-
31
-
32
-
33
-
34
-
35
-
36
-
37
-
38
-
39
-
40
-
41
-
42
-
43
-
44
-
45
-
46
-
47
-
48
-
49
-
50
-
51
-
52
-
53
-
54
-
55
-
56
-
57
-
58
-
59
-
60
-
61
-
62
-
63
-
64
-
65
-
66
-
67
-
68
-
69
-
70
-
71
-
72
-
73
-
74
-
75
-
76
-
77
-
78
-
79
-
80
-
81
-
82
-
83
-
84
-
85
-
86
-
87
-
88
-
 89
89 -
 90
90 -
 91
91 -
 92
92 -
 93
93 -
 94
94 -
 95
95 -
 96
96 -
 97
97 -
 98
98 -
 99
99 -
100
-
101
-
102
-
103
-
104
-
105
-
106
-
107
-
108
-
109
-
110
-
111
-
112
-
113
-
114
-
115
-
116
-
117
-
118
-
119
-
120
-
121
-
122
-
123
-
124
-
125
-
126
-
127
-
128
-
129
-
130
-
131
-
132
-
133
-
134
-
135
-
136
-
137
-
138
-
139
-
140
-
141
-
142
-
143
-
144
-
145
-
146
-
147
-
148
-
149
-
150
-
151
-
152
-
153
-
154
-
155
-
156
-
157
-
158
-
159
-
160
-
161
-
162
-
163
-
164
-
165
-
166
-
167
-
168
-
169
-
170
-
171
-
172
-
173
-
174
-
175
-
176
-
177
-
178
-
179
-
180
-
181
-
182
-
183
-
184
-
185
-
186
-
187
-
188
-
189
-
190
-
191
-
192
-
193
-
194
-
195
-
196
-
197
-
198
-
199
-
200
-
201
-
202
-
203
-
204
-
205
-
206
-
207
-
208
-
209
-
210
-
211
-
212
-
213
-
214
-
215
-
216
 |
 |