Dell E310dw Dell Printer Users Guide - Page 25
Paper Handling, Load and Print using the Paper Tray
 |
View all Dell E310dw manuals
Add to My Manuals
Save this manual to your list of manuals |
Page 25 highlights
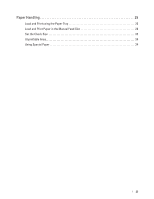
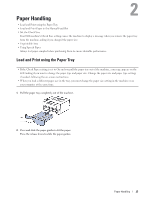
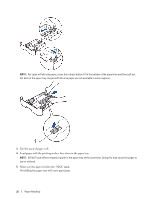
2 Paper Handling • Load and Print using the Paper Tray • Load and Print Paper in the Manual Feed Slot • Set the Check Size Your Dell machine's Check Size setting causes the machine to display a message when you remove the paper tray from the machine, asking if you changed the paper size. • Unprintable Area • Using Special Paper Always test paper samples before purchasing them to ensure desirable performance. Load and Print using the Paper Tray • If the Check Paper setting is set to On and you pull the paper tray out of the machine, a message appears on the LCD asking if you want to change the paper type and paper size. Change the paper size and paper type settings if needed, following the on-screen instructions. • When you load a different paper size in the tray, you must change the paper size setting in the machine or on your computer at the same time. 1. Pull the paper tray completely out of the machine. 2. Press and slide the paper guides to fit the paper. Press the release levers to slide the paper guides. Paper Handling 25
-
 1
1 -
2
-
3
-
4
-
5
-
6
-
7
-
8
-
9
-
10
-
11
-
12
-
13
-
14
-
15
-
16
-
17
-
18
-
19
-
 20
20 -
 21
21 -
 22
22 -
 23
23 -
 24
24 -
 25
25 -
 26
26 -
 27
27 -
 28
28 -
 29
29 -
 30
30 -
31
-
32
-
33
-
34
-
35
-
36
-
37
-
38
-
39
-
40
-
41
-
42
-
43
-
44
-
45
-
46
-
47
-
48
-
49
-
50
-
51
-
52
-
53
-
54
-
55
-
56
-
57
-
58
-
59
-
60
-
61
-
62
-
63
-
64
-
65
-
66
-
67
-
68
-
69
-
70
-
71
-
72
-
73
-
74
-
75
-
76
-
77
-
78
-
79
-
80
-
81
-
82
-
83
-
84
-
85
-
86
-
87
-
88
-
89
-
90
-
91
-
92
-
93
-
94
-
95
-
96
-
97
-
98
-
99
-
100
-
101
-
102
-
103
-
104
-
105
-
106
-
107
-
108
-
109
-
110
-
111
-
112
-
113
-
114
-
115
-
116
-
117
-
118
-
119
-
120
-
121
-
122
-
123
-
124
-
125
-
126
-
127
-
128
-
129
-
130
-
131
-
132
-
133
-
134
-
135
-
136
-
137
-
138
-
139
-
140
-
141
-
142
-
143
-
144
-
145
-
146
-
147
-
148
-
149
-
150
-
151
-
152
-
153
-
154
-
155
-
156
-
157
-
158
-
159
-
160
-
161
-
162
-
163
-
164
-
165
-
166
-
167
-
168
-
169
-
170
-
171
-
172
-
173
-
174
-
175
-
176
-
177
-
178
-
179
-
180
-
181
-
182
-
183
-
184
-
185
-
186
-
187
-
188
-
189
-
190
-
191
-
192
-
193
-
194
-
195
-
196
-
197
-
198
-
199
-
200
-
201
-
202
-
203
-
204
-
205
-
206
-
207
-
208
-
209
-
210
-
211
-
212
-
213
-
214
-
215
-
216
 |
 |
