Dell E310dw Dell Printer Users Guide - Page 90
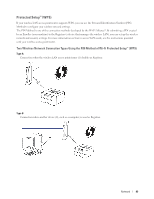
How to Con Your Wireless Network Using the PIN Method of Wi-Fi Protected Setup™ (WPS)
 |
View all Dell E310dw manuals
Add to My Manuals
Save this manual to your list of manuals |
Page 90 highlights
NOTE: Routers or access points that support WPS are marked with this symbol: How to Configure Your Wireless Network Using the PIN Method of Wi-Fi Protected Setup™ (WPS) 1. Press p or q to select the Network option, and then press OK. 2. Press p or q to select the WLAN option, and then press OK. 3. Press p or q to select the WPS w/PIN Code option, and then press OK. 4. When WLAN Enable? appears, press p to select On. This will start the wireless setup wizard. To cancel, press Back. 5. The LCD displays an eight-digit PIN and the machine starts searching for a wireless LAN access point/router. 6. Using a computer that is on the network, type "http://access point's IP address" in your browser (where "access point's IP address" is the IP address of the device that is used as the Registrar). 7. Go to the WPS setting page and type the PIN, and then follow the on-screen instructions. NOTE: The Registrar is usually the wireless LAN access point/router. NOTE: The setting page will differ depending on the brand of wireless LAN access point/router. For more information, see the instructions supplied with your wireless LAN access point/router. If you are using a Windows Vista®, Windows®7, or Windows®8 computer as a Registrar, complete the following steps: 8. Do one of the following: • (Windows Vista®) Click (Start) > Network > Add a wireless device. • (Windows®7) Click (Start) > Devices and Printers > Add a device. • (Windows®8) Move your mouse to the lower right corner of your desktop. When the menu bar appears, click Settings > Control Panel > Hardware and Sound > Devices and Printers > Add a device. NOTE: To use a Windows Vista®, Windows®7, or Windows®8 computer as a Registrar, you must register it to your network in advance. For more information, see the instructions supplied with your wireless LAN access point/ router. NOTE: If you use Windows®7 or Windows®8 as a Registrar, you can install the printer driver after the wireless configuration by following the on-screen instructions. To install the full driver and software package, use the Dell 90 Network
-
 1
1 -
2
-
3
-
4
-
5
-
6
-
7
-
8
-
9
-
10
-
11
-
12
-
13
-
14
-
15
-
16
-
17
-
18
-
19
-
20
-
21
-
22
-
23
-
24
-
25
-
26
-
27
-
28
-
29
-
30
-
31
-
32
-
33
-
34
-
35
-
36
-
37
-
38
-
39
-
40
-
41
-
42
-
43
-
44
-
45
-
46
-
47
-
48
-
49
-
50
-
51
-
52
-
53
-
54
-
55
-
56
-
57
-
58
-
59
-
60
-
61
-
62
-
63
-
64
-
65
-
66
-
67
-
68
-
69
-
70
-
71
-
72
-
73
-
74
-
75
-
76
-
77
-
78
-
79
-
80
-
81
-
82
-
83
-
84
-
 85
85 -
 86
86 -
 87
87 -
 88
88 -
 89
89 -
 90
90 -
 91
91 -
 92
92 -
 93
93 -
 94
94 -
 95
95 -
96
-
97
-
98
-
99
-
100
-
101
-
102
-
103
-
104
-
105
-
106
-
107
-
108
-
109
-
110
-
111
-
112
-
113
-
114
-
115
-
116
-
117
-
118
-
119
-
120
-
121
-
122
-
123
-
124
-
125
-
126
-
127
-
128
-
129
-
130
-
131
-
132
-
133
-
134
-
135
-
136
-
137
-
138
-
139
-
140
-
141
-
142
-
143
-
144
-
145
-
146
-
147
-
148
-
149
-
150
-
151
-
152
-
153
-
154
-
155
-
156
-
157
-
158
-
159
-
160
-
161
-
162
-
163
-
164
-
165
-
166
-
167
-
168
-
169
-
170
-
171
-
172
-
173
-
174
-
175
-
176
-
177
-
178
-
179
-
180
-
181
-
182
-
183
-
184
-
185
-
186
-
187
-
188
-
189
-
190
-
191
-
192
-
193
-
194
-
195
-
196
-
197
-
198
-
199
-
200
-
201
-
202
-
203
-
204
-
205
-
206
-
207
-
208
-
209
-
210
-
211
-
212
-
213
-
214
-
215
-
216
 |
 |