Dell E310dw Dell Printer Users Guide - Page 68
Change the Orientation of Your Print (Portrait or Landscape) (Macintosh)
 |
View all Dell E310dw manuals
Add to My Manuals
Save this manual to your list of manuals |
Page 68 highlights
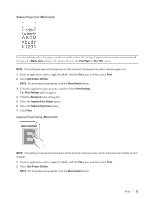
Change the Orientation of Your Print (Portrait or Landscape) (Macintosh) Portrait Landscape 1. From an application, such as Apple TextEdit, click the File menu, and then select Print. 2. Select Dell Printer E310dw. NOTE: For more page setup options, click the Show Details button. 3. Select the Orientation option that matches the way you want the document to print. 4. Change other printer settings, if needed. 5. Click Print. Print More Than One Page on a Single Sheet of Paper (N in 1) (Macintosh) 1. From an application, such as Apple TextEdit, click the File menu, and then select Print. 2. Select Dell Printer E310dw. NOTE: For more page setup options, click the Show Details button. 3. Click the application pop-up menu, and then select Layout. The Layout setting options appear. 4. Click the Pages per Sheet pop-up menu, and then select the number of pages to print on each sheet. 5. Click the Layout Direction menu, and then select how you want the pages ordered. 6. Click the Border pop-up menu, and then select your border line type. 68 Print
-
 1
1 -
2
-
3
-
4
-
5
-
6
-
7
-
8
-
9
-
10
-
11
-
12
-
13
-
14
-
15
-
16
-
17
-
18
-
19
-
20
-
21
-
22
-
23
-
24
-
25
-
26
-
27
-
28
-
29
-
30
-
31
-
32
-
33
-
34
-
35
-
36
-
37
-
38
-
39
-
40
-
41
-
42
-
43
-
44
-
45
-
46
-
47
-
48
-
49
-
50
-
51
-
52
-
53
-
54
-
55
-
56
-
57
-
58
-
59
-
60
-
61
-
62
-
 63
63 -
 64
64 -
 65
65 -
 66
66 -
 67
67 -
 68
68 -
 69
69 -
 70
70 -
 71
71 -
 72
72 -
 73
73 -
74
-
75
-
76
-
77
-
78
-
79
-
80
-
81
-
82
-
83
-
84
-
85
-
86
-
87
-
88
-
89
-
90
-
91
-
92
-
93
-
94
-
95
-
96
-
97
-
98
-
99
-
100
-
101
-
102
-
103
-
104
-
105
-
106
-
107
-
108
-
109
-
110
-
111
-
112
-
113
-
114
-
115
-
116
-
117
-
118
-
119
-
120
-
121
-
122
-
123
-
124
-
125
-
126
-
127
-
128
-
129
-
130
-
131
-
132
-
133
-
134
-
135
-
136
-
137
-
138
-
139
-
140
-
141
-
142
-
143
-
144
-
145
-
146
-
147
-
148
-
149
-
150
-
151
-
152
-
153
-
154
-
155
-
156
-
157
-
158
-
159
-
160
-
161
-
162
-
163
-
164
-
165
-
166
-
167
-
168
-
169
-
170
-
171
-
172
-
173
-
174
-
175
-
176
-
177
-
178
-
179
-
180
-
181
-
182
-
183
-
184
-
185
-
186
-
187
-
188
-
189
-
190
-
191
-
192
-
193
-
194
-
195
-
196
-
197
-
198
-
199
-
200
-
201
-
202
-
203
-
204
-
205
-
206
-
207
-
208
-
209
-
210
-
211
-
212
-
213
-
214
-
215
-
216
 |
 |
