Dell E310dw Dell Printer Users Guide - Page 91
Con Your Machine for a Wireless Network in Ad-Hoc Mode (For IEEE 802.11b/g/n)
 |
View all Dell E310dw manuals
Add to My Manuals
Save this manual to your list of manuals |
Page 91 highlights
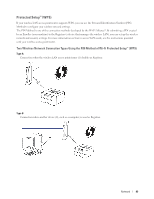
installer on the Installer CD-ROM. 9. Select your machine and click Next. 10. Type the PIN displayed on the machine's LCD, and then click Next. 11. Select your network, and then click Next. 12. Click Close. If your wireless device is connected successfully, the machine's LCD displays Connected. The machine will print your machine's wireless status report. If the connection fails, check the error code on the printed report. NOTE: If the connection fails, your machine reverts to a wired network interface. For Windows®: You have completed the wireless network setup. Install drivers and software necessary for operating your device from the Installer CD-ROM. For Macintosh: You have completed the wireless network setup. To install drivers and software necessary for operating your device, double-click "StartHereOS X.app" in the installation CD-ROM. Configure Your Machine for a Wireless Network in Ad-Hoc Mode (For IEEE 802.11b/g/n) • Configure Your Machine for a Wireless Network in Ad-Hoc Mode Using a New SSID If you are using a new SSID, all other devices will connect using the SSID you assign to your Dell machine in the following steps. You must connect to this SSID from your computer when it is configured for Ad-Hoc mode. • Configure Your Machine for a Wireless Network in Ad-Hoc Mode Using an Existing SSID If you are trying to pair your Dell machine to a computer that is already in Ad-Hoc mode and has a configured SSID, use these instructions. • Connected to a Wireless Computer without a Wireless LAN Access Point Router in the Network (Ad-Hoc Mode) This type of network does not have a central wireless LAN access point/router. Each wireless client communicates directly with each other. When the Dell wireless machine (your machine) is part of this network, it receives all print jobs directly from the computer sending print data. Configure Your Machine for a Wireless Network in Ad-Hoc Mode Using a New SSID If you are using a new SSID, all other devices will connect using the SSID you assign to your Dell machine in the following steps. You must connect to this SSID from your computer when it is configured for Ad-Hoc mode. 1. Press p or q to select the Network option, and then press OK. 2. Press p or q to select the WLAN option, and then press OK. 3. Press p or q to select the Setup Wizard option, and then press OK. 4. When WLAN Enable? appears, press p to select On. This will start the wireless setup wizard. To cancel, press Back. 5. The machine will search for your network and display a list of available SSIDs. Press p or q to select the option, and then press OK. Network 91
-
 1
1 -
2
-
3
-
4
-
5
-
6
-
7
-
8
-
9
-
10
-
11
-
12
-
13
-
14
-
15
-
16
-
17
-
18
-
19
-
20
-
21
-
22
-
23
-
24
-
25
-
26
-
27
-
28
-
29
-
30
-
31
-
32
-
33
-
34
-
35
-
36
-
37
-
38
-
39
-
40
-
41
-
42
-
43
-
44
-
45
-
46
-
47
-
48
-
49
-
50
-
51
-
52
-
53
-
54
-
55
-
56
-
57
-
58
-
59
-
60
-
61
-
62
-
63
-
64
-
65
-
66
-
67
-
68
-
69
-
70
-
71
-
72
-
73
-
74
-
75
-
76
-
77
-
78
-
79
-
80
-
81
-
82
-
83
-
84
-
85
-
 86
86 -
 87
87 -
 88
88 -
 89
89 -
 90
90 -
 91
91 -
 92
92 -
 93
93 -
 94
94 -
 95
95 -
 96
96 -
97
-
98
-
99
-
100
-
101
-
102
-
103
-
104
-
105
-
106
-
107
-
108
-
109
-
110
-
111
-
112
-
113
-
114
-
115
-
116
-
117
-
118
-
119
-
120
-
121
-
122
-
123
-
124
-
125
-
126
-
127
-
128
-
129
-
130
-
131
-
132
-
133
-
134
-
135
-
136
-
137
-
138
-
139
-
140
-
141
-
142
-
143
-
144
-
145
-
146
-
147
-
148
-
149
-
150
-
151
-
152
-
153
-
154
-
155
-
156
-
157
-
158
-
159
-
160
-
161
-
162
-
163
-
164
-
165
-
166
-
167
-
168
-
169
-
170
-
171
-
172
-
173
-
174
-
175
-
176
-
177
-
178
-
179
-
180
-
181
-
182
-
183
-
184
-
185
-
186
-
187
-
188
-
189
-
190
-
191
-
192
-
193
-
194
-
195
-
196
-
197
-
198
-
199
-
200
-
201
-
202
-
203
-
204
-
205
-
206
-
207
-
208
-
209
-
210
-
211
-
212
-
213
-
214
-
215
-
216
 |
 |