Epson PowerLite Pro G5350 User's Guide - Page 139
The message, is displayed., Only part of the computer image is displayed., If you're using Mac OS X
 |
View all Epson PowerLite Pro G5350 manuals
Add to My Manuals
Save this manual to your list of manuals |
Page 139 highlights
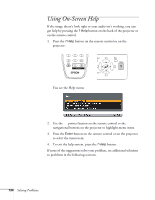
■ Depending on your computer's video card, you might need to use the Display utility in the Control Panel to make sure that both the LCD screen and external monitor port are enabled. See your computer's documentation or online help for details. If you're using Mac OS X: 1. Open System Preferences. 2. Click Displays. 3. Click Detect Displays. 4. Make sure the VGA Display or Color LCD dialog box is selected. 5. Click the Arrangement or Arrange tab. 6. Make sure the Mirror Displays checkbox is selected. The message Not Supported is displayed. ■ Make sure the correct input signal is selected in the Signal menu (see page 98). ■ Make sure your computer's resolution and frequency or refresh rate is supported by the projector (see page 159). If necessary, change your computer's settings. Only part of the computer image is displayed. ■ Press the Auto button on the remote control or the Enter button on the projector. ■ Make sure the image Position setting is correct in the Signal menu. See page 99 for more information. ■ Press the Aspect button on the remote control. ■ Press the Esc button on the remote control to cancel the E-Zoom function. ■ Make sure your computer's resolution setting is correct. See the compatible video formats listed on page 159. Solving Problems 139
-
 1
1 -
2
-
3
-
4
-
5
-
6
-
7
-
8
-
9
-
10
-
11
-
12
-
13
-
14
-
15
-
16
-
17
-
18
-
19
-
20
-
21
-
22
-
23
-
24
-
25
-
26
-
27
-
28
-
29
-
30
-
31
-
32
-
33
-
34
-
35
-
36
-
37
-
38
-
39
-
40
-
41
-
42
-
43
-
44
-
45
-
46
-
47
-
48
-
49
-
50
-
51
-
52
-
53
-
54
-
55
-
56
-
57
-
58
-
59
-
60
-
61
-
62
-
63
-
64
-
65
-
66
-
67
-
68
-
69
-
70
-
71
-
72
-
73
-
74
-
75
-
76
-
77
-
78
-
79
-
80
-
81
-
82
-
83
-
84
-
85
-
86
-
87
-
88
-
89
-
90
-
91
-
92
-
93
-
94
-
95
-
96
-
97
-
98
-
99
-
100
-
101
-
102
-
103
-
104
-
105
-
106
-
107
-
108
-
109
-
110
-
111
-
112
-
113
-
114
-
115
-
116
-
117
-
118
-
119
-
120
-
121
-
122
-
123
-
124
-
125
-
126
-
127
-
128
-
129
-
130
-
131
-
132
-
133
-
 134
134 -
 135
135 -
 136
136 -
 137
137 -
 138
138 -
 139
139 -
 140
140 -
 141
141 -
 142
142 -
 143
143 -
 144
144 -
145
-
146
-
147
-
148
-
149
-
150
-
151
-
152
-
153
-
154
-
155
-
156
-
157
-
158
-
159
-
160
-
161
-
162
-
163
-
164
-
165
-
166
-
167
-
168
-
169
-
170
-
171
-
172
-
173
-
174
-
175
-
176
-
177
 |
 |