Epson PowerLite Pro G5350 User's Guide - Page 35
Connecting to a Digital Camera or Other USB Device - powerlite pro g5350nl multimedia projector
 |
View all Epson PowerLite Pro G5350 manuals
Add to My Manuals
Save this manual to your list of manuals |
Page 35 highlights
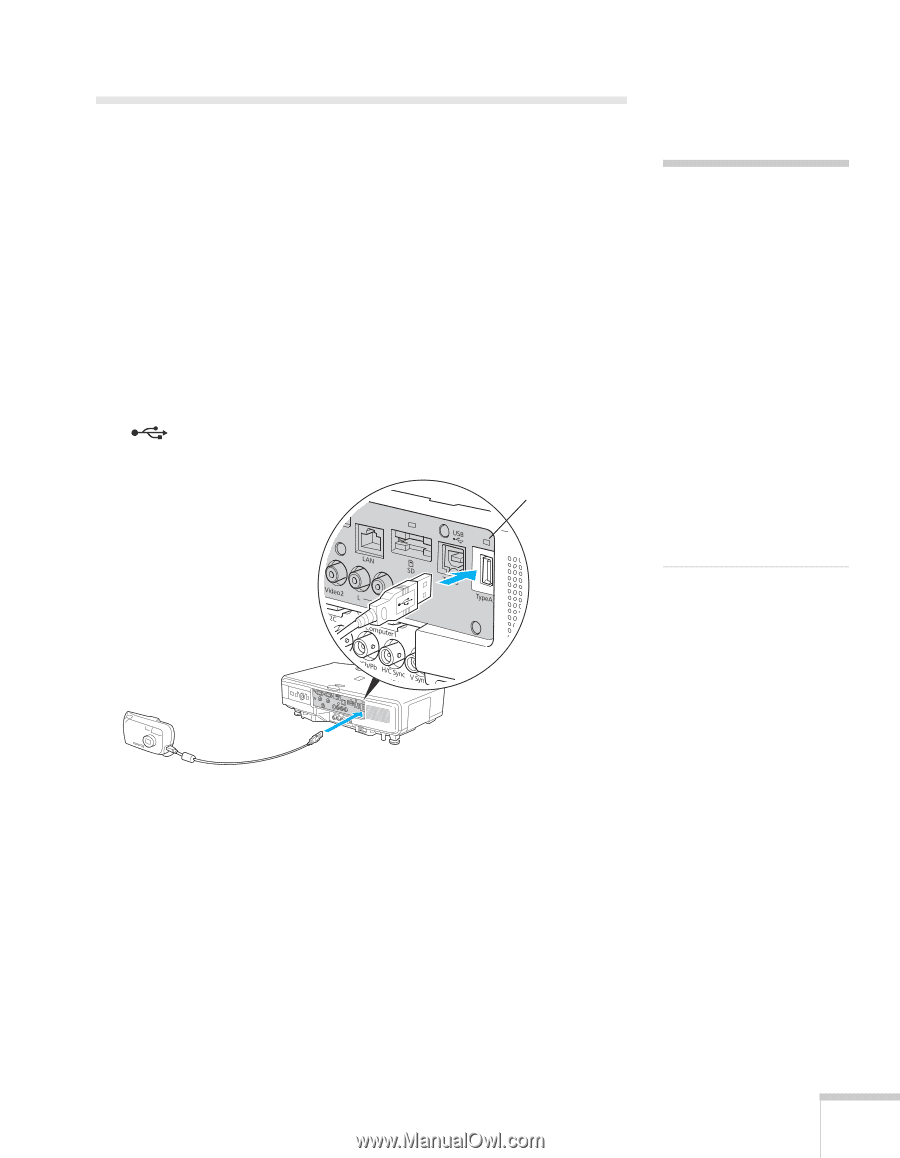
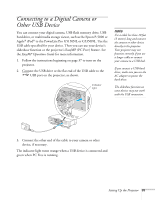
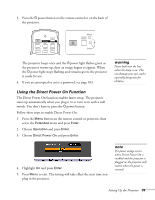
Connecting to a Digital Camera or Other USB Device You can connect your digital camera, USB flash memory drive, USB hard drive, or multimedia storage viewer, such as the Epson P-5000 or Apple® iPod® to the PowerLite Pro G5150NL or G5350NL. Use the USB cable specified for your device. Then you can use your device's slideshow function or the projector's EasyMP (PC Free) feature. See the EasyMP Operation Guide for more information. 1. Follow the instructions beginning on page 37 to turn on the projector. 2. Connect the USB drive or the flat end of the USB cable to the USB port on the projector, as shown. Indicator light note Use a cable less than 10 feet (3 meters) long and connect the camera or other device directly to the projector. Your projector may not function correctly if you use a longer cable or connect your camera to a USB hub. If you connect a USB hard drive, make sure you use the AC adapter to power the hard drive. The slideshow function on some devices may not work with the USB connection. 3. Connect the other end of the cable to your camera or other device, if necessary. The indicator light turns orange when a USB device is connected and green when PC Free is running. Setting Up the Projector 35
-
 1
1 -
2
-
3
-
4
-
5
-
6
-
7
-
8
-
9
-
10
-
11
-
12
-
13
-
14
-
15
-
16
-
17
-
18
-
19
-
20
-
21
-
22
-
23
-
24
-
25
-
26
-
27
-
28
-
29
-
 30
30 -
 31
31 -
 32
32 -
 33
33 -
 34
34 -
 35
35 -
 36
36 -
 37
37 -
 38
38 -
 39
39 -
 40
40 -
41
-
42
-
43
-
44
-
45
-
46
-
47
-
48
-
49
-
50
-
51
-
52
-
53
-
54
-
55
-
56
-
57
-
58
-
59
-
60
-
61
-
62
-
63
-
64
-
65
-
66
-
67
-
68
-
69
-
70
-
71
-
72
-
73
-
74
-
75
-
76
-
77
-
78
-
79
-
80
-
81
-
82
-
83
-
84
-
85
-
86
-
87
-
88
-
89
-
90
-
91
-
92
-
93
-
94
-
95
-
96
-
97
-
98
-
99
-
100
-
101
-
102
-
103
-
104
-
105
-
106
-
107
-
108
-
109
-
110
-
111
-
112
-
113
-
114
-
115
-
116
-
117
-
118
-
119
-
120
-
121
-
122
-
123
-
124
-
125
-
126
-
127
-
128
-
129
-
130
-
131
-
132
-
133
-
134
-
135
-
136
-
137
-
138
-
139
-
140
-
141
-
142
-
143
-
144
-
145
-
146
-
147
-
148
-
149
-
150
-
151
-
152
-
153
-
154
-
155
-
156
-
157
-
158
-
159
-
160
-
161
-
162
-
163
-
164
-
165
-
166
-
167
-
168
-
169
-
170
-
171
-
172
-
173
-
174
-
175
-
176
-
177
 |
 |