Epson PowerLite Pro G5350 User's Guide - Page 99
connectors labeled Y/Cb/Cr or Y/Pb/Pr., when viewing image
 |
View all Epson PowerLite Pro G5350 manuals
Add to My Manuals
Save this manual to your list of manuals |
Page 99 highlights
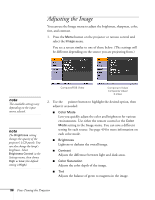
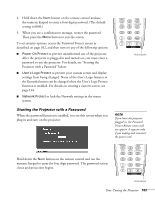
■ Tracking Adjust this value to eliminate vertical stripes in computer images. ■ Sync Adjust this value if computer images appear blurry or flicker. ■ Position If the image is slightly cut off on one or more sides, it may not be centered exactly. Select this setting and use the pointer button to center it. ■ Progressive For composite video, S-video, component video, and signals from the HDMI port only. Turn this setting on to convert interlaced signals into progressive signals (best for still images). Select Video for viewing general video images. Select Film/Auto for movie images, CG, and animated images. Leave the setting Off for moving images. ■ Noise Reduction Smooths out rough images. Select your favorite setting. Epson recommends that you select Off when viewing image sources with very low noise, such as DVDs. ■ HDMI Video Range When you connect to the HDMI input port, set the projector's video range to match the video range setting of your device. ■ Input Signal If the colors don't look right on the Auto setting, select the setting for the type of equipment you've connected to the Computer1, Computer2, or BNC ports. Choose RGB for a computer or RGB-video connection, and Component for a video player that outputs a component video signal (with connectors labeled Y/Cb/Cr or Y/Pb/Pr). note You can also use the remote control's Auto button to automatically reset the projector's Tracking, Sync, and Position settings. See page 141 for details. note The Progressive setting for signals from the HDMI input port (excluding digital RGB) or component video can only be adjusted when 480i/576i/1080i signals are being input.). note The Noise Reduction and HDMI Video Range settings cannot be set for digital RGB signals. Fine-Tuning the Projector 99
-
 1
1 -
2
-
3
-
4
-
5
-
6
-
7
-
8
-
9
-
10
-
11
-
12
-
13
-
14
-
15
-
16
-
17
-
18
-
19
-
20
-
21
-
22
-
23
-
24
-
25
-
26
-
27
-
28
-
29
-
30
-
31
-
32
-
33
-
34
-
35
-
36
-
37
-
38
-
39
-
40
-
41
-
42
-
43
-
44
-
45
-
46
-
47
-
48
-
49
-
50
-
51
-
52
-
53
-
54
-
55
-
56
-
57
-
58
-
59
-
60
-
61
-
62
-
63
-
64
-
65
-
66
-
67
-
68
-
69
-
70
-
71
-
72
-
73
-
74
-
75
-
76
-
77
-
78
-
79
-
80
-
81
-
82
-
83
-
84
-
85
-
86
-
87
-
88
-
89
-
90
-
91
-
92
-
93
-
 94
94 -
 95
95 -
 96
96 -
 97
97 -
 98
98 -
 99
99 -
 100
100 -
 101
101 -
 102
102 -
 103
103 -
 104
104 -
105
-
106
-
107
-
108
-
109
-
110
-
111
-
112
-
113
-
114
-
115
-
116
-
117
-
118
-
119
-
120
-
121
-
122
-
123
-
124
-
125
-
126
-
127
-
128
-
129
-
130
-
131
-
132
-
133
-
134
-
135
-
136
-
137
-
138
-
139
-
140
-
141
-
142
-
143
-
144
-
145
-
146
-
147
-
148
-
149
-
150
-
151
-
152
-
153
-
154
-
155
-
156
-
157
-
158
-
159
-
160
-
161
-
162
-
163
-
164
-
165
-
166
-
167
-
168
-
169
-
170
-
171
-
172
-
173
-
174
-
175
-
176
-
177
 |
 |