Epson PowerLite Pro G5350 User's Guide - Page 43
The Projector and Notebook Don’t Display the Same Image, If you're using a PC notebook
 |
View all Epson PowerLite Pro G5350 manuals
Add to My Manuals
Save this manual to your list of manuals |
Page 43 highlights
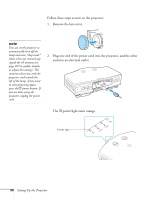
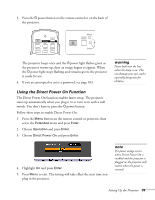
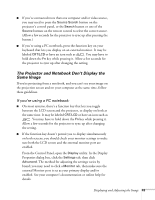
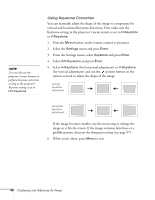
■ If you've connected more than one computer and/or video source, you may need to press the Source Search button on the projector's control panel, or the Search button or one of the Source buttons on the remote control to select the correct source. (Allow a few seconds for the projector to sync up after pressing the button.) ■ If you're using a PC notebook, press the function key on your keyboard that lets you display on an external monitor. It may be labeled CRT/LCD or have an icon such as . You may have to hold down the Fn key while pressing it. Allow a few seconds for the projector to sync up after changing the setting. The Projector and Notebook Don't Display the Same Image If you're projecting from a notebook, and you can't see your image on the projection screen and on your computer at the same time, follow these guidelines. If you're using a PC notebook: ■ On most systems, there's a function key that lets you toggle between the LCD screen and the projector, or display on both at the same time. It may be labeled CRT/LCD or have an icon such as . You may have to hold down the Fn key while pressing it. Allow a few seconds for the projector to sync up after changing the setting. ■ If the function key doesn't permit you to display simultaneously on both screens, you should check your monitor settings to make sure both the LCD screen and the external monitor port are enabled. From the Control Panel, open the Display utility. In the Display Properties dialog box, click the Settings tab, then click Advanced. The method for adjusting the settings varies by brand; you may need to click a Monitor tab, then make sure the external Monitor port is set as your primary display and/or enabled. See your computer's documentation or online help for details. Displaying and Adjusting the Image 43
-
 1
1 -
2
-
3
-
4
-
5
-
6
-
7
-
8
-
9
-
10
-
11
-
12
-
13
-
14
-
15
-
16
-
17
-
18
-
19
-
20
-
21
-
22
-
23
-
24
-
25
-
26
-
27
-
28
-
29
-
30
-
31
-
32
-
33
-
34
-
35
-
36
-
37
-
 38
38 -
 39
39 -
 40
40 -
 41
41 -
 42
42 -
 43
43 -
 44
44 -
 45
45 -
 46
46 -
 47
47 -
 48
48 -
49
-
50
-
51
-
52
-
53
-
54
-
55
-
56
-
57
-
58
-
59
-
60
-
61
-
62
-
63
-
64
-
65
-
66
-
67
-
68
-
69
-
70
-
71
-
72
-
73
-
74
-
75
-
76
-
77
-
78
-
79
-
80
-
81
-
82
-
83
-
84
-
85
-
86
-
87
-
88
-
89
-
90
-
91
-
92
-
93
-
94
-
95
-
96
-
97
-
98
-
99
-
100
-
101
-
102
-
103
-
104
-
105
-
106
-
107
-
108
-
109
-
110
-
111
-
112
-
113
-
114
-
115
-
116
-
117
-
118
-
119
-
120
-
121
-
122
-
123
-
124
-
125
-
126
-
127
-
128
-
129
-
130
-
131
-
132
-
133
-
134
-
135
-
136
-
137
-
138
-
139
-
140
-
141
-
142
-
143
-
144
-
145
-
146
-
147
-
148
-
149
-
150
-
151
-
152
-
153
-
154
-
155
-
156
-
157
-
158
-
159
-
160
-
161
-
162
-
163
-
164
-
165
-
166
-
167
-
168
-
169
-
170
-
171
-
172
-
173
-
174
-
175
-
176
-
177
 |
 |