Epson PowerLite Pro G5350 User's Guide - Page 22
Connecting to the BNC Connectors, connectors as shown below. Depending on your
 |
View all Epson PowerLite Pro G5350 manuals
Add to My Manuals
Save this manual to your list of manuals |
Page 22 highlights
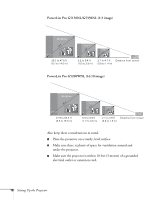
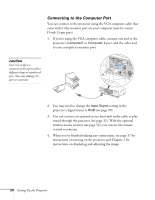
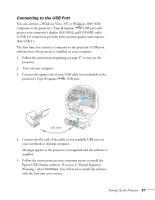
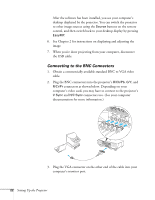
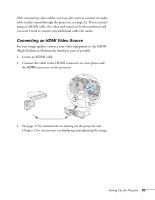
After the software has been installed, you see your computer's desktop displayed by the projector. You can switch the projector to other image sources using the Source buttons on the remote control, and then switch back to your desktop display by pressing EasyMP. 6. See Chapter 2 for instructions on displaying and adjusting the image. 7. When you're done projecting from your computer, disconnect the USB cable. Connecting to the BNC Connectors 1. Obtain a commercially available standard BNC to VGA video cable. 2. Plug the BNC connectors into the projector's B/Cb/Pb, G/Y, and R/Cr/Pr connectors as shown below. Depending on your computer's video card, you may have to connect to the projector's V Sync and H/C Sync connectors too. (See your computer documentation for more information.) 3. Plug the VGA connector on the other end of the cable into your computer's monitor port. 22 Setting Up the Projector
-
 1
1 -
2
-
3
-
4
-
5
-
6
-
7
-
8
-
9
-
10
-
11
-
12
-
13
-
14
-
15
-
16
-
 17
17 -
 18
18 -
 19
19 -
 20
20 -
 21
21 -
 22
22 -
 23
23 -
 24
24 -
 25
25 -
 26
26 -
 27
27 -
28
-
29
-
30
-
31
-
32
-
33
-
34
-
35
-
36
-
37
-
38
-
39
-
40
-
41
-
42
-
43
-
44
-
45
-
46
-
47
-
48
-
49
-
50
-
51
-
52
-
53
-
54
-
55
-
56
-
57
-
58
-
59
-
60
-
61
-
62
-
63
-
64
-
65
-
66
-
67
-
68
-
69
-
70
-
71
-
72
-
73
-
74
-
75
-
76
-
77
-
78
-
79
-
80
-
81
-
82
-
83
-
84
-
85
-
86
-
87
-
88
-
89
-
90
-
91
-
92
-
93
-
94
-
95
-
96
-
97
-
98
-
99
-
100
-
101
-
102
-
103
-
104
-
105
-
106
-
107
-
108
-
109
-
110
-
111
-
112
-
113
-
114
-
115
-
116
-
117
-
118
-
119
-
120
-
121
-
122
-
123
-
124
-
125
-
126
-
127
-
128
-
129
-
130
-
131
-
132
-
133
-
134
-
135
-
136
-
137
-
138
-
139
-
140
-
141
-
142
-
143
-
144
-
145
-
146
-
147
-
148
-
149
-
150
-
151
-
152
-
153
-
154
-
155
-
156
-
157
-
158
-
159
-
160
-
161
-
162
-
163
-
164
-
165
-
166
-
167
-
168
-
169
-
170
-
171
-
172
-
173
-
174
-
175
-
176
-
177
 |
 |