Epson PowerLite Pro G5350 User's Guide - Page 48
Using Keystone Correction
 |
View all Epson PowerLite Pro G5350 manuals
Add to My Manuals
Save this manual to your list of manuals |
Page 48 highlights
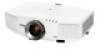
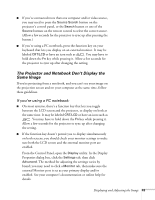
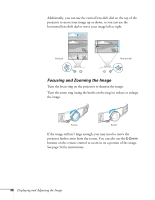
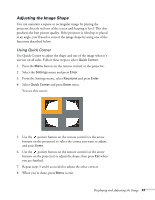
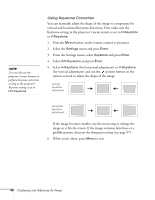
note Use can also use the projector's arrow buttons to perform keystone correction as long as the projector's Keystone setting is set to H/V-Keystone. Using Keystone Correction You can manually adjust the shape of the image to compensate for vertical and horizontal keystone distortion. First make sure the Keystone setting in the projector's menu system is set to H-Keystone or V-Keystone: 1. Press the Menu button on the remote control or projector. 2. Select the Settings menu and press Enter. 3. From the Settings menu, select Keystone and press Enter. 4. Select H/V-Keystone and press Enter. 5. Select H-Keystone (for horizontal adjustment) or V-Keystone (for vertical adjustment) and use the pointer button on the remote control to adjust the shape of the image. Vertical keystone adjustment Horizontal keystone adjustment If the image becomes smaller, use the zoom ring to enlarge the image so it fits the screen. If the image contains faint lines or a gridlike pattern, decrease the sharpness setting (see page 97). 6. When you're done, press Menu to exit. 48 Displaying and Adjusting the Image
-
 1
1 -
2
-
3
-
4
-
5
-
6
-
7
-
8
-
9
-
10
-
11
-
12
-
13
-
14
-
15
-
16
-
17
-
18
-
19
-
20
-
21
-
22
-
23
-
24
-
25
-
26
-
27
-
28
-
29
-
30
-
31
-
32
-
33
-
34
-
35
-
36
-
37
-
38
-
39
-
40
-
41
-
42
-
 43
43 -
 44
44 -
 45
45 -
 46
46 -
 47
47 -
 48
48 -
 49
49 -
 50
50 -
 51
51 -
 52
52 -
 53
53 -
54
-
55
-
56
-
57
-
58
-
59
-
60
-
61
-
62
-
63
-
64
-
65
-
66
-
67
-
68
-
69
-
70
-
71
-
72
-
73
-
74
-
75
-
76
-
77
-
78
-
79
-
80
-
81
-
82
-
83
-
84
-
85
-
86
-
87
-
88
-
89
-
90
-
91
-
92
-
93
-
94
-
95
-
96
-
97
-
98
-
99
-
100
-
101
-
102
-
103
-
104
-
105
-
106
-
107
-
108
-
109
-
110
-
111
-
112
-
113
-
114
-
115
-
116
-
117
-
118
-
119
-
120
-
121
-
122
-
123
-
124
-
125
-
126
-
127
-
128
-
129
-
130
-
131
-
132
-
133
-
134
-
135
-
136
-
137
-
138
-
139
-
140
-
141
-
142
-
143
-
144
-
145
-
146
-
147
-
148
-
149
-
150
-
151
-
152
-
153
-
154
-
155
-
156
-
157
-
158
-
159
-
160
-
161
-
162
-
163
-
164
-
165
-
166
-
167
-
168
-
169
-
170
-
171
-
172
-
173
-
174
-
175
-
176
-
177
 |
 |