Epson PowerLite Pro G5350 User's Guide - Page 71
Setting Up Your Mac for Access Point Mode on If you, Return, Setup, complete
 |
View all Epson PowerLite Pro G5350 manuals
Add to My Manuals
Save this manual to your list of manuals |
Page 71 highlights
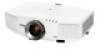
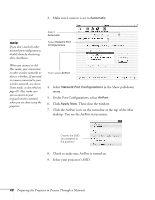
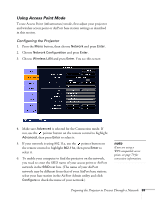
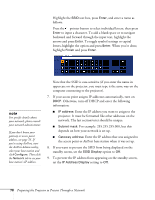
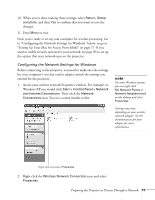
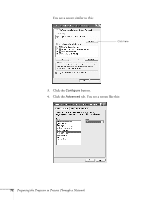
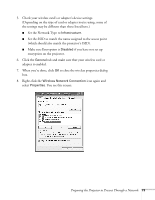
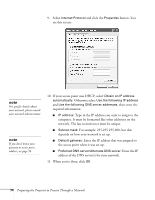
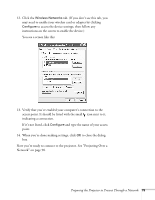
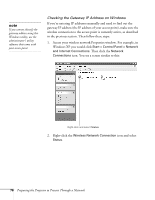
10. When you're done making these settings, select Return, Setup complete, and then Yes to confirm that you want to save the changes. 11. Press Menu to exit. Now you're ready to set up your computer for wireless projecting. Go to "Configuring the Network Settings for Windows" below, or go to "Setting Up Your Mac for Access Point Mode" on page 77. If you want to enable security options for your network, see page 85 to set up the option that your network uses on the projector. Configuring the Network Settings for Windows Before connecting to the projector, you need to make sure the settings for your computer's wireless card or adapter match the settings you entered for the projector. 1. Access your wireless network Properties window. For example, in Windows XP you would click Start > Control Panel > Network and Internet Connections. Then click the Network Connections icon. You see a screen similar to this: note On some Windows systems, you can right-click My Network Places or Network Neighborhood on the desktop and select Properties. Settings may vary, depending on your wireless network adapter. See the documentation for your adapter for more information. Right-click and select Properties 2. Right-click the Wireless Network Connection icon and select Properties. Preparing the Projector to Present Through a Network 71
-
 1
1 -
2
-
3
-
4
-
5
-
6
-
7
-
8
-
9
-
10
-
11
-
12
-
13
-
14
-
15
-
16
-
17
-
18
-
19
-
20
-
21
-
22
-
23
-
24
-
25
-
26
-
27
-
28
-
29
-
30
-
31
-
32
-
33
-
34
-
35
-
36
-
37
-
38
-
39
-
40
-
41
-
42
-
43
-
44
-
45
-
46
-
47
-
48
-
49
-
50
-
51
-
52
-
53
-
54
-
55
-
56
-
57
-
58
-
59
-
60
-
61
-
62
-
63
-
64
-
65
-
 66
66 -
 67
67 -
 68
68 -
 69
69 -
 70
70 -
 71
71 -
 72
72 -
 73
73 -
 74
74 -
 75
75 -
 76
76 -
77
-
78
-
79
-
80
-
81
-
82
-
83
-
84
-
85
-
86
-
87
-
88
-
89
-
90
-
91
-
92
-
93
-
94
-
95
-
96
-
97
-
98
-
99
-
100
-
101
-
102
-
103
-
104
-
105
-
106
-
107
-
108
-
109
-
110
-
111
-
112
-
113
-
114
-
115
-
116
-
117
-
118
-
119
-
120
-
121
-
122
-
123
-
124
-
125
-
126
-
127
-
128
-
129
-
130
-
131
-
132
-
133
-
134
-
135
-
136
-
137
-
138
-
139
-
140
-
141
-
142
-
143
-
144
-
145
-
146
-
147
-
148
-
149
-
150
-
151
-
152
-
153
-
154
-
155
-
156
-
157
-
158
-
159
-
160
-
161
-
162
-
163
-
164
-
165
-
166
-
167
-
168
-
169
-
170
-
171
-
172
-
173
-
174
-
175
-
176
-
177
 |
 |