Epson PowerLite Pro Z8255NL User Manual - Page 106
Check, Remedy, Only when projecting computer images, Signal, Resolution, Scale, Position, Input
 |
View all Epson PowerLite Pro Z8255NL manuals
Add to My Manuals
Save this manual to your list of manuals |
Page 106 highlights
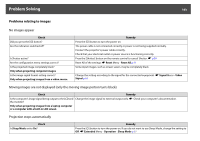
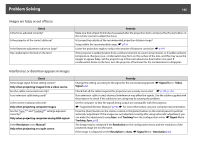
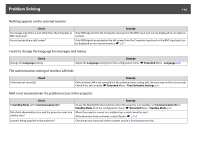
Problem Solving 106 The image is truncated (large) or small, or the aspect is not suitable Check Is the aspect adjusted correctly? Is a wide panel computer image being projected? Only when projecting computer images Is the image still being enlarged by E-Zoom? Is Scale set to On? Is Position adjusted correctly? Is the computer set for dual display? Only when projecting computer images Is the correct resolution selected? Only when projecting computer images Remedy Press the [Aspect] button on the remote control to select an aspect suitable for the input source. s p.27 Change the setting according to the signal for the connected equipment. s Signal Menu - Resolution p.62 Press the [Esc] button on the remote control to cancel E-Zoom. s p.41 Set Scale to Off on the configuration menu. s Signal Menu - Scale p.62 Press the [Auto] button on the remote control or the [Enter] button on the control panel to automatically adjust the position of projected images from a computer. If the images are not adjusted correctly after using automatic adjustment, you can make the adjustments using Position from the configuration menu. Apart from computer analog RGB signals, you can adjust other signals while projecting by adjusting Position from the configuration menu. s Signal Menu - Position p.62 If dual display is activated in the "Display Properties" of the computer's Control panel, only about half of the image on the computer screen is projected. To display the entire image on the computer screen, turn off the dual display setting. s Computer video driver documentation Set the computer so that the signals being output are compatible with the projector. s "Supported Monitor Displays" p.198 s Computer documentation Image colors are not right Check Do the input signal settings match the signals from the connected device? Is the image Brightness set correctly? Are the cables connected correctly? Is Contrastg adjusted correctly? Is the Color Adjustment correctly? Remedy Change the setting according to the signal for the connected equipment. s Signal Menu - Input Signal, Video Signal p.62 Adjust the Brightness setting from the configuration menu. s Image Menu - Brightness p.60 Check that all the cables required for projection are securely connected. s p.152, p.154 Adjust the Contrast setting from the configuration menu. s Image Menu - Contrast p.60 Adjust the Advanced setting from the configuration menu. s Image Menu - Advanced p.60
-
 1
1 -
2
-
3
-
4
-
5
-
6
-
7
-
8
-
9
-
10
-
11
-
12
-
13
-
14
-
15
-
16
-
17
-
18
-
19
-
20
-
21
-
22
-
23
-
24
-
25
-
26
-
27
-
28
-
29
-
30
-
31
-
32
-
33
-
34
-
35
-
36
-
37
-
38
-
39
-
40
-
41
-
42
-
43
-
44
-
45
-
46
-
47
-
48
-
49
-
50
-
51
-
52
-
53
-
54
-
55
-
56
-
57
-
58
-
59
-
60
-
61
-
62
-
63
-
64
-
65
-
66
-
67
-
68
-
69
-
70
-
71
-
72
-
73
-
74
-
75
-
76
-
77
-
78
-
79
-
80
-
81
-
82
-
83
-
84
-
85
-
86
-
87
-
88
-
89
-
90
-
91
-
92
-
93
-
94
-
95
-
96
-
97
-
98
-
99
-
100
-
 101
101 -
 102
102 -
 103
103 -
 104
104 -
 105
105 -
 106
106 -
 107
107 -
 108
108 -
 109
109 -
 110
110 -
 111
111 -
112
-
113
-
114
-
115
-
116
-
117
-
118
-
119
-
120
-
121
-
122
-
123
-
124
-
125
-
126
-
127
-
128
-
129
-
130
-
131
-
132
-
133
-
134
-
135
-
136
-
137
-
138
-
139
-
140
-
141
-
142
-
143
-
144
-
145
-
146
-
147
-
148
-
149
-
150
-
151
-
152
-
153
-
154
-
155
-
156
-
157
-
158
-
159
-
160
-
161
-
162
-
163
-
164
-
165
-
166
-
167
-
168
-
169
-
170
-
171
-
172
-
173
-
174
-
175
-
176
-
177
-
178
-
179
-
180
-
181
-
182
-
183
-
184
-
185
-
186
-
187
-
188
-
189
-
190
-
191
-
192
-
193
-
194
-
195
-
196
-
197
-
198
-
199
-
200
-
201
-
202
-
203
-
204
-
205
-
206
-
207
-
208
-
209
-
210
-
211
-
212
-
213
-
214
-
215
-
216
-
217
-
218
-
219
-
220
-
221
-
222
-
223
-
224
-
225
-
226
-
227
-
228
-
229
-
230
-
231
-
232
-
233
-
234
-
235
-
236
-
237
-
238
-
239
-
240
-
241
-
242
-
243
-
244
-
245
-
246
-
247
-
248
-
249
-
250
-
251
-
252
-
253
-
254
 |
 |
