Epson PowerLite Pro Z8255NL User Manual - Page 129
Setting Certificates, Click Network menu - Administrator Settings - Manage
 |
View all Epson PowerLite Pro Z8255NL manuals
Add to My Manuals
Save this manual to your list of manuals |
Page 129 highlights
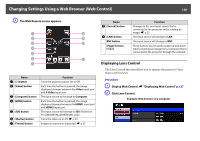
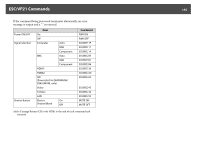
Changing Settings Using a Web Browser (Web Control) 129 C The Lens Control screen appears. Name J [Wide] button K [Scale Up] button L [Stop] button Function Enlarges the image without changing the projection size. Adjusts the focus. Stops the adjustment. Name A [Scale down] button B [Tele] button C [Down] button D [Left] button E [Repeat] button F [Step] button G [Right] button H [Default Shift] button I [Up] button Function Adjusts the focus. Reduces the image without changing the projection size. Shifts the lens downward. Shifts the lens leftward. Continues adjusting until the [Stop] button is pressed. Adjusts by one step each time the button is pressed. Shifts the lens rightward. Resets the lens to it's default position. Shifts the lens upward. Setting Certificates You can use a web browser to set the certificate settings used for wireless LAN authentication. Install the following certificates in the projector: Client Certificate and CA certificate for wireless LAN security settings, and Web Server Certificate for the Secure HTTP function. Procedure A Display Web Control. s "Displaying Web Control" p.127 B Click Network menu - Administrator Settings - Manage Certificates. C The Manage Certificates screen appears. Sub Menu Client Certificate Items/Values Refresh/Clear Issued to Issued by Validity period
-
 1
1 -
2
-
3
-
4
-
5
-
6
-
7
-
8
-
9
-
10
-
11
-
12
-
13
-
14
-
15
-
16
-
17
-
18
-
19
-
20
-
21
-
22
-
23
-
24
-
25
-
26
-
27
-
28
-
29
-
30
-
31
-
32
-
33
-
34
-
35
-
36
-
37
-
38
-
39
-
40
-
41
-
42
-
43
-
44
-
45
-
46
-
47
-
48
-
49
-
50
-
51
-
52
-
53
-
54
-
55
-
56
-
57
-
58
-
59
-
60
-
61
-
62
-
63
-
64
-
65
-
66
-
67
-
68
-
69
-
70
-
71
-
72
-
73
-
74
-
75
-
76
-
77
-
78
-
79
-
80
-
81
-
82
-
83
-
84
-
85
-
86
-
87
-
88
-
89
-
90
-
91
-
92
-
93
-
94
-
95
-
96
-
97
-
98
-
99
-
100
-
101
-
102
-
103
-
104
-
105
-
106
-
107
-
108
-
109
-
110
-
111
-
112
-
113
-
114
-
115
-
116
-
117
-
118
-
119
-
120
-
121
-
122
-
123
-
 124
124 -
 125
125 -
 126
126 -
 127
127 -
 128
128 -
 129
129 -
 130
130 -
 131
131 -
 132
132 -
 133
133 -
 134
134 -
135
-
136
-
137
-
138
-
139
-
140
-
141
-
142
-
143
-
144
-
145
-
146
-
147
-
148
-
149
-
150
-
151
-
152
-
153
-
154
-
155
-
156
-
157
-
158
-
159
-
160
-
161
-
162
-
163
-
164
-
165
-
166
-
167
-
168
-
169
-
170
-
171
-
172
-
173
-
174
-
175
-
176
-
177
-
178
-
179
-
180
-
181
-
182
-
183
-
184
-
185
-
186
-
187
-
188
-
189
-
190
-
191
-
192
-
193
-
194
-
195
-
196
-
197
-
198
-
199
-
200
-
201
-
202
-
203
-
204
-
205
-
206
-
207
-
208
-
209
-
210
-
211
-
212
-
213
-
214
-
215
-
216
-
217
-
218
-
219
-
220
-
221
-
222
-
223
-
224
-
225
-
226
-
227
-
228
-
229
-
230
-
231
-
232
-
233
-
234
-
235
-
236
-
237
-
238
-
239
-
240
-
241
-
242
-
243
-
244
-
245
-
246
-
247
-
248
-
249
-
250
-
251
-
252
-
253
-
254
 |
 |
