Epson PowerLite Pro Z8255NL User Manual - Page 14
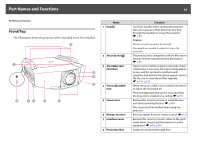
Part Names and Functions, Front/Top, Function, Handle, Security slot, Air intake vent, Air filter
 |
View all Epson PowerLite Pro Z8255NL manuals
Add to My Manuals
Save this manual to your list of manuals |
Page 14 highlights
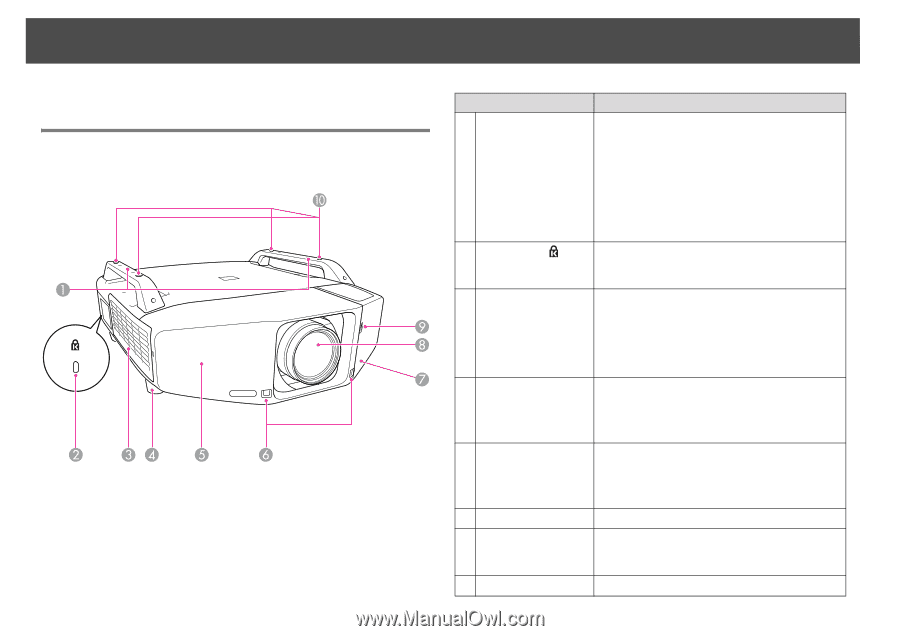
Part Names and Functions 14 Part Names and Functions Front/Top The illustration shows the projector with a standard zoom lens installed. Name 1 Handle 2 Security slot( ) 3 Air intake vent (Air filter) 4 Front adjustable foot 5 Front cover 6 Remote receiver 7 Interface cover 8 Projection lens Function Use these handles when carrying the projector. Also, you can pass a theft-deterrent wire lock through the handles to secure the projector. s p.50 Caution Do not carry the projector by yourself. Two people are needed to unpack or carry the projector. The security slot is compatible with the Microsaver Security System manufactured by Kensington. s p.50 Takes in air to cool the projector internally. If dust collects here it can cause the internal temperature to rise, and this can lead to problems with operation and shorten the optical engine's service life. Be sure to clean the air filter regularly. s p.116, p.122 When set up on a desk, turn to extend and retract to adjust the horizontal tilt. The front adjustable feet can be removed when the projector is installed on a ceiling. s p.193 Remove this cover to remove or install the lens unit when replacing the lens. s p.186 This cover must be installed when using the projector. Receives signals from the remote control. s p.23 Remove this cover to connect cables to the ports inside when connecting the projector to video equipment. s p.16, p.191 Images are projected through here.
-
 1
1 -
2
-
3
-
4
-
5
-
6
-
7
-
8
-
 9
9 -
 10
10 -
 11
11 -
 12
12 -
 13
13 -
 14
14 -
 15
15 -
 16
16 -
 17
17 -
 18
18 -
 19
19 -
20
-
21
-
22
-
23
-
24
-
25
-
26
-
27
-
28
-
29
-
30
-
31
-
32
-
33
-
34
-
35
-
36
-
37
-
38
-
39
-
40
-
41
-
42
-
43
-
44
-
45
-
46
-
47
-
48
-
49
-
50
-
51
-
52
-
53
-
54
-
55
-
56
-
57
-
58
-
59
-
60
-
61
-
62
-
63
-
64
-
65
-
66
-
67
-
68
-
69
-
70
-
71
-
72
-
73
-
74
-
75
-
76
-
77
-
78
-
79
-
80
-
81
-
82
-
83
-
84
-
85
-
86
-
87
-
88
-
89
-
90
-
91
-
92
-
93
-
94
-
95
-
96
-
97
-
98
-
99
-
100
-
101
-
102
-
103
-
104
-
105
-
106
-
107
-
108
-
109
-
110
-
111
-
112
-
113
-
114
-
115
-
116
-
117
-
118
-
119
-
120
-
121
-
122
-
123
-
124
-
125
-
126
-
127
-
128
-
129
-
130
-
131
-
132
-
133
-
134
-
135
-
136
-
137
-
138
-
139
-
140
-
141
-
142
-
143
-
144
-
145
-
146
-
147
-
148
-
149
-
150
-
151
-
152
-
153
-
154
-
155
-
156
-
157
-
158
-
159
-
160
-
161
-
162
-
163
-
164
-
165
-
166
-
167
-
168
-
169
-
170
-
171
-
172
-
173
-
174
-
175
-
176
-
177
-
178
-
179
-
180
-
181
-
182
-
183
-
184
-
185
-
186
-
187
-
188
-
189
-
190
-
191
-
192
-
193
-
194
-
195
-
196
-
197
-
198
-
199
-
200
-
201
-
202
-
203
-
204
-
205
-
206
-
207
-
208
-
209
-
210
-
211
-
212
-
213
-
214
-
215
-
216
-
217
-
218
-
219
-
220
-
221
-
222
-
223
-
224
-
225
-
226
-
227
-
228
-
229
-
230
-
231
-
232
-
233
-
234
-
235
-
236
-
237
-
238
-
239
-
240
-
241
-
242
-
243
-
244
-
245
-
246
-
247
-
248
-
249
-
250
-
251
-
252
-
253
-
254
 |
 |