Epson PowerLite Pro Z8255NL User Manual - Page 20
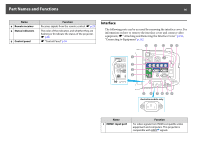
Color Mode] button, Lens Shift] button
 |
View all Epson PowerLite Pro Z8255NL manuals
Add to My Manuals
Save this manual to your list of manuals |
Page 20 highlights
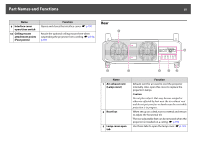
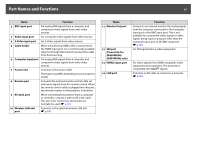
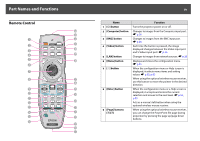
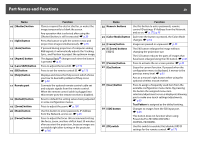
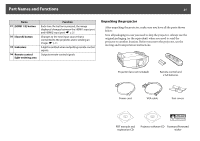
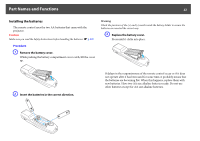
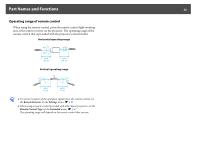
Part Names and Functions 20 Name 10 [Shutter] button 11 [Split] button 12 [Auto] button 13 [Aspect] button 14 [Lens Shift] button 15 [ID] button 16 [Help] button 17 Remote port 18 [Default] button 19 [Zoom] button 20 [Num] button 21 [Focus] button Function Closes or opens the electric shutter, or mutes the image temporarily to blank the screen. Any operation that is selected after using the [Shutter] button, is still is executed. s p.39 Press this button to split the screen in two and project two images simultaneously. s p.35 If pressed during projection of computer analog RGB signals, it automatically adjusts the Tracking, Sync., and Position to project the optimum image. The Aspect Ratiog changes each time the button is pressed. s p.27 Press to adjust the lens shift. s p.159 Press to set the remote control ID. s p.173 Displays and closes the Help screen which shows you how to deal with problems if they occur. s p.93 Connects the optional remote control cable set and outputs signals from the remote control. When the remote control cable is plugged into this remote port, the remote receiver is disabled. Reset to default the setting values being adjusted in some configuration menus. Press to adjust the zoom. s p.160 Use this button to enter passwords, IP Address from the Network, and so on. s p.45 Press to adjust the focus. We recommend setting the focus, zoom, and lens shift at least 30 minutes after you start the projection, because images are not stable right after turning on the projector. s p.160 Name Function 22 Numeric buttons Use this button to enter passwords, remote control ID settings, IP Address from the Network, and so on. s p.175, p.45 23 [Color Mode] button Each time the button is pressed, the Color Mode changes. s p.34 24 [Freeze] button Images are paused or unpaused. s p.39 25 [E-Zoom] buttons [z][x] The [z] button enlarges the image without changing the projection size. The [x] button reduces the parts of images that have been enlarged using the [z] button. s p.41 26 [Pointer] button Press to activate the on screen pointer. s p.40 27 [Esc] button a Stops the current function. If pressed when the configuration menu is displayed, it moves to the previous menu level. s p.55 Acts as a mouse's right button when using the optional wireless mouse receiver. 28 [User] button Press to assign a frequently used item from the available configuration menu items. By pressing the button the assigned menu item selection/adjustment screen is displayed, allowing you to make one-touch settings/adjustments. s p.65 Test Pattern is assigned as the default setting. 29 [SDI] button c Changes to images from the SDI input port. s p.26 This button does not function when using PowerLite Pro Z8150NL/Z8250NL/ Z8255NL/Z8350WNL. 30 [ID] switch Use this switch to enable (On)/disable (Off) ID settings for the remote control. s p.173
-
 1
1 -
2
-
3
-
4
-
5
-
6
-
7
-
8
-
9
-
10
-
11
-
12
-
13
-
14
-
 15
15 -
 16
16 -
 17
17 -
 18
18 -
 19
19 -
 20
20 -
 21
21 -
 22
22 -
 23
23 -
 24
24 -
 25
25 -
26
-
27
-
28
-
29
-
30
-
31
-
32
-
33
-
34
-
35
-
36
-
37
-
38
-
39
-
40
-
41
-
42
-
43
-
44
-
45
-
46
-
47
-
48
-
49
-
50
-
51
-
52
-
53
-
54
-
55
-
56
-
57
-
58
-
59
-
60
-
61
-
62
-
63
-
64
-
65
-
66
-
67
-
68
-
69
-
70
-
71
-
72
-
73
-
74
-
75
-
76
-
77
-
78
-
79
-
80
-
81
-
82
-
83
-
84
-
85
-
86
-
87
-
88
-
89
-
90
-
91
-
92
-
93
-
94
-
95
-
96
-
97
-
98
-
99
-
100
-
101
-
102
-
103
-
104
-
105
-
106
-
107
-
108
-
109
-
110
-
111
-
112
-
113
-
114
-
115
-
116
-
117
-
118
-
119
-
120
-
121
-
122
-
123
-
124
-
125
-
126
-
127
-
128
-
129
-
130
-
131
-
132
-
133
-
134
-
135
-
136
-
137
-
138
-
139
-
140
-
141
-
142
-
143
-
144
-
145
-
146
-
147
-
148
-
149
-
150
-
151
-
152
-
153
-
154
-
155
-
156
-
157
-
158
-
159
-
160
-
161
-
162
-
163
-
164
-
165
-
166
-
167
-
168
-
169
-
170
-
171
-
172
-
173
-
174
-
175
-
176
-
177
-
178
-
179
-
180
-
181
-
182
-
183
-
184
-
185
-
186
-
187
-
188
-
189
-
190
-
191
-
192
-
193
-
194
-
195
-
196
-
197
-
198
-
199
-
200
-
201
-
202
-
203
-
204
-
205
-
206
-
207
-
208
-
209
-
210
-
211
-
212
-
213
-
214
-
215
-
216
-
217
-
218
-
219
-
220
-
221
-
222
-
223
-
224
-
225
-
226
-
227
-
228
-
229
-
230
-
231
-
232
-
233
-
234
-
235
-
236
-
237
-
238
-
239
-
240
-
241
-
242
-
243
-
244
-
245
-
246
-
247
-
248
-
249
-
250
-
251
-
252
-
253
-
254
 |
 |