Epson PowerLite Pro Z8255NL User Manual - Page 64
SDI Video Range
 |
View all Epson PowerLite Pro Z8255NL manuals
Add to My Manuals
Save this manual to your list of manuals |
Page 64 highlights
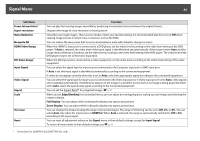
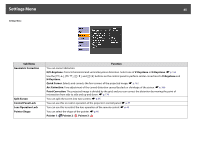
Signal Menu 64 Sub Menu Frame Interpolation* Super-resolution Noise Reduction Mosquito NR HDMI Video Range SDI Video Range* Input Signal Video Signal Aspect Scale Overscan Reset Function You can play fast moving images smoothly by producing intermediate frames between the original frames. Sharpens the image of a low resolution or blurry picture. Smoothes out rough images. There are two modes. Select your favorite setting. It is recommended that this is set to Off when viewing image sources in which noise is very low, such as for DVDs. You can reduce the wavy noise that occurs in lines between areas with dramatic changes in colors. When the HDMI1/2 input port is connected to a DVD player, set the video level according to the video level setting of the DVD player. If Auto is selected, the video level of the input signal is identified and set automatically. If the range is set to Auto and the image shows whiteout or blackout, set the video level according to the video level setting of the DVD player. The video level of the DVD player may be set to Normal or Expanded. When the SDI input port is connected to a video equipment, set the video level according to the video level setting of the video equipment. You can select the signal type for input sources connected to the Computer input port or BNC input port. If Auto is set, the input signal is identified automatically according to the connected equipment. If colors do not appear correctly when this is set to Auto, select the appropriate signal according to the connected equipment. You can select the signal type for input sources connected to the Video input port or S-Video input port. If set to Auto, video signals are recognized automatically. If interference appears in the image or a problem occurs such as no image is being projected when set to Auto, select the appropriate signal according to the connected equipment. You can set the Aspect Ratiog for projected images. s p.27 When you set Edge Blending from Extended menu, you can adjust an overlapping area, scaling up each image and selecting the range to display. Full Display: You can adjust while renewing the display area aspect and position. Zoom Display: You can adjust while locking the display area aspect and position. You can change the Output Scaling (the range of projected image). The range of trimming can be set to Off, 4%, or 8%. You can select Auto only when the input source is HDMI1/2. When Auto is selected, the range is automatically switched to Off or 8% according to the input signal. You can reset all adjustment values on the Signal menu to their default settings, except for Input Signal. To return all menu items to their default settings, see s p.91 * PowerLite Pro Z8450WUNL/Z8455WUNL only
-
 1
1 -
2
-
3
-
4
-
5
-
6
-
7
-
8
-
9
-
10
-
11
-
12
-
13
-
14
-
15
-
16
-
17
-
18
-
19
-
20
-
21
-
22
-
23
-
24
-
25
-
26
-
27
-
28
-
29
-
30
-
31
-
32
-
33
-
34
-
35
-
36
-
37
-
38
-
39
-
40
-
41
-
42
-
43
-
44
-
45
-
46
-
47
-
48
-
49
-
50
-
51
-
52
-
53
-
54
-
55
-
56
-
57
-
58
-
 59
59 -
 60
60 -
 61
61 -
 62
62 -
 63
63 -
 64
64 -
 65
65 -
 66
66 -
 67
67 -
 68
68 -
 69
69 -
70
-
71
-
72
-
73
-
74
-
75
-
76
-
77
-
78
-
79
-
80
-
81
-
82
-
83
-
84
-
85
-
86
-
87
-
88
-
89
-
90
-
91
-
92
-
93
-
94
-
95
-
96
-
97
-
98
-
99
-
100
-
101
-
102
-
103
-
104
-
105
-
106
-
107
-
108
-
109
-
110
-
111
-
112
-
113
-
114
-
115
-
116
-
117
-
118
-
119
-
120
-
121
-
122
-
123
-
124
-
125
-
126
-
127
-
128
-
129
-
130
-
131
-
132
-
133
-
134
-
135
-
136
-
137
-
138
-
139
-
140
-
141
-
142
-
143
-
144
-
145
-
146
-
147
-
148
-
149
-
150
-
151
-
152
-
153
-
154
-
155
-
156
-
157
-
158
-
159
-
160
-
161
-
162
-
163
-
164
-
165
-
166
-
167
-
168
-
169
-
170
-
171
-
172
-
173
-
174
-
175
-
176
-
177
-
178
-
179
-
180
-
181
-
182
-
183
-
184
-
185
-
186
-
187
-
188
-
189
-
190
-
191
-
192
-
193
-
194
-
195
-
196
-
197
-
198
-
199
-
200
-
201
-
202
-
203
-
204
-
205
-
206
-
207
-
208
-
209
-
210
-
211
-
212
-
213
-
214
-
215
-
216
-
217
-
218
-
219
-
220
-
221
-
222
-
223
-
224
-
225
-
226
-
227
-
228
-
229
-
230
-
231
-
232
-
233
-
234
-
235
-
236
-
237
-
238
-
239
-
240
-
241
-
242
-
243
-
244
-
245
-
246
-
247
-
248
-
249
-
250
-
251
-
252
-
253
-
254
 |
 |