Epson PowerLite Pro Z8255NL User Manual - Page 150
Installation Methods, Warning
 |
View all Epson PowerLite Pro Z8255NL manuals
Add to My Manuals
Save this manual to your list of manuals |
Page 150 highlights
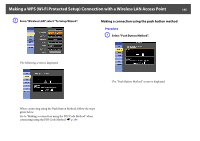
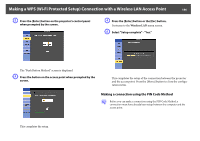
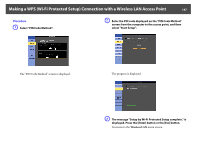
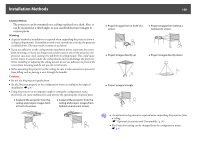
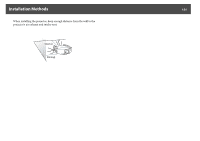
Installation Methods 150 Installation Methods The projector can be mounted on a ceiling or placed on a desk. Also, it can be mounted at a tilted angle, so you can flexibly project images to various places. Warning • A special method of installation is required when suspending the projector from a ceiling (ceiling mount). If installation work is not carried out correctly, the projector could fall down. This may result in injury or accidents. • If you use adhesives on the ceiling mount attachment points to prevent the screws from loosening, or if you use things such as lubricants or oils on the projector, the projector case may crack causing it to fall from its ceiling mount. This could cause serious injury to anyone under the ceiling mount and could damage the projector. When installing or adjusting the ceiling mount, do not use adhesives to prevent the screws from loosening and do not use oils or lubricants. • When mounting the projector on the ceiling, be sure to take measures to prevent it from falling such as passing a wire through the handles. Caution • Do not use the projector upside down. • Set the Direction properly in the configuration menu according to the angle of installation. s p.67 • Using the projector at an improper angle or setting the configuration menu incorrectly can cause malfunctions and shorten the operating life of optical parts. • Suspend the projector from the ceiling and project images from in front of a screen. • Suspend the projector from the ceiling and project images from behind a translucent screen. • Project images from in front of a screen. • Project images from behind a translucent screen. • Project images directly up • Project images directly down • Project images at angle q • An optional ceiling mount is required when suspending the projector from a ceiling. s "Optional Accessories and Consumables" p.195 • The Projection setting can be changed from the configuration menu. s p.67
-
 1
1 -
2
-
3
-
4
-
5
-
6
-
7
-
8
-
9
-
10
-
11
-
12
-
13
-
14
-
15
-
16
-
17
-
18
-
19
-
20
-
21
-
22
-
23
-
24
-
25
-
26
-
27
-
28
-
29
-
30
-
31
-
32
-
33
-
34
-
35
-
36
-
37
-
38
-
39
-
40
-
41
-
42
-
43
-
44
-
45
-
46
-
47
-
48
-
49
-
50
-
51
-
52
-
53
-
54
-
55
-
56
-
57
-
58
-
59
-
60
-
61
-
62
-
63
-
64
-
65
-
66
-
67
-
68
-
69
-
70
-
71
-
72
-
73
-
74
-
75
-
76
-
77
-
78
-
79
-
80
-
81
-
82
-
83
-
84
-
85
-
86
-
87
-
88
-
89
-
90
-
91
-
92
-
93
-
94
-
95
-
96
-
97
-
98
-
99
-
100
-
101
-
102
-
103
-
104
-
105
-
106
-
107
-
108
-
109
-
110
-
111
-
112
-
113
-
114
-
115
-
116
-
117
-
118
-
119
-
120
-
121
-
122
-
123
-
124
-
125
-
126
-
127
-
128
-
129
-
130
-
131
-
132
-
133
-
134
-
135
-
136
-
137
-
138
-
139
-
140
-
141
-
142
-
143
-
144
-
 145
145 -
 146
146 -
 147
147 -
 148
148 -
 149
149 -
 150
150 -
 151
151 -
 152
152 -
 153
153 -
 154
154 -
 155
155 -
156
-
157
-
158
-
159
-
160
-
161
-
162
-
163
-
164
-
165
-
166
-
167
-
168
-
169
-
170
-
171
-
172
-
173
-
174
-
175
-
176
-
177
-
178
-
179
-
180
-
181
-
182
-
183
-
184
-
185
-
186
-
187
-
188
-
189
-
190
-
191
-
192
-
193
-
194
-
195
-
196
-
197
-
198
-
199
-
200
-
201
-
202
-
203
-
204
-
205
-
206
-
207
-
208
-
209
-
210
-
211
-
212
-
213
-
214
-
215
-
216
-
217
-
218
-
219
-
220
-
221
-
222
-
223
-
224
-
225
-
226
-
227
-
228
-
229
-
230
-
231
-
232
-
233
-
234
-
235
-
236
-
237
-
238
-
239
-
240
-
241
-
242
-
243
-
244
-
245
-
246
-
247
-
248
-
249
-
250
-
251
-
252
-
253
-
254
 |
 |
