Epson PowerLite Pro Z8255NL User Manual - Page 180
Adjusting to Match Colors on Multi-Projection, Blend Range, Blend Curve, Black Level
 |
View all Epson PowerLite Pro Z8255NL manuals
Add to My Manuals
Save this manual to your list of manuals |
Page 180 highlights
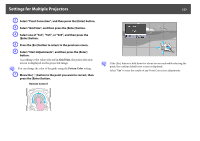
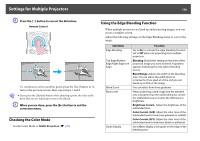
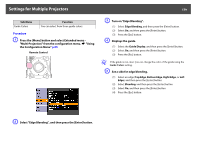
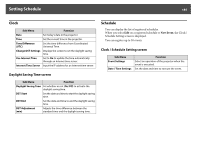
Settings for Multiple Projectors 180 (5) In Blend Range, adjust the width of the blended area. The width should be set so that the guide appears on the border of where the images overlap. G Adjust the black level, if necessary. (1) Select Black Level, and then press the [Enter] button. (2) In Brightness Correct., adjust the brightness of the unblended area. (3) In Color Correct. (G/R), adjust the color tone of the unblended area to look more greenish or reddish. (4) In Color Correct. (B/Y), adjust the color tone of the unblended area to look more bluish or yellowish. (5) Press the [Esc] button. q If you press the [Default] button while adjusting Brightness Correct., Color Correct. (G/R), or Color Correct. (B/Y), the item that you are adjusting is reset to it's default. q If you press the [Default] button while adjusting Blend Range, the value that you are adjusting is reset to the default. (6) Press the [Esc] button. F Set "Blend Curve". (1) Select Blend Curve, and then press the [Enter] button. (2) Select from 3 gradient choices, and then press the [Enter] button. (3) Press the [Esc] button. Adjusting to Match Colors on Multi-Projection When multiple projectors are lined up and projecting images, you can manually correct the brightness and color tone of each projector's image so that the colors projected from each projector match closely. In some cases the brightness and color tone may not match completely even after correction.
-
 1
1 -
2
-
3
-
4
-
5
-
6
-
7
-
8
-
9
-
10
-
11
-
12
-
13
-
14
-
15
-
16
-
17
-
18
-
19
-
20
-
21
-
22
-
23
-
24
-
25
-
26
-
27
-
28
-
29
-
30
-
31
-
32
-
33
-
34
-
35
-
36
-
37
-
38
-
39
-
40
-
41
-
42
-
43
-
44
-
45
-
46
-
47
-
48
-
49
-
50
-
51
-
52
-
53
-
54
-
55
-
56
-
57
-
58
-
59
-
60
-
61
-
62
-
63
-
64
-
65
-
66
-
67
-
68
-
69
-
70
-
71
-
72
-
73
-
74
-
75
-
76
-
77
-
78
-
79
-
80
-
81
-
82
-
83
-
84
-
85
-
86
-
87
-
88
-
89
-
90
-
91
-
92
-
93
-
94
-
95
-
96
-
97
-
98
-
99
-
100
-
101
-
102
-
103
-
104
-
105
-
106
-
107
-
108
-
109
-
110
-
111
-
112
-
113
-
114
-
115
-
116
-
117
-
118
-
119
-
120
-
121
-
122
-
123
-
124
-
125
-
126
-
127
-
128
-
129
-
130
-
131
-
132
-
133
-
134
-
135
-
136
-
137
-
138
-
139
-
140
-
141
-
142
-
143
-
144
-
145
-
146
-
147
-
148
-
149
-
150
-
151
-
152
-
153
-
154
-
155
-
156
-
157
-
158
-
159
-
160
-
161
-
162
-
163
-
164
-
165
-
166
-
167
-
168
-
169
-
170
-
171
-
172
-
173
-
174
-
 175
175 -
 176
176 -
 177
177 -
 178
178 -
 179
179 -
 180
180 -
 181
181 -
 182
182 -
 183
183 -
 184
184 -
 185
185 -
186
-
187
-
188
-
189
-
190
-
191
-
192
-
193
-
194
-
195
-
196
-
197
-
198
-
199
-
200
-
201
-
202
-
203
-
204
-
205
-
206
-
207
-
208
-
209
-
210
-
211
-
212
-
213
-
214
-
215
-
216
-
217
-
218
-
219
-
220
-
221
-
222
-
223
-
224
-
225
-
226
-
227
-
228
-
229
-
230
-
231
-
232
-
233
-
234
-
235
-
236
-
237
-
238
-
239
-
240
-
241
-
242
-
243
-
244
-
245
-
246
-
247
-
248
-
249
-
250
-
251
-
252
-
253
-
254
 |
 |
