Epson PowerLite Pro Z8255NL User Manual - Page 120
Replacing Consumables, the confirmation buzzer beeps twice, disconnect the power
 |
View all Epson PowerLite Pro Z8255NL manuals
Add to My Manuals
Save this manual to your list of manuals |
Page 120 highlights
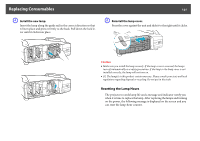
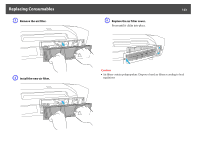
Replacing Consumables • Never disassemble or remodel the lamp. If a remodeled or reassembled lamp is installed into the projector and used, it could cause a fire, electric shock, or an accident. Warning Wait until the lamps have cooled down sufficiently before removing the lamp cover. If the lamp is still hot, burns or other injuries may result. It takes about one hour after the power has been turned off for the lamp to be cool enough. Procedure A Press the [t] power button on the remote control or the back of the projector to turn off the projector's power. After the confirmation buzzer beeps twice, disconnect the power cable. B Wait until the lamps have cooled down sufficiently before removing the lamp cover on the back of the projector. Pinch the tabs on the front of the lamp cover together to release the lock. When the lock releases, pull the cover straight out. 120 C Pull up the lock lever for the lamp you want to replace and pull the lamp straight out. If the lamp is cracked, replace it with a new lamp, or contact Epson. s p.114 A Lamp 1 B Lamp 2
-
 1
1 -
2
-
3
-
4
-
5
-
6
-
7
-
8
-
9
-
10
-
11
-
12
-
13
-
14
-
15
-
16
-
17
-
18
-
19
-
20
-
21
-
22
-
23
-
24
-
25
-
26
-
27
-
28
-
29
-
30
-
31
-
32
-
33
-
34
-
35
-
36
-
37
-
38
-
39
-
40
-
41
-
42
-
43
-
44
-
45
-
46
-
47
-
48
-
49
-
50
-
51
-
52
-
53
-
54
-
55
-
56
-
57
-
58
-
59
-
60
-
61
-
62
-
63
-
64
-
65
-
66
-
67
-
68
-
69
-
70
-
71
-
72
-
73
-
74
-
75
-
76
-
77
-
78
-
79
-
80
-
81
-
82
-
83
-
84
-
85
-
86
-
87
-
88
-
89
-
90
-
91
-
92
-
93
-
94
-
95
-
96
-
97
-
98
-
99
-
100
-
101
-
102
-
103
-
104
-
105
-
106
-
107
-
108
-
109
-
110
-
111
-
112
-
113
-
114
-
 115
115 -
 116
116 -
 117
117 -
 118
118 -
 119
119 -
 120
120 -
 121
121 -
 122
122 -
 123
123 -
 124
124 -
 125
125 -
126
-
127
-
128
-
129
-
130
-
131
-
132
-
133
-
134
-
135
-
136
-
137
-
138
-
139
-
140
-
141
-
142
-
143
-
144
-
145
-
146
-
147
-
148
-
149
-
150
-
151
-
152
-
153
-
154
-
155
-
156
-
157
-
158
-
159
-
160
-
161
-
162
-
163
-
164
-
165
-
166
-
167
-
168
-
169
-
170
-
171
-
172
-
173
-
174
-
175
-
176
-
177
-
178
-
179
-
180
-
181
-
182
-
183
-
184
-
185
-
186
-
187
-
188
-
189
-
190
-
191
-
192
-
193
-
194
-
195
-
196
-
197
-
198
-
199
-
200
-
201
-
202
-
203
-
204
-
205
-
206
-
207
-
208
-
209
-
210
-
211
-
212
-
213
-
214
-
215
-
216
-
217
-
218
-
219
-
220
-
221
-
222
-
223
-
224
-
225
-
226
-
227
-
228
-
229
-
230
-
231
-
232
-
233
-
234
-
235
-
236
-
237
-
238
-
239
-
240
-
241
-
242
-
243
-
244
-
245
-
246
-
247
-
248
-
249
-
250
-
251
-
252
-
253
-
254
 |
 |
