Epson PowerLite Pro Z8255NL User Manual - Page 189
Replace the front cover., Z8255NL/Z8455WUNL only.
 |
View all Epson PowerLite Pro Z8255NL manuals
Add to My Manuals
Save this manual to your list of manuals |
Page 189 highlights
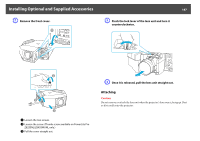
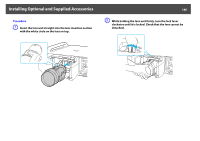
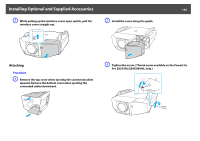
Installing Optional and Supplied Accessories 189 C Replace the front cover. C Tighten the two screws. D Replace the interface cover. A Install the cover along the guide. B Tighten the screw. (Thumb screw available on the PowerLite Pro Z8255NL/Z8455WUNL only.) A Install the cover along the guide. B Tighten the screw. Caution • Install the front cover before using the projector. • Store the projector with the lens unit installed. If the projector is stored without the lens unit, dust and dirt may get inside the projector and cause malfunctions or lower the quality of projection.
-
 1
1 -
2
-
3
-
4
-
5
-
6
-
7
-
8
-
9
-
10
-
11
-
12
-
13
-
14
-
15
-
16
-
17
-
18
-
19
-
20
-
21
-
22
-
23
-
24
-
25
-
26
-
27
-
28
-
29
-
30
-
31
-
32
-
33
-
34
-
35
-
36
-
37
-
38
-
39
-
40
-
41
-
42
-
43
-
44
-
45
-
46
-
47
-
48
-
49
-
50
-
51
-
52
-
53
-
54
-
55
-
56
-
57
-
58
-
59
-
60
-
61
-
62
-
63
-
64
-
65
-
66
-
67
-
68
-
69
-
70
-
71
-
72
-
73
-
74
-
75
-
76
-
77
-
78
-
79
-
80
-
81
-
82
-
83
-
84
-
85
-
86
-
87
-
88
-
89
-
90
-
91
-
92
-
93
-
94
-
95
-
96
-
97
-
98
-
99
-
100
-
101
-
102
-
103
-
104
-
105
-
106
-
107
-
108
-
109
-
110
-
111
-
112
-
113
-
114
-
115
-
116
-
117
-
118
-
119
-
120
-
121
-
122
-
123
-
124
-
125
-
126
-
127
-
128
-
129
-
130
-
131
-
132
-
133
-
134
-
135
-
136
-
137
-
138
-
139
-
140
-
141
-
142
-
143
-
144
-
145
-
146
-
147
-
148
-
149
-
150
-
151
-
152
-
153
-
154
-
155
-
156
-
157
-
158
-
159
-
160
-
161
-
162
-
163
-
164
-
165
-
166
-
167
-
168
-
169
-
170
-
171
-
172
-
173
-
174
-
175
-
176
-
177
-
178
-
179
-
180
-
181
-
182
-
183
-
 184
184 -
 185
185 -
 186
186 -
 187
187 -
 188
188 -
 189
189 -
 190
190 -
 191
191 -
 192
192 -
 193
193 -
 194
194 -
195
-
196
-
197
-
198
-
199
-
200
-
201
-
202
-
203
-
204
-
205
-
206
-
207
-
208
-
209
-
210
-
211
-
212
-
213
-
214
-
215
-
216
-
217
-
218
-
219
-
220
-
221
-
222
-
223
-
224
-
225
-
226
-
227
-
228
-
229
-
230
-
231
-
232
-
233
-
234
-
235
-
236
-
237
-
238
-
239
-
240
-
241
-
242
-
243
-
244
-
245
-
246
-
247
-
248
-
249
-
250
-
251
-
252
-
253
-
254
 |
 |

Installing Optional and Supplied Accessories
189
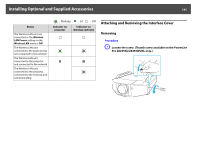
C
Replace the front cover.
D
Replace the interface cover.
Caution
•
Install the front cover before using the projector.
•
Store the projector with the lens unit installed.
If the projector is stored without the lens unit, dust and dirt may get inside the
projector and cause malfunctions or lower the quality of projection.
A
Install the cover along the guide.
B
Tighten the screw. (Thumb screw available on the PowerLite Pro
Z8255NL/Z8455WUNL only.)
C
Tighten the two screws.
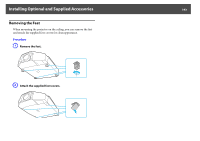
A
Install the cover along the guide.
B
Tighten the screw.