HP 635n HP Jetdirect Print Server Administrator's Guide (Firmware V.36) - Page 47
Windows Systems, Start, Settings, Control Panel, Administrative Tools, Action, New Scope
 |
UPC - 882780301016
View all HP 635n manuals
Add to My Manuals
Save this manual to your list of manuals |
Page 47 highlights
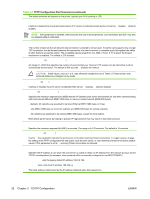
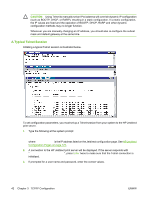
If your HP-UX system does not provide Dynamic Domain Name Services (DDNS) for its DHCP implementation, HP recommends that you set all print server lease durations to "infinite". This ensures that print server IP addresses remain static until dynamic domain name services are available. Windows Systems HP Jetdirect print servers support IP configuration from a supported Windows DHCP server. This section describes how to set up a pool, or "scope," of IP addresses that the Windows server can assign or lease to any requester. When configured for BOOTP or DHCP operation and powered on, the HP Jetdirect print server automatically sends a BOOTP or DHCP request for its IP configuration. If properly set up, a Windows DHCP server will respond with the print server's IP configuration data. NOTE: This information is provided as an overview. For specific information or for additional support, see the information supplied with your DHCP server software. NOTE: To avoid problems resulting from IP addresses that change, HP recommends that all printers be assigned IP addresses with infinite leases or reserved IP addresses. Windows 2000 Server/Server 2003 To set up a DHCP(IPv4) scope on a Windows 2000 server or Server 2003 system, perform the following steps: 1. Run the Windows DHCP manager utility. ● Windows 2000: Click Start, then select Settings and Control Panel. Open the Administrative Tools folder and run the DHCP utility. ● Server 2003: Click Start, then select Control Panel. Open the Administrative Tools folder and run the DHCP utility. 2. In the DHCP window, locate and select your Windows server in the DHCP tree. If your server is not listed in the tree, select DHCP and click the Action menu to add the server. 3. After selecting your server in the DHCP tree, click the Action menu and select New Scope. This runs the Add New Scope Wizard. 4. In the Add New Scope Wizard, click Next. 5. Enter a Name and Description for this scope, then click Next. 6. Enter the range of IP addresses for this scope (beginning IP address and ending IP address). Also, enter the subnet mask. then click Next. NOTE: If subnetting is used, the subnet mask defines which portion of an IP address specifies the subnet and which portion specifies the client device. 7. If applicable, enter the range of IP addresses within the scope to be excluded by the server. Then click Next. 8. Set the IP address lease duration for your DHCP clients. Then click Next. HP recommends that all printers be assigned reserved IP addresses. This can be accomplished after you set up the scope (see step 11). 9. Select No to configure DHCP options for this scope later. Then click Next. ENWW IPv4 Configuration 37
-
 1
1 -
2
-
3
-
4
-
5
-
6
-
7
-
8
-
9
-
10
-
11
-
12
-
13
-
14
-
15
-
16
-
17
-
18
-
19
-
20
-
21
-
22
-
23
-
24
-
25
-
26
-
27
-
28
-
29
-
30
-
31
-
32
-
33
-
34
-
35
-
36
-
37
-
38
-
39
-
40
-
41
-
 42
42 -
 43
43 -
 44
44 -
 45
45 -
 46
46 -
 47
47 -
 48
48 -
 49
49 -
 50
50 -
 51
51 -
 52
52 -
53
-
54
-
55
-
56
-
57
-
58
-
59
-
60
-
61
-
62
-
63
-
64
-
65
-
66
-
67
-
68
-
69
-
70
-
71
-
72
-
73
-
74
-
75
-
76
-
77
-
78
-
79
-
80
-
81
-
82
-
83
-
84
-
85
-
86
-
87
-
88
-
89
-
90
-
91
-
92
-
93
-
94
-
95
-
96
-
97
-
98
-
99
-
100
-
101
-
102
-
103
-
104
-
105
-
106
-
107
-
108
-
109
-
110
-
111
-
112
-
113
-
114
-
115
-
116
-
117
-
118
-
119
-
120
-
121
-
122
-
123
-
124
-
125
-
126
-
127
-
128
-
129
-
130
-
131
-
132
-
133
-
134
-
135
-
136
-
137
-
138
-
139
-
140
-
141
-
142
-
143
-
144
-
145
-
146
-
147
-
148
-
149
-
150
-
151
-
152
-
153
-
154
-
155
-
156
-
157
-
158
-
159
-
160
-
161
-
162
-
163
-
164
-
165
-
166
-
167
-
168
-
169
-
170
-
171
-
172
-
173
-
174
-
175
-
176
-
177
-
178
-
179
-
180
-
181
-
182
-
183
-
184
-
185
-
186
-
187
-
188
-
189
-
190
-
191
-
192
-
193
-
194
-
195
-
196
-
197
-
198
-
199
-
200
-
201
-
202
 |
 |