HP 635n HP Jetdirect Print Server Administrator's Guide (Firmware V.36) - Page 68
Using Telnet to Erase the Existing IP Settings,
 |
UPC - 882780301016
View all HP 635n manuals
Add to My Manuals
Save this manual to your list of manuals |
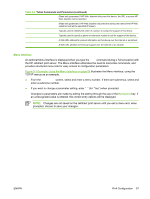
Page 68 highlights
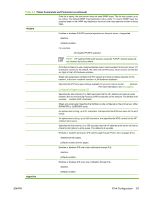
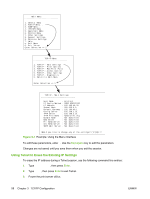
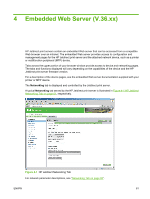
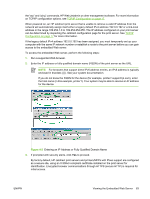
Main Menu 1. General Menu 2. TCP/IP Menu... 3. SNMP Menu... 4. IPX/SPX Menu 5. AppleTalk Menu 6. DLC/LLC Menu 7. Other Settings 8. Support Settings 9. Wireless Settings ?. Help e. Exit Menu 0. Exit Telnet Enter Selection => 2 TCP/IP Menu 1. TCP/IP - Main Settings 2. TCP/IP - Print Options 3. TCP/IP - Raw Print Ports 4. TCP/IP - Access Control 5. TCP/IP - Other Settings 6. TCP/IP - Diagnostics 0. Return to Main Menu Enter Selection => 1 TCP/IP - Main Settings Host Name : printer1 IP Config Method : USER SPECIFIED IP Address : 192.168.45.39 Subnet Mask : 255.255.0.0 Default Gateway : 192.168.40.1 Config Server : 192.168.2.21 TFTP Server : 192.168.2.21 TFTP File Name : hpnp/print.cfg Domain Name : Not Specified DNS Server : Not Specified Pri WINS Server : Not Specified Sec WINS Server : Not Specified SMTP Mail Server : Not Specified Would you like to change any of the settings? (Y/[N]):Y Figure 3-1 Example: Using the Menu Interface To edit these parameters, enter Y. Use the Backspace key to edit the parameters. Changes are not saved until you save them when you exit the session. Using Telnet to Erase the Existing IP Settings To erase the IP address during a Telnet session, use the following command line entries: 1. Type cold-reset, then press Enter. 2. Type quit, then press Enter to exit Telnet. 3. Power the print server off/on. 58 Chapter 3 TCP/IP Configuration ENWW
-
 1
1 -
2
-
3
-
4
-
5
-
6
-
7
-
8
-
9
-
10
-
11
-
12
-
13
-
14
-
15
-
16
-
17
-
18
-
19
-
20
-
21
-
22
-
23
-
24
-
25
-
26
-
27
-
28
-
29
-
30
-
31
-
32
-
33
-
34
-
35
-
36
-
37
-
38
-
39
-
40
-
41
-
42
-
43
-
44
-
45
-
46
-
47
-
48
-
49
-
50
-
51
-
52
-
53
-
54
-
55
-
56
-
57
-
58
-
59
-
60
-
61
-
62
-
 63
63 -
 64
64 -
 65
65 -
 66
66 -
 67
67 -
 68
68 -
 69
69 -
 70
70 -
 71
71 -
 72
72 -
 73
73 -
74
-
75
-
76
-
77
-
78
-
79
-
80
-
81
-
82
-
83
-
84
-
85
-
86
-
87
-
88
-
89
-
90
-
91
-
92
-
93
-
94
-
95
-
96
-
97
-
98
-
99
-
100
-
101
-
102
-
103
-
104
-
105
-
106
-
107
-
108
-
109
-
110
-
111
-
112
-
113
-
114
-
115
-
116
-
117
-
118
-
119
-
120
-
121
-
122
-
123
-
124
-
125
-
126
-
127
-
128
-
129
-
130
-
131
-
132
-
133
-
134
-
135
-
136
-
137
-
138
-
139
-
140
-
141
-
142
-
143
-
144
-
145
-
146
-
147
-
148
-
149
-
150
-
151
-
152
-
153
-
154
-
155
-
156
-
157
-
158
-
159
-
160
-
161
-
162
-
163
-
164
-
165
-
166
-
167
-
168
-
169
-
170
-
171
-
172
-
173
-
174
-
175
-
176
-
177
-
178
-
179
-
180
-
181
-
182
-
183
-
184
-
185
-
186
-
187
-
188
-
189
-
190
-
191
-
192
-
193
-
194
-
195
-
196
-
197
-
198
-
199
-
200
-
201
-
202
 |
 |
