HP Integrity rx2800 Installation Guide, Windows Server 2008 R2 v7.0 - Page 20
Set Up a Headless Console Using a Null Modem Cable, Set Up a GUI Console
 |
View all HP Integrity rx2800 manuals
Add to My Manuals
Save this manual to your list of manuals |
Page 20 highlights
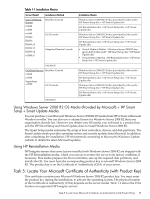
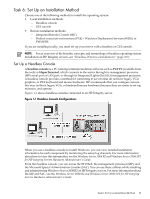
You can configure a headless console by using one of the following: • A null modem cable • A cat5 LAN cable • A Remote Serial Console The first two methods require a terminal emulation application such as HyperTerminal or PuTTY. PuTTY is a free implementation of telnet and SSH for 32-bit Windows and UNIX. PuTTY provides an X terminal. You must use PuTTY version 0.59 or higher, available from the PuTTY website: http://www.chiark.greenend.org.uk/~sgtatham/putty/download.html Set Up a Headless Console Using a Null Modem Cable To set up the headless console using a null modem cable, follow these steps: 1. Connect the PC to the server MP serial port with a null modem cable. 2. Install PuTTY on the client PC and specify the following port settings: • Bits per second: 9600 • Data bits: 8 • Parity: none • Stop bits: 1 • Flow control: Xon/Xoff 3. Use the Keyboard Configuration Panel to map the backspace key to Control + H. 4. Boot the server. 5. Run PuTTY and press Enter. The MP login prompt displays. 6. Enter your user name and password. The MP command prompt displays. 7. Enter the CO command to access the headless console. 8. The set up is complete. Proceed to the Headless Console installation process, "Install from a Headless Console" (page 31). Set up a Headless Console Using a LAN To set up the headless console over a LAN, follow these steps: 1. Connect the PC to the server LAN port with a cat5 cable. 2. Use telnet to access the MP. The MP login prompt displays. 3. Enter your user name and password. The MP command prompt displays. 4. Enter the CO command to access the headless console. 5. The set up is complete. Proceed to the Headless Console installation process: "Install from a Headless Console" (page 31). Set Up a Headless Console Using a Remote Serial Console To set up the headless console using a Remote Serial Console, follow these steps: 1. Using a secure web browser, enter the name or IP address of the server MP. 2. Enter your user name and password to log in to the System Management Homepage. 3. On the Remote Console tab, select Remote Serial Console in the left panel. 4. Click Launch. A new window displays, providing access to the headless console. 5. The set up is complete. Proceed to the Headless Console installation process, "Install from a Headless Console" (page 31). Set Up a GUI Console A GUI console is a VGA monitor, a USB HP keyboard, and a USB mouse connected to the server. (You can use a USB-to-PS2 converter to connect to a console switch.) If a VGA card is not installed, 20 Preparing for Installation
-
 1
1 -
2
-
3
-
4
-
5
-
6
-
7
-
8
-
9
-
10
-
11
-
12
-
13
-
14
-
 15
15 -
 16
16 -
 17
17 -
 18
18 -
 19
19 -
 20
20 -
 21
21 -
 22
22 -
 23
23 -
 24
24 -
 25
25 -
26
-
27
-
28
-
29
-
30
-
31
-
32
-
33
-
34
-
35
-
36
-
37
-
38
-
39
-
40
-
41
-
42
-
43
-
44
-
45
-
46
-
47
-
48
-
49
-
50
-
51
-
52
-
53
-
54
-
55
-
56
-
57
-
58
-
59
-
60
-
61
-
62
-
63
-
64
-
65
-
66
-
67
-
68
-
69
-
70
-
71
-
72
-
73
-
74
-
75
-
76
-
77
-
78
-
79
-
80
-
81
-
82
-
83
-
84
-
85
-
86
-
87
-
88
-
89
-
90
-
91
-
92
-
93
-
94
-
95
-
96
-
97
-
98
-
99
-
100
-
101
-
102
-
103
-
104
-
105
-
106
-
107
-
108
-
109
-
110
 |
 |