HP Integrity rx2800 Installation Guide, Windows Server 2008 R2 v7.0 - Page 80
Creating a Backup Boot File Using the EFI Shell, Verify Successful Backup Boot File Creation
 |
View all HP Integrity rx2800 manuals
Add to My Manuals
Save this manual to your list of manuals |
Page 80 highlights
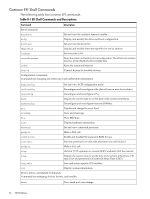
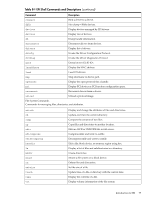
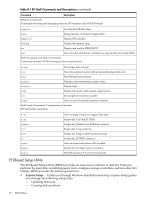
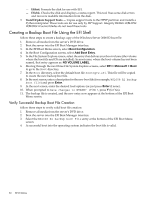
- Efifmt. Formats the disk for use with EFI. - Efichk. Checks the disk and displays a status report. This tool fixes some disk errors and recovers readable information from the disk. • Install/Update Support Tools - Copies support tools to the HPSP partition and installs a Python interpreter. These tools are for use only by HP Support. Integrity BL860c i2/BL870c i2/BL890c i2 server blades do not need these tools. Creating a Backup Boot File Using the EFI Shell follow these steps to create a backup copy of the Windows Server 2008 R2 boot file: 1. Remove all media from the server's DVD drive. 2. Boot the server into the EFI Boot Manager interface. 3. In the EFI Boot Menu screen, select Boot Configuration. 4. In the Boot Configuration screen, select Add Boot Entry. 5. In the File System Explore screen, select the entry that defines your boot volume (the volume where the boot file and OS are installed). In most cases, where the boot volume has not been named, that entry appears as: NO VOLUME LABEL. 6. Moving through the next three File System Explore screens, select EFI > Microsoft > Boot to go to the Boot directory. 7. In the Boot directory, select the default boot file: bootmgfw.efi. This file will be copied to create the new backup boot file. 8. In the next screen, enter a description for the new boot file (for example, WS2008 R2 backup boot file) and press Enter. 9. In the next screen, enter the desired load options (or just press Enter if none). 10. When prompted to Save changes to NVRAM? [Y/N]?, press Y (for Yes). 11. The backup file is created, and the new entry now appears at the bottom of the EFI Boot Menu screen. Verify Successful Backup Boot File Creation follow these steps to verify valid boot file creation: 1. Remove all media from the server's DVD drive. 2. Boot the server into the EFI Boot Manager interface. 3. Select the WS2008 R2 backup boot file entry at the bottom of the EFI Boot Menu screen. 4. A successful boot into the operating system indicates the boot file is valid. 80 EFI Utilities
-
 1
1 -
2
-
3
-
4
-
5
-
6
-
7
-
8
-
9
-
10
-
11
-
12
-
13
-
14
-
15
-
16
-
17
-
18
-
19
-
20
-
21
-
22
-
23
-
24
-
25
-
26
-
27
-
28
-
29
-
30
-
31
-
32
-
33
-
34
-
35
-
36
-
37
-
38
-
39
-
40
-
41
-
42
-
43
-
44
-
45
-
46
-
47
-
48
-
49
-
50
-
51
-
52
-
53
-
54
-
55
-
56
-
57
-
58
-
59
-
60
-
61
-
62
-
63
-
64
-
65
-
66
-
67
-
68
-
69
-
70
-
71
-
72
-
73
-
74
-
 75
75 -
 76
76 -
 77
77 -
 78
78 -
 79
79 -
 80
80 -
 81
81 -
 82
82 -
 83
83 -
 84
84 -
 85
85 -
86
-
87
-
88
-
89
-
90
-
91
-
92
-
93
-
94
-
95
-
96
-
97
-
98
-
99
-
100
-
101
-
102
-
103
-
104
-
105
-
106
-
107
-
108
-
109
-
110
 |
 |