HP Integrity rx2800 Installation Guide, Windows Server 2008 R2 v7.0 - Page 48
Method 1, Start the WinPE OS Loader by typing
 |
View all HP Integrity rx2800 manuals
Add to My Manuals
Save this manual to your list of manuals |
Page 48 highlights
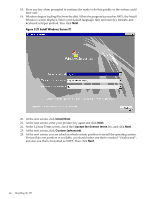
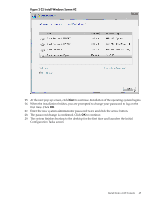
NOTE: The default MP "user name/password" is "Administrator/Admin" for BL8x0 i2 and rx2800 i2 server blades, and "Admin/Admin" for all other servers. 4. Type co and press Enter. 5. Deletion of existing Windows Boot Manager entries is recommended. To delete boot entries, choose one of the following methods: • Use the EFI Maintenance menu: - If you are using the Enhanced EFI Boot Manager Menu (gray background), select EFI Boot Manager Menu → Boot Configuration → Remove Boot Entry. - If you are using the Legacy EFI Boot Manager Menu (black background), select EFI Boot Manager Menu → Boot Option Maintenance Menu → Delete Boot Option(s). Then scroll down to the desired boot entry and press Enter. • Clear the NVRAM using the instructions in your Platform Reference Guide. 6. If there were boot entries that required deletion in the previous step, reboot the system now by typing reset and pressing Enter. 7. Log in to the MP port again using HyperTerminal or PuTTY, and enter the MP user name and password. 8. At the MP> prompt, type co and press Enter. NOTE: You can also use Remote Serial Console to perform this step. 9. Boot from the Reinstallation media using one of the following methods: • Method 1: Select EFI Boot Manager menu → Internal Bootable DVD from EFI Boot Manager (if this choice is available). If you use this method, you can skip steps 10 and 11 and go directly to step 12. • Method 2: Select EFI Shell and go to the /CDROM(Entry0) file system by typing fs0: and pressing Enter. 10. Start the WinPE OS Loader by typing cd \efi\boot and pressing Enter. 11. Type bootia64.efi and press Enter. 12. When the SAC prompt appears (EVENT:), type cmd and press Enter. 13. Hold down the Esc key, press the Tab key once, then release both keys and press Enter to switch to a new command channel. 14. At the command prompt, type txtrestore and press Enter. 15. If the system indicates that the current date is invalid, use the date command to enter the current date. Then reenter the txtrestore command again. 16. Read the Image Restore Tips displayed in the next screen and follow the suggestions provided. When ready to continue, press y and then Enter. If you want to abort, press n and then Enter instead. 17. The system prompts you to select which adapter to install. Select the desired adapter number from the list displayed. 18. The system prompts you to select which drive to install. Select the desired drive number from the list displayed. 19. Select the partition size (64 GB is the default, and in most cases, the minimum recommended size) and press Enter. The maximum partition size is limited to the size of the drive. 20. Select Y to continue. The installation process copies files to the hard disk. Do not power off the server during the installation. 21. When all files from the DVD drive are copied to the server boot disk, read the displayed message. If there were any errors during this process you must address the cause of the 48 Installing the OS
-
 1
1 -
2
-
3
-
4
-
5
-
6
-
7
-
8
-
9
-
10
-
11
-
12
-
13
-
14
-
15
-
16
-
17
-
18
-
19
-
20
-
21
-
22
-
23
-
24
-
25
-
26
-
27
-
28
-
29
-
30
-
31
-
32
-
33
-
34
-
35
-
36
-
37
-
38
-
39
-
40
-
41
-
42
-
 43
43 -
 44
44 -
 45
45 -
 46
46 -
 47
47 -
 48
48 -
 49
49 -
 50
50 -
 51
51 -
 52
52 -
 53
53 -
54
-
55
-
56
-
57
-
58
-
59
-
60
-
61
-
62
-
63
-
64
-
65
-
66
-
67
-
68
-
69
-
70
-
71
-
72
-
73
-
74
-
75
-
76
-
77
-
78
-
79
-
80
-
81
-
82
-
83
-
84
-
85
-
86
-
87
-
88
-
89
-
90
-
91
-
92
-
93
-
94
-
95
-
96
-
97
-
98
-
99
-
100
-
101
-
102
-
103
-
104
-
105
-
106
-
107
-
108
-
109
-
110
 |
 |