HP Integrity rx2800 Installation Guide, Windows Server 2008 R2 v7.0 - Page 24
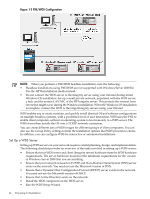
Set Up a WDS Server, PXE/WDS Configuration
 |
View all HP Integrity rx2800 manuals
Add to My Manuals
Save this manual to your list of manuals |
Page 24 highlights
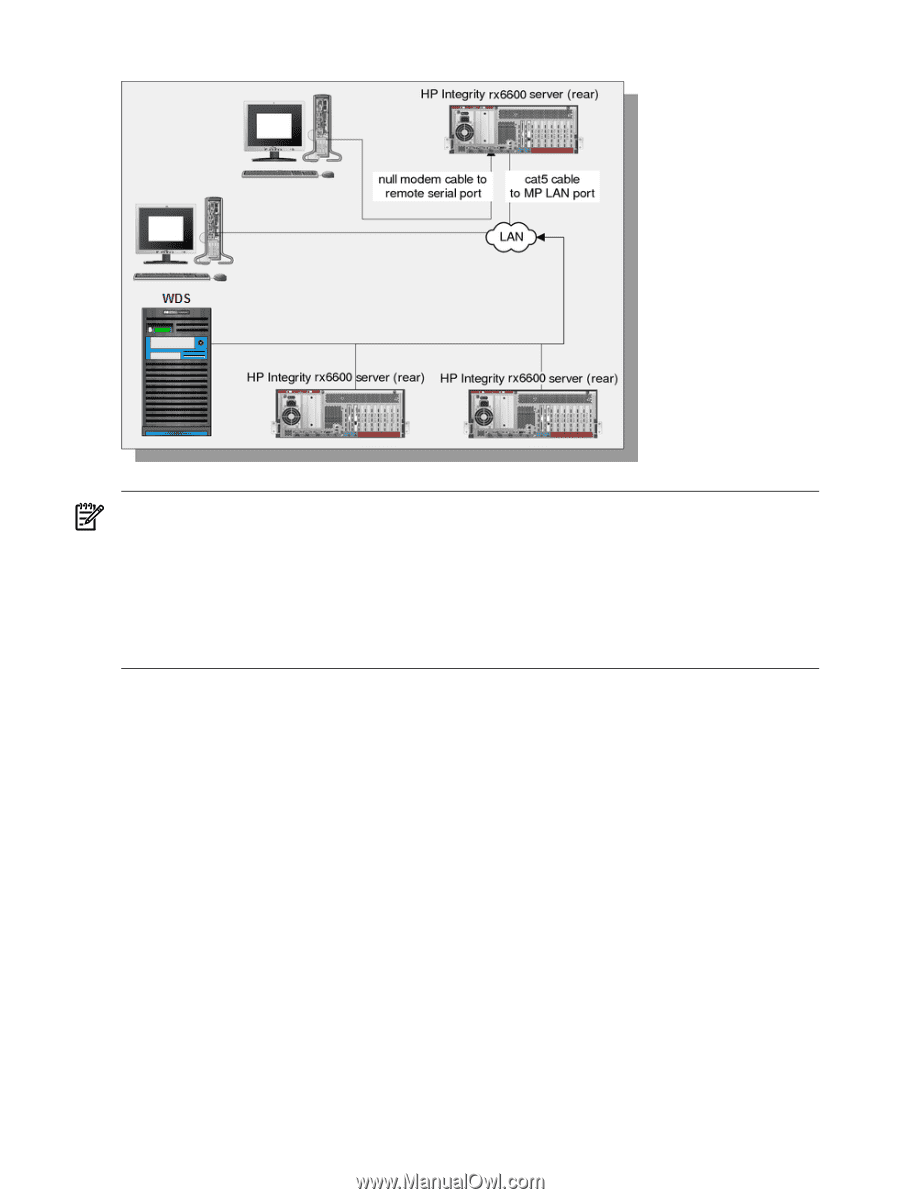
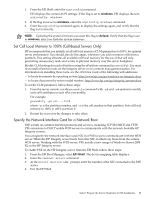
Figure 1-3 PXE/WDS Configuration NOTE: When you perform a PXE/WDS headless installation, note the following: • Headless installations using PXE/WDS are not supported with Windows Server 2008 R2. Use the HP Reinstallation media instead. • Do not connect the WDS server to the Integrity server using your intranet during initial Windows OS installation. Set up a small private network, populated with the WDS server, a hub, and the system LAN NIC of the HP Integrity server. This protects the intranet from errors that might occur during the Windows installation. When the Windows OS installation is complete, connect the WDS to the target Integrity servers using your intranet. WDS enables you to create, maintain, and quickly install identical OS and software configurations on multiple headless systems, with a predefined level of user interaction. WDS uses the PXE to enable client computers without an operating system to boot remotely to a WDS server. The WDS server then installs the OS over a TCP/IP network connection. You can create different sets of WDS images for different groups of client computers. You can also use the Group Policy settings to limit the installation options that WDS presents to clients. In addition, you can configure WDS for interactive or automated installations. Set Up a WDS Server Setting up WDS servers on your network requires careful planning, design, and implementation. The following checklist provides an overview of the tasks involved in setting up a WDS server: • Ensure that your WDS server and client (Integrity server) hardware meet the WDS hardware requirements. The server hardware must meet the minimum requirements for the version of Windows Server 2008 that you are installing. • Ensure that your network is based on TCP/IP, and that a Domain Name System (DNS) server exists on the network. You need not use the Microsoft version of DNS. • Ensure that a Dynamic Host Configuration Protocol (DHCP) server exists on the network. You need not use the Microsoft version of DHCP. • Ensure that Active Directory exists on the network. • Install the WDS component on the WDS server. • Run the WDS Setup Wizard. 24 Preparing for Installation
-
 1
1 -
2
-
3
-
4
-
5
-
6
-
7
-
8
-
9
-
10
-
11
-
12
-
13
-
14
-
15
-
16
-
17
-
18
-
 19
19 -
 20
20 -
 21
21 -
 22
22 -
 23
23 -
 24
24 -
 25
25 -
 26
26 -
 27
27 -
 28
28 -
 29
29 -
30
-
31
-
32
-
33
-
34
-
35
-
36
-
37
-
38
-
39
-
40
-
41
-
42
-
43
-
44
-
45
-
46
-
47
-
48
-
49
-
50
-
51
-
52
-
53
-
54
-
55
-
56
-
57
-
58
-
59
-
60
-
61
-
62
-
63
-
64
-
65
-
66
-
67
-
68
-
69
-
70
-
71
-
72
-
73
-
74
-
75
-
76
-
77
-
78
-
79
-
80
-
81
-
82
-
83
-
84
-
85
-
86
-
87
-
88
-
89
-
90
-
91
-
92
-
93
-
94
-
95
-
96
-
97
-
98
-
99
-
100
-
101
-
102
-
103
-
104
-
105
-
106
-
107
-
108
-
109
-
110
 |
 |