HP LaserJet 4v/mv Service Manual - Page 144
Table 7-1 - spec
 |
View all HP LaserJet 4v/mv manuals
Add to My Manuals
Save this manual to your list of manuals |
Page 144 highlights
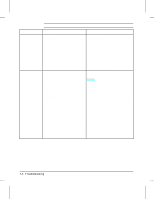
Table 7-1 Message 12 PRINTER OPEN 13 PAPER JAM Status Messages - continued Description Recommended Action The front door is not firmly closed, or the toner cartridge is not installed correctly. Make sure the toner cartridge is fully seated and the front door is firmly closed. If the message persists: 1. With the front door open, check that the sensor flag for Front Door Open Sensor (PS402) is not broken or stuck. (PS402 is located on the small Front Door Unit Terminal PCA on the front door under the Transfer Roller.) 2. Check functionality of the toner cartridge microswitch (SW501) on the High Voltage PCA (activated by metal tab in the rear wall of the toner cartridge cavity, adjacent to the high voltage contacts). 3. Replace the DC Controller PCA. Paper is jammed in the paper path, or a paper jam sensor may be stuck, causing a false paper jam warning. The jam rate specifications are: MP TRAY: 1 per 6000 CASSETTE: 1 per 4000 NOTE: Many variables can affect actual frequency of jams. The above specifications are intended as a general guideline only. Remove jammed paper (see "Clearing Paper Jams" in the User's Manual). The front door must be opened and closed again before pressing [On Line] to resume. The following are the most likely causes of repeated paper jam problems: 1. Paper cassettes not correctly loaded (refer to the User's Manual). 2. Print media does not meet specs or is in poor condition (refer to the Paper Specifications Guide). 3. The printer needs cleaning (refer to Chapter 4). 4. Pickup, Registration or Output rollers contaminated, worn or damaged. 5. Toner cartridge gears are worn or damaged (try a different cartridge). 6. Other paper path gears worn or damaged. If no paper jams are found but the message persists (false paper jams): 1. Check paper jam sensor flags for sticking or damage. Paper movement is monitored by (2) paper sensors. PS 501, the Pickup Unit Sensor is located on the High Voltage Power Supply PCA high voltage power supply PCA;pickup unit sensor. PS401 is located on the small front door Unit Terminal PCA on the front door under the Fusing Assembly (remove the Fusing Assembly to see). 2. Replace the DC Controller PCA. 7-8 Troubleshooting
-
 1
1 -
2
-
3
-
4
-
5
-
6
-
7
-
8
-
9
-
10
-
11
-
12
-
13
-
14
-
15
-
16
-
17
-
18
-
19
-
20
-
21
-
22
-
23
-
24
-
25
-
26
-
27
-
28
-
29
-
30
-
31
-
32
-
33
-
34
-
35
-
36
-
37
-
38
-
39
-
40
-
41
-
42
-
43
-
44
-
45
-
46
-
47
-
48
-
49
-
50
-
51
-
52
-
53
-
54
-
55
-
56
-
57
-
58
-
59
-
60
-
61
-
62
-
63
-
64
-
65
-
66
-
67
-
68
-
69
-
70
-
71
-
72
-
73
-
74
-
75
-
76
-
77
-
78
-
79
-
80
-
81
-
82
-
83
-
84
-
85
-
86
-
87
-
88
-
89
-
90
-
91
-
92
-
93
-
94
-
95
-
96
-
97
-
98
-
99
-
100
-
101
-
102
-
103
-
104
-
105
-
106
-
107
-
108
-
109
-
110
-
111
-
112
-
113
-
114
-
115
-
116
-
117
-
118
-
119
-
120
-
121
-
122
-
123
-
124
-
125
-
126
-
127
-
128
-
129
-
130
-
131
-
132
-
133
-
134
-
135
-
136
-
137
-
138
-
 139
139 -
 140
140 -
 141
141 -
 142
142 -
 143
143 -
 144
144 -
 145
145 -
 146
146 -
 147
147 -
 148
148 -
 149
149 -
150
-
151
-
152
-
153
-
154
-
155
-
156
-
157
-
158
-
159
-
160
-
161
-
162
-
163
-
164
-
165
-
166
-
167
-
168
-
169
-
170
-
171
-
172
-
173
-
174
-
175
-
176
-
177
-
178
-
179
-
180
-
181
-
182
-
183
-
184
-
185
-
186
-
187
-
188
-
189
-
190
-
191
-
192
-
193
-
194
-
195
-
196
-
197
-
198
-
199
-
200
-
201
-
202
-
203
-
204
-
205
-
206
-
207
-
208
-
209
-
210
-
211
-
212
-
213
-
214
-
215
-
216
-
217
-
218
-
219
-
220
-
221
-
222
-
223
-
224
-
225
-
226
-
227
-
228
-
229
-
230
-
231
-
232
-
233
-
234
-
235
-
236
-
237
-
238
-
239
-
240
-
241
-
242
-
243
-
244
-
245
-
246
-
247
-
248
 |
 |
