HP LaserJet 4v/mv Service Manual - Page 157
LaserJet Printer Family Paper Specifications Guide
 |
View all HP LaserJet 4v/mv manuals
Add to My Manuals
Save this manual to your list of manuals |
Page 157 highlights
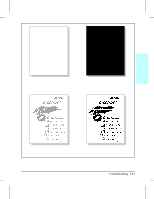
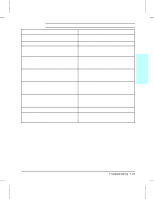
7 Troubleshooting Table 7-4 Blank (White) Page Possible Cause Recommended Action OCCASIONAL BLANK PAGES: 1. Software Configuration. Make sure the application software is not sending incorrect page length requests, or extra page eject commands. 2. Network Configuration. Some sharing devices Check with the Network Administrator. on networks may generate a blank page as a separator. 3. Multiple Feeds. The printer may be feeding Remove the paper from the paper cassette and fan two or more pages at once because the paper is the paper edges to separate the pages (see HP difficult to separate. LaserJet Printer Family Paper Specifications Guide). ALL PAGES BLANK: 1. Sealing tape left in toner cartridge. Remove the sealing tape. 2. Empty or defective toner cartridge. 1. If unsure, weigh the cartridge: Full weight = 2000 grams (70.6 oz) Empty weight = 1600 grams (56.5 oz) NOTE: Some toner may reside in the waste toner cavity, affecting the weight of the cartridge. 2. Perform the "Drum Rotation Functional Check" described later in this chapter or try a known good toner cartridge. Replace the toner cartridge if necessary. 3. Defective or contaminated Transfer Roller. Without a functional Transfer Roller, toner cannot be pulled from the photosensitive drum to the paper. Check roller installation and contact. Perform the "Half Self Test Functional Check" described later in this chapter. If there is an image on the drum, but not on paper, replace the Transfer Roller. 4. High voltage connector springs are dirty or defective. The high voltage connectors are mounted on the High Voltage Power Supply PCA and protrude into the toner cartridge cavity. Check the springs for functionality. Clean if dirty, replace if defective or missing. 5. Laser/Scanner door not opening properly. 1. Remove and re-seat the toner cartridge. 2. Check the Laser/Scanner shutter door for proper operation. If defective, replace the Laser/Scanner Assembly. 6. High Voltage Power Supply is defective. Replace the High Voltage Power Supply PCA. 7. DC Controller PCA is defective. The DC Replace the DC Controller PCA. Controller supplies the proper voltage to the High Voltage Power Supply PCA. Troubleshooting 7-21
-
 1
1 -
2
-
3
-
4
-
5
-
6
-
7
-
8
-
9
-
10
-
11
-
12
-
13
-
14
-
15
-
16
-
17
-
18
-
19
-
20
-
21
-
22
-
23
-
24
-
25
-
26
-
27
-
28
-
29
-
30
-
31
-
32
-
33
-
34
-
35
-
36
-
37
-
38
-
39
-
40
-
41
-
42
-
43
-
44
-
45
-
46
-
47
-
48
-
49
-
50
-
51
-
52
-
53
-
54
-
55
-
56
-
57
-
58
-
59
-
60
-
61
-
62
-
63
-
64
-
65
-
66
-
67
-
68
-
69
-
70
-
71
-
72
-
73
-
74
-
75
-
76
-
77
-
78
-
79
-
80
-
81
-
82
-
83
-
84
-
85
-
86
-
87
-
88
-
89
-
90
-
91
-
92
-
93
-
94
-
95
-
96
-
97
-
98
-
99
-
100
-
101
-
102
-
103
-
104
-
105
-
106
-
107
-
108
-
109
-
110
-
111
-
112
-
113
-
114
-
115
-
116
-
117
-
118
-
119
-
120
-
121
-
122
-
123
-
124
-
125
-
126
-
127
-
128
-
129
-
130
-
131
-
132
-
133
-
134
-
135
-
136
-
137
-
138
-
139
-
140
-
141
-
142
-
143
-
144
-
145
-
146
-
147
-
148
-
149
-
150
-
151
-
 152
152 -
 153
153 -
 154
154 -
 155
155 -
 156
156 -
 157
157 -
 158
158 -
 159
159 -
 160
160 -
 161
161 -
 162
162 -
163
-
164
-
165
-
166
-
167
-
168
-
169
-
170
-
171
-
172
-
173
-
174
-
175
-
176
-
177
-
178
-
179
-
180
-
181
-
182
-
183
-
184
-
185
-
186
-
187
-
188
-
189
-
190
-
191
-
192
-
193
-
194
-
195
-
196
-
197
-
198
-
199
-
200
-
201
-
202
-
203
-
204
-
205
-
206
-
207
-
208
-
209
-
210
-
211
-
212
-
213
-
214
-
215
-
216
-
217
-
218
-
219
-
220
-
221
-
222
-
223
-
224
-
225
-
226
-
227
-
228
-
229
-
230
-
231
-
232
-
233
-
234
-
235
-
236
-
237
-
238
-
239
-
240
-
241
-
242
-
243
-
244
-
245
-
246
-
247
-
248
 |
 |
