HP LaserJet 4v/mv Service Manual - Page 158
Possible Cause, Recommended Action, Table 7-5
 |
View all HP LaserJet 4v/mv manuals
Add to My Manuals
Save this manual to your list of manuals |
Page 158 highlights
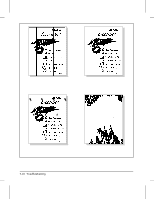
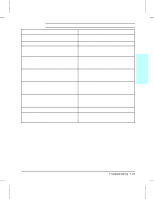
Table 7-5 Black Page Possible Cause Recommended Action 1. Defective toner cartridge. Replace the toner cartridge. 2. Light is leaking into the printer. Ensure all covers are in place. 3. High voltage contact springs are dirty or defective. The high voltage contacts are mounted on the High Voltage Power Supply PCA and protrude into the toner cartridge cavity. Inspect and clean the high voltage contacts. If damaged, replace the High Voltage Power Supply PCA. 4. High voltage power supply circuit is defective Replace the High Voltage Power Supply PCA. (not supplying the correct negative voltage). 5. DC Controller PCA is defective. If the DC Controller turns ON the laser beam continuously, the entire surface of the Photosensitive drum is neutralized causing a completely black page. Replace the DC Controller PCA. 6. Laser/Scanner Assembly is faulty (turning laser on continuously). Replace the Laser/Scanner Assembly. 7. Connectors between the Laser/Scanner unit Inspect and reseat the connectors. Replace and DC Controller are not seated properly or are cables as necessary. defective. 7-22 Troubleshooting
-
 1
1 -
2
-
3
-
4
-
5
-
6
-
7
-
8
-
9
-
10
-
11
-
12
-
13
-
14
-
15
-
16
-
17
-
18
-
19
-
20
-
21
-
22
-
23
-
24
-
25
-
26
-
27
-
28
-
29
-
30
-
31
-
32
-
33
-
34
-
35
-
36
-
37
-
38
-
39
-
40
-
41
-
42
-
43
-
44
-
45
-
46
-
47
-
48
-
49
-
50
-
51
-
52
-
53
-
54
-
55
-
56
-
57
-
58
-
59
-
60
-
61
-
62
-
63
-
64
-
65
-
66
-
67
-
68
-
69
-
70
-
71
-
72
-
73
-
74
-
75
-
76
-
77
-
78
-
79
-
80
-
81
-
82
-
83
-
84
-
85
-
86
-
87
-
88
-
89
-
90
-
91
-
92
-
93
-
94
-
95
-
96
-
97
-
98
-
99
-
100
-
101
-
102
-
103
-
104
-
105
-
106
-
107
-
108
-
109
-
110
-
111
-
112
-
113
-
114
-
115
-
116
-
117
-
118
-
119
-
120
-
121
-
122
-
123
-
124
-
125
-
126
-
127
-
128
-
129
-
130
-
131
-
132
-
133
-
134
-
135
-
136
-
137
-
138
-
139
-
140
-
141
-
142
-
143
-
144
-
145
-
146
-
147
-
148
-
149
-
150
-
151
-
152
-
 153
153 -
 154
154 -
 155
155 -
 156
156 -
 157
157 -
 158
158 -
 159
159 -
 160
160 -
 161
161 -
 162
162 -
 163
163 -
164
-
165
-
166
-
167
-
168
-
169
-
170
-
171
-
172
-
173
-
174
-
175
-
176
-
177
-
178
-
179
-
180
-
181
-
182
-
183
-
184
-
185
-
186
-
187
-
188
-
189
-
190
-
191
-
192
-
193
-
194
-
195
-
196
-
197
-
198
-
199
-
200
-
201
-
202
-
203
-
204
-
205
-
206
-
207
-
208
-
209
-
210
-
211
-
212
-
213
-
214
-
215
-
216
-
217
-
218
-
219
-
220
-
221
-
222
-
223
-
224
-
225
-
226
-
227
-
228
-
229
-
230
-
231
-
232
-
233
-
234
-
235
-
236
-
237
-
238
-
239
-
240
-
241
-
242
-
243
-
244
-
245
-
246
-
247
-
248
 |
 |
