HP LaserJet 4v/mv Service Manual - Page 160
Possible Cause, Recommended Action, Table 7-7, Table 7-8
 |
View all HP LaserJet 4v/mv manuals
Add to My Manuals
Save this manual to your list of manuals |
Page 160 highlights
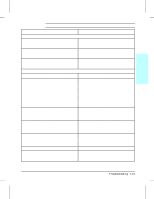
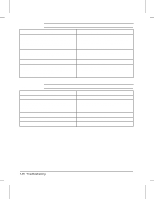
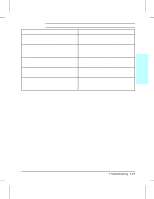
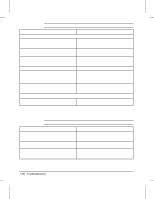
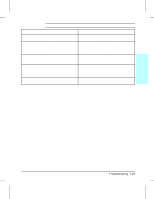
Table 7-7 White Stripes (parallel to path) Possible Cause Recommended Action 1. Toner cartridge is nearly empty. This can cause uneven toner distribution. Remove the toner cartridge and shake it gently. The cartridge will soon require replacement. 2. Toner cartridge has been exposed to too much Store the toner cartridge in a darkened light. environment for several days. This may restore the photosensitive potential. 3. Foreign objects in beam path. Any foreign objects will block the light from developing an image on the Photosensitive drum. Remove the toner cartridge and check for damage. Replace the toner cartridge if it is damaged. Remove the Printer Cover and inspect the path from the Laser/Scanner to the toner cartridge drum, looking for foreign objects in the beam path. Table 7-8 Black Lines (perpendicular to path) Possible Cause Recommended Action 1. Toner cartridge is damaged. Inspect the toner cartridge for a scratched photosensitive drum or toner leaking through worn seals. Replace as necessary. 2. Fusing Assembly is contaminated or damaged. Inspect the Fusing Assembly for toner build-up or scratches on the fuser rollers. Try cleaning with alcohol. Replace the Fusing Assembly if damaged. 3. Static Eliminator Strip teeth are contaminated Remove and inspect (see Chapter 6 for removal or defective. procedure). Clean using compressed air. Replace if damaged. 7-24 Troubleshooting
-
 1
1 -
2
-
3
-
4
-
5
-
6
-
7
-
8
-
9
-
10
-
11
-
12
-
13
-
14
-
15
-
16
-
17
-
18
-
19
-
20
-
21
-
22
-
23
-
24
-
25
-
26
-
27
-
28
-
29
-
30
-
31
-
32
-
33
-
34
-
35
-
36
-
37
-
38
-
39
-
40
-
41
-
42
-
43
-
44
-
45
-
46
-
47
-
48
-
49
-
50
-
51
-
52
-
53
-
54
-
55
-
56
-
57
-
58
-
59
-
60
-
61
-
62
-
63
-
64
-
65
-
66
-
67
-
68
-
69
-
70
-
71
-
72
-
73
-
74
-
75
-
76
-
77
-
78
-
79
-
80
-
81
-
82
-
83
-
84
-
85
-
86
-
87
-
88
-
89
-
90
-
91
-
92
-
93
-
94
-
95
-
96
-
97
-
98
-
99
-
100
-
101
-
102
-
103
-
104
-
105
-
106
-
107
-
108
-
109
-
110
-
111
-
112
-
113
-
114
-
115
-
116
-
117
-
118
-
119
-
120
-
121
-
122
-
123
-
124
-
125
-
126
-
127
-
128
-
129
-
130
-
131
-
132
-
133
-
134
-
135
-
136
-
137
-
138
-
139
-
140
-
141
-
142
-
143
-
144
-
145
-
146
-
147
-
148
-
149
-
150
-
151
-
152
-
153
-
154
-
 155
155 -
 156
156 -
 157
157 -
 158
158 -
 159
159 -
 160
160 -
 161
161 -
 162
162 -
 163
163 -
 164
164 -
 165
165 -
166
-
167
-
168
-
169
-
170
-
171
-
172
-
173
-
174
-
175
-
176
-
177
-
178
-
179
-
180
-
181
-
182
-
183
-
184
-
185
-
186
-
187
-
188
-
189
-
190
-
191
-
192
-
193
-
194
-
195
-
196
-
197
-
198
-
199
-
200
-
201
-
202
-
203
-
204
-
205
-
206
-
207
-
208
-
209
-
210
-
211
-
212
-
213
-
214
-
215
-
216
-
217
-
218
-
219
-
220
-
221
-
222
-
223
-
224
-
225
-
226
-
227
-
228
-
229
-
230
-
231
-
232
-
233
-
234
-
235
-
236
-
237
-
238
-
239
-
240
-
241
-
242
-
243
-
244
-
245
-
246
-
247
-
248
 |
 |
