HP LaserJet 4v/mv Service Manual - Page 166
LaserJet Printer Family Paper Specifications, Guide, HP LaserJet Printer, Family Paper
 |
View all HP LaserJet 4v/mv manuals
Add to My Manuals
Save this manual to your list of manuals |
Page 166 highlights
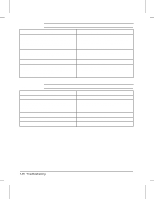
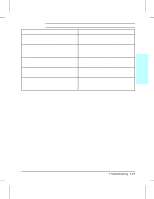
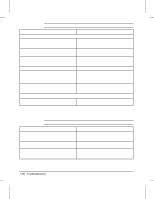
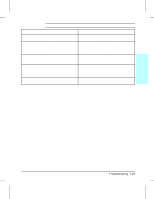
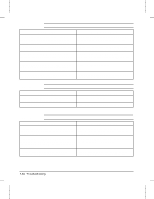
Table 7-17 Smeared Print Possible Cause Recommended Action 1. Bad media. The moisture content, conductivity, or Try a different paper lot or other media (see HP surface finish of the media being printed may not LaserJet Printer Family Paper Specifications work correctly with the electrophotographic process. Guide). 2. Dirty Fusing Rollers. Toner build-up can cause Remove and inspect the Fusing Assembly for the print on a page to smear. excessive toner build-up. Clean using alcohol. 3. The Static Eliminator Strip is dirty or is not grounded, allowing a static charge to remain on the page. Clean or replace the Anti-Static Brush. Use compressed air to clean (see "Anti -Static Brush" in Chapter 6). 4. Fusing Assembly is defective. The print will Replace the Fusing Assembly. smear if the Fusing Assembly is not heated sufficiently to bond the toner image to the paper. 5. DC Controller is defective. The DC Controller regulates fusing roller temperature. If a new Fusing Assembly does not resolve the problem, replace the DC Controller PCA. Table 7-18 Compressed Print Possible Cause 1. Toner cartridge bushings are too tight. This may occur on refilled toner cartridges. 2. Broken or worn gear. Recommended Action Replace the toner cartridge. Inspect and replace the worn gear or assembly. Table 7-19 Image Skew Possible Cause Recommended Action 1. Paper is loaded incorrectly. If the paper is not Remove paper from the tray and install paper installed flush into the paper cassette, a skewing correctly. Position the paper guide correctly for problem will result. the paper size being used. 2. Bad Paper Lot. Paper that is manufactured Try a different paper lot (see HP LaserJet Printer poorly or inconsistently, or that has too smooth or Family Paper Specifications Guide). too rough a surface texture can cause an image skew problem. 3. Worn Pickup and/or Registration Rollers. Paper is not being picked-up consistently. Inspect all paper path rollers, looking for wear, cracks, or glazing. Replace the worn rollers. 7-30 Troubleshooting
-
 1
1 -
2
-
3
-
4
-
5
-
6
-
7
-
8
-
9
-
10
-
11
-
12
-
13
-
14
-
15
-
16
-
17
-
18
-
19
-
20
-
21
-
22
-
23
-
24
-
25
-
26
-
27
-
28
-
29
-
30
-
31
-
32
-
33
-
34
-
35
-
36
-
37
-
38
-
39
-
40
-
41
-
42
-
43
-
44
-
45
-
46
-
47
-
48
-
49
-
50
-
51
-
52
-
53
-
54
-
55
-
56
-
57
-
58
-
59
-
60
-
61
-
62
-
63
-
64
-
65
-
66
-
67
-
68
-
69
-
70
-
71
-
72
-
73
-
74
-
75
-
76
-
77
-
78
-
79
-
80
-
81
-
82
-
83
-
84
-
85
-
86
-
87
-
88
-
89
-
90
-
91
-
92
-
93
-
94
-
95
-
96
-
97
-
98
-
99
-
100
-
101
-
102
-
103
-
104
-
105
-
106
-
107
-
108
-
109
-
110
-
111
-
112
-
113
-
114
-
115
-
116
-
117
-
118
-
119
-
120
-
121
-
122
-
123
-
124
-
125
-
126
-
127
-
128
-
129
-
130
-
131
-
132
-
133
-
134
-
135
-
136
-
137
-
138
-
139
-
140
-
141
-
142
-
143
-
144
-
145
-
146
-
147
-
148
-
149
-
150
-
151
-
152
-
153
-
154
-
155
-
156
-
157
-
158
-
159
-
160
-
 161
161 -
 162
162 -
 163
163 -
 164
164 -
 165
165 -
 166
166 -
 167
167 -
 168
168 -
 169
169 -
 170
170 -
 171
171 -
172
-
173
-
174
-
175
-
176
-
177
-
178
-
179
-
180
-
181
-
182
-
183
-
184
-
185
-
186
-
187
-
188
-
189
-
190
-
191
-
192
-
193
-
194
-
195
-
196
-
197
-
198
-
199
-
200
-
201
-
202
-
203
-
204
-
205
-
206
-
207
-
208
-
209
-
210
-
211
-
212
-
213
-
214
-
215
-
216
-
217
-
218
-
219
-
220
-
221
-
222
-
223
-
224
-
225
-
226
-
227
-
228
-
229
-
230
-
231
-
232
-
233
-
234
-
235
-
236
-
237
-
238
-
239
-
240
-
241
-
242
-
243
-
244
-
245
-
246
-
247
-
248
 |
 |
