HP LaserJet 4v/mv Service Manual - Page 152
Image Formation Troubleshooting
 |
View all HP LaserJet 4v/mv manuals
Add to My Manuals
Save this manual to your list of manuals |
Page 152 highlights
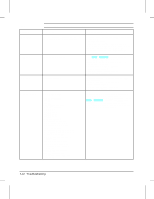
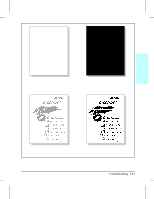
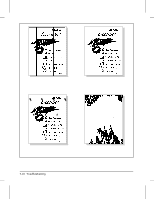
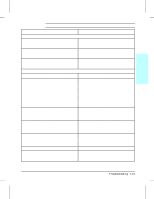
Image Formation Troubleshooting Check the Toner Cartridge Image formation defects are many times the result of toner cartridge problems. If there is any doubt, always replace the toner cartridge before troubleshooting image defects. Use the following check list to ensure that the toner cartridge is still operable. • Inspect the toner cartridge for remaining toner. • Check the expiration date of the toner cartridge (stamped on the cartridge box). • Check the toner cartridge to see if it has been disassembled or refilled. • Ensure that the toner cartridge is seated properly in the cavity. • Inspect the cartridge for leaking toner through worn seals. (If the drum has been manually rotated it may have caused internal damage and toner spills may result). • Check the surface of the photosensitive drum in the cartridge to see if it has been damaged or scratched. Touching the drum will contaminate the photosensitive surface and may cause spotting and defects during printing. • White areas on the page may indicate that the drum has been exposed to light for too long. If white areas appear, stop the printer and wait a few minutes. This process should eliminate most defective images. If not, the toner cartridge may be placed in a dark environment for several days, which may restore some life to the drum. Faulty Image Examples This section illustrates some image defects and their possible causes. Since there are many variables in the printing process, it is possible to encounter image defects that are not illustrated in the following illustrations. If you find a defect that is not illustrated, record the probable cause along with the printing environmental conditions and save a copy of the defect for future reference. Each example is followed by a table that lists in order the probable causes of the image defect. 7-16 Troubleshooting
-
 1
1 -
2
-
3
-
4
-
5
-
6
-
7
-
8
-
9
-
10
-
11
-
12
-
13
-
14
-
15
-
16
-
17
-
18
-
19
-
20
-
21
-
22
-
23
-
24
-
25
-
26
-
27
-
28
-
29
-
30
-
31
-
32
-
33
-
34
-
35
-
36
-
37
-
38
-
39
-
40
-
41
-
42
-
43
-
44
-
45
-
46
-
47
-
48
-
49
-
50
-
51
-
52
-
53
-
54
-
55
-
56
-
57
-
58
-
59
-
60
-
61
-
62
-
63
-
64
-
65
-
66
-
67
-
68
-
69
-
70
-
71
-
72
-
73
-
74
-
75
-
76
-
77
-
78
-
79
-
80
-
81
-
82
-
83
-
84
-
85
-
86
-
87
-
88
-
89
-
90
-
91
-
92
-
93
-
94
-
95
-
96
-
97
-
98
-
99
-
100
-
101
-
102
-
103
-
104
-
105
-
106
-
107
-
108
-
109
-
110
-
111
-
112
-
113
-
114
-
115
-
116
-
117
-
118
-
119
-
120
-
121
-
122
-
123
-
124
-
125
-
126
-
127
-
128
-
129
-
130
-
131
-
132
-
133
-
134
-
135
-
136
-
137
-
138
-
139
-
140
-
141
-
142
-
143
-
144
-
145
-
146
-
 147
147 -
 148
148 -
 149
149 -
 150
150 -
 151
151 -
 152
152 -
 153
153 -
 154
154 -
 155
155 -
 156
156 -
 157
157 -
158
-
159
-
160
-
161
-
162
-
163
-
164
-
165
-
166
-
167
-
168
-
169
-
170
-
171
-
172
-
173
-
174
-
175
-
176
-
177
-
178
-
179
-
180
-
181
-
182
-
183
-
184
-
185
-
186
-
187
-
188
-
189
-
190
-
191
-
192
-
193
-
194
-
195
-
196
-
197
-
198
-
199
-
200
-
201
-
202
-
203
-
204
-
205
-
206
-
207
-
208
-
209
-
210
-
211
-
212
-
213
-
214
-
215
-
216
-
217
-
218
-
219
-
220
-
221
-
222
-
223
-
224
-
225
-
226
-
227
-
228
-
229
-
230
-
231
-
232
-
233
-
234
-
235
-
236
-
237
-
238
-
239
-
240
-
241
-
242
-
243
-
244
-
245
-
246
-
247
-
248
 |
 |
