HP LaserJet 4v/mv Service Manual - Page 159
HP LaserJet Printer, Family Paper Specifications Guide - specs
 |
View all HP LaserJet 4v/mv manuals
Add to My Manuals
Save this manual to your list of manuals |
Page 159 highlights
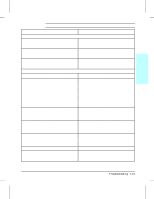
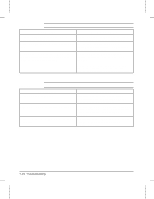
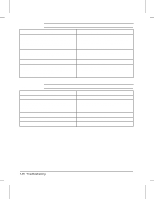
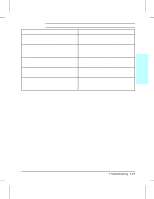
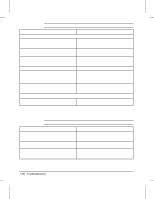
7 Troubleshooting Table 7-6 Faded Print Possible Cause Recommended Action 1. Toner supply is low. Shake the cartridge gently to redistribute the toner, or replace the cartridge. 2. Print Density is set incorrectly. Change to a darker setting and retry printing. 3. EconoMode is on. EconoMode saves toner by Turn EconoMode off. reducing the dot density. This may appear to be a print quality problem in some cases. 4. Paper does not meet specs. The moisture content, conductivity, or surface finish may not work correctly with the electrophotographic process. Try a different paper lot (see HP LaserJet Printer Family Paper Specifications Guide). 5. Transfer Roller is defective or incorrectly Inspect the Transfer Roller for proper installation installed. If the transfer roller loses conductivity, it and contact. If the Transfer Roller is damaged, cannot effectively pull toner from the drum to the replace it. paper. 6. Laser/Scanner door is not opening properly. 1. Remove and re-seat the toner cartridge. 2. Check the Laser/Scanner shutter door for proper operation. If defective, replace the Laser/Scanner Assembly. 7. High voltage contact springs are dirty or defective. The high voltage contacts are mounted on the High Voltage Power Supply PCA and protrude into the toner cartridge cavity. Check the contacts for functionality. If dirty, clean using alcohol; if damaged, replace the High Voltage Power Supply PCA. 8. High Voltage Power Supply PCA is defective. Replace the High Voltage Power Supply PCA. 9. DC Controller PCA is defective. The DC Replace the DC Controller PCA. Controller supplies the proper voltage to the High Voltage Power Supply PCA. Troubleshooting 7-23
-
 1
1 -
2
-
3
-
4
-
5
-
6
-
7
-
8
-
9
-
10
-
11
-
12
-
13
-
14
-
15
-
16
-
17
-
18
-
19
-
20
-
21
-
22
-
23
-
24
-
25
-
26
-
27
-
28
-
29
-
30
-
31
-
32
-
33
-
34
-
35
-
36
-
37
-
38
-
39
-
40
-
41
-
42
-
43
-
44
-
45
-
46
-
47
-
48
-
49
-
50
-
51
-
52
-
53
-
54
-
55
-
56
-
57
-
58
-
59
-
60
-
61
-
62
-
63
-
64
-
65
-
66
-
67
-
68
-
69
-
70
-
71
-
72
-
73
-
74
-
75
-
76
-
77
-
78
-
79
-
80
-
81
-
82
-
83
-
84
-
85
-
86
-
87
-
88
-
89
-
90
-
91
-
92
-
93
-
94
-
95
-
96
-
97
-
98
-
99
-
100
-
101
-
102
-
103
-
104
-
105
-
106
-
107
-
108
-
109
-
110
-
111
-
112
-
113
-
114
-
115
-
116
-
117
-
118
-
119
-
120
-
121
-
122
-
123
-
124
-
125
-
126
-
127
-
128
-
129
-
130
-
131
-
132
-
133
-
134
-
135
-
136
-
137
-
138
-
139
-
140
-
141
-
142
-
143
-
144
-
145
-
146
-
147
-
148
-
149
-
150
-
151
-
152
-
153
-
 154
154 -
 155
155 -
 156
156 -
 157
157 -
 158
158 -
 159
159 -
 160
160 -
 161
161 -
 162
162 -
 163
163 -
 164
164 -
165
-
166
-
167
-
168
-
169
-
170
-
171
-
172
-
173
-
174
-
175
-
176
-
177
-
178
-
179
-
180
-
181
-
182
-
183
-
184
-
185
-
186
-
187
-
188
-
189
-
190
-
191
-
192
-
193
-
194
-
195
-
196
-
197
-
198
-
199
-
200
-
201
-
202
-
203
-
204
-
205
-
206
-
207
-
208
-
209
-
210
-
211
-
212
-
213
-
214
-
215
-
216
-
217
-
218
-
219
-
220
-
221
-
222
-
223
-
224
-
225
-
226
-
227
-
228
-
229
-
230
-
231
-
232
-
233
-
234
-
235
-
236
-
237
-
238
-
239
-
240
-
241
-
242
-
243
-
244
-
245
-
246
-
247
-
248
 |
 |
