HP PSC 2500 HP PSC 2500 series All-in-One - (English) Reference Guide - Page 167
Enter a Network, Wireless Settings, wireless Network Name SSID, Communication Mode
 |
View all HP PSC 2500 manuals
Add to My Manuals
Save this manual to your list of manuals |
Page 167 highlights
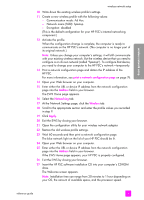
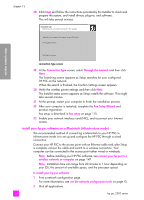
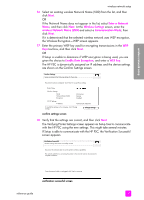
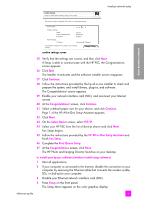
wireless network setup wireless network setup 16 Select an existing wireless Network Name (SSID) from the list, and then click Next. OR If the Network Name does not appear in the list, select Enter a Network Name, and then click Next. At the Wireless Settings screen, enter the wireless Network Name (SSID) and select a Communication Mode; then click Next. If it is determined that the selected wireless network uses WEP encryption, the Wireless Encryption-WEP screen appears. 17 Enter the primary WEP key used for encrypting transmissions in the WEP Keys text box, and then click Next. OR If Setup is unable to determine if WEP encryption is being used, you are given the choice to Enable Data Encryption, and enter a WEP key. The HP PSC is dynamically assigned an IP address and the device settings are shown on the Confirm Settings screen. Confirm Settings Setup recommends the following settings for the printer. The printer has been configured. Click 'Next' to accept these settings. Printer Name: Wireless Settings: Mode: Network Name (SSID): Encryption: Infrastructure hpsetup Disabled TCP/IP Settings: IP Address: Automatically Obtained To modify the settings on this computer, click 'Change Settings.' Change Settings confirm settings screen 18 Verify that the settings are correct, and then click Next. The Verifying Printer Settings screen appears as Setup tries to communicate with the HP PSC using the new settings. This might take several minutes. If Setup is able to communicate with the HP PSC, the Verification Successful screen appears. Verification Successful Wireless settings have been successfully verified. Disconnect the network cable to use the printer's wireless capabilities. The network cable that is connecting the printer to the network must be disconnected to complete installation. Once the network cable is unplugged, click 'Next' to continue. verification successful screen reference guide 157
-
 1
1 -
2
-
3
-
4
-
5
-
6
-
7
-
8
-
9
-
10
-
11
-
12
-
13
-
14
-
15
-
16
-
17
-
18
-
19
-
20
-
21
-
22
-
23
-
24
-
25
-
26
-
27
-
28
-
29
-
30
-
31
-
32
-
33
-
34
-
35
-
36
-
37
-
38
-
39
-
40
-
41
-
42
-
43
-
44
-
45
-
46
-
47
-
48
-
49
-
50
-
51
-
52
-
53
-
54
-
55
-
56
-
57
-
58
-
59
-
60
-
61
-
62
-
63
-
64
-
65
-
66
-
67
-
68
-
69
-
70
-
71
-
72
-
73
-
74
-
75
-
76
-
77
-
78
-
79
-
80
-
81
-
82
-
83
-
84
-
85
-
86
-
87
-
88
-
89
-
90
-
91
-
92
-
93
-
94
-
95
-
96
-
97
-
98
-
99
-
100
-
101
-
102
-
103
-
104
-
105
-
106
-
107
-
108
-
109
-
110
-
111
-
112
-
113
-
114
-
115
-
116
-
117
-
118
-
119
-
120
-
121
-
122
-
123
-
124
-
125
-
126
-
127
-
128
-
129
-
130
-
131
-
132
-
133
-
134
-
135
-
136
-
137
-
138
-
139
-
140
-
141
-
142
-
143
-
144
-
145
-
146
-
147
-
148
-
149
-
150
-
151
-
152
-
153
-
154
-
155
-
156
-
157
-
158
-
159
-
160
-
161
-
 162
162 -
 163
163 -
 164
164 -
 165
165 -
 166
166 -
 167
167 -
 168
168 -
 169
169 -
 170
170 -
 171
171 -
 172
172 -
173
-
174
-
175
-
176
-
177
-
178
-
179
-
180
-
181
-
182
-
183
-
184
-
185
-
186
-
187
-
188
-
189
-
190
-
191
-
192
-
193
-
194
-
195
-
196
-
197
-
198
-
199
-
200
-
201
-
202
-
203
-
204
-
205
-
206
-
207
-
208
-
209
-
210
-
211
-
212
-
213
-
214
-
215
-
216
-
217
-
218
-
219
-
220
-
221
-
222
-
223
-
224
-
225
-
226
-
227
-
228
-
229
-
230
-
231
-
232
-
233
-
234
-
235
-
236
-
237
-
238
-
239
-
240
-
241
-
242
-
243
-
244
-
245
-
246
 |
 |
