HP PSC 2500 HP PSC 2500 series All-in-One - (English) Reference Guide - Page 68
enable fax confirmation, send a basic fax
 |
View all HP PSC 2500 manuals
Add to My Manuals
Save this manual to your list of manuals |
Page 68 highlights
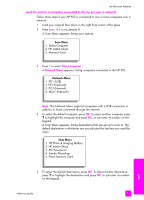
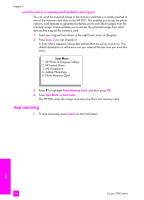
fax chapter 6 enable fax confirmation By default, your HP PSC prints a report only if there is a problem with sending or receiving a fax. A confirmation message indicating whether an item was successfully sent appears briefly on the color graphics display after each transaction. If you need printed confirmation that your faxes are successfully sent, follow these instructions before sending any faxes. 1 Press Setup. 2 Press 1, then press 5. This selects Print Report and then selects Fax Report Setup. Print Report 1. Last Transaction 2. Fax Log 3. Speed Dial List 4. Self-Test Report 5. Fax Report Setup Fax Report Setup 1. Every Error 2. Send Error 3. Receive Error 4. Every Fax 5. Send Only 6. Off 3 Press 5, then press OK. This selects Send Only. Note: You will still receive printed reports for any errors that occur during faxing if you select the Send Only report. For more information on printing reports, see print reports on page 64. send a basic fax This section describes how to send a basic black-and-white fax. If you are interested in sending a multiple-page fax, see send a two-page blackand-white fax on page 59. You can also send a color or photo fax. For more information, see send a color original or photo fax on page 59. 1 Load the first page face down on the right front corner of the glass. For more information, see load an original on page 11. 2 Press Fax. The Enter Fax Number screen appears. 3 Enter the fax number. 4 Press Start Black. Pressing Start Black scans the first page to memory. After the page has been scanned, the front panel prompts you to scan another page. 5 Press 1 (Yes) to fax another page or 2 (No) if you do not have another page to fax. 58 hp psc 2500 series
-
 1
1 -
2
-
3
-
4
-
5
-
6
-
7
-
8
-
9
-
10
-
11
-
12
-
13
-
14
-
15
-
16
-
17
-
18
-
19
-
20
-
21
-
22
-
23
-
24
-
25
-
26
-
27
-
28
-
29
-
30
-
31
-
32
-
33
-
34
-
35
-
36
-
37
-
38
-
39
-
40
-
41
-
42
-
43
-
44
-
45
-
46
-
47
-
48
-
49
-
50
-
51
-
52
-
53
-
54
-
55
-
56
-
57
-
58
-
59
-
60
-
61
-
62
-
 63
63 -
 64
64 -
 65
65 -
 66
66 -
 67
67 -
 68
68 -
 69
69 -
 70
70 -
 71
71 -
 72
72 -
 73
73 -
74
-
75
-
76
-
77
-
78
-
79
-
80
-
81
-
82
-
83
-
84
-
85
-
86
-
87
-
88
-
89
-
90
-
91
-
92
-
93
-
94
-
95
-
96
-
97
-
98
-
99
-
100
-
101
-
102
-
103
-
104
-
105
-
106
-
107
-
108
-
109
-
110
-
111
-
112
-
113
-
114
-
115
-
116
-
117
-
118
-
119
-
120
-
121
-
122
-
123
-
124
-
125
-
126
-
127
-
128
-
129
-
130
-
131
-
132
-
133
-
134
-
135
-
136
-
137
-
138
-
139
-
140
-
141
-
142
-
143
-
144
-
145
-
146
-
147
-
148
-
149
-
150
-
151
-
152
-
153
-
154
-
155
-
156
-
157
-
158
-
159
-
160
-
161
-
162
-
163
-
164
-
165
-
166
-
167
-
168
-
169
-
170
-
171
-
172
-
173
-
174
-
175
-
176
-
177
-
178
-
179
-
180
-
181
-
182
-
183
-
184
-
185
-
186
-
187
-
188
-
189
-
190
-
191
-
192
-
193
-
194
-
195
-
196
-
197
-
198
-
199
-
200
-
201
-
202
-
203
-
204
-
205
-
206
-
207
-
208
-
209
-
210
-
211
-
212
-
213
-
214
-
215
-
216
-
217
-
218
-
219
-
220
-
221
-
222
-
223
-
224
-
225
-
226
-
227
-
228
-
229
-
230
-
231
-
232
-
233
-
234
-
235
-
236
-
237
-
238
-
239
-
240
-
241
-
242
-
243
-
244
-
245
-
246
 |
 |
