HP PSC 2500 HP PSC 2500 series All-in-One - (English) Reference Guide - Page 59
prepare a color t-shirt transfer, Copy Menu, Reduce/Enlarge, Poster
 |
View all HP PSC 2500 manuals
Add to My Manuals
Save this manual to your list of manuals |
Page 59 highlights
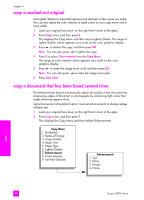
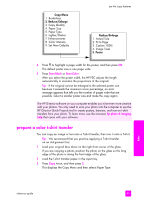
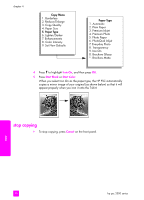
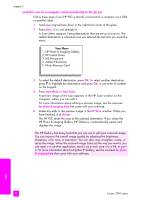
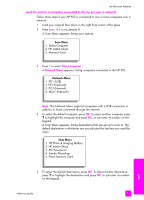
Copy Menu 1. Borderless 2. Reduce/Enlarge 3. Copy Quality 4. Paper Size 5. Paper Type 6. Lighter/Darker 7. Enhancements 8. Color Intensity 9. Set New Defaults use the copy features Reduce/Enlarge 1. Actual Size 2. Fit to Page 3. Custom 100% 4. Image Sizes 5. Poster 4 Press to highlight a page width for the poster, and then press OK. The default poster size is one page wide. 5 Press Start Black or Start Color. After you select the poster width, the HP PSC adjusts the length automatically to maintain the proportions of the original. Tip: If the original cannot be enlarged to the selected poster size because it exceeds the maximum zoom percentage, an error message appears that tells you the number of pages wide that are possible. Select a smaller poster size and make the copy again. The HP Director software on your computer enables you to be even more creative with your photos. You only need to scan your photo into the computer to use the HP Director Quick Projects tool to create posters, banners, and iron-on t-shirt transfers from your photo. To learn more, see the onscreen hp photo & imaging help that came with your software. prepare a color t-shirt transfer You can copy an image or text onto a T-shirt transfer, then iron it onto a T-shirt. Tip: We recommend that you practice applying a T-shirt transfer on an old garment first. 1 Load your original face down on the right front corner of the glass. If you are copying a photo, position the photo on the glass so the long edge of the photo is along the front edge of the glass. 2 Load the T-shirt transfer paper in the input tray. 3 Press Copy twice, and then press 5. This displays the Copy Menu and then selects Paper Type. copy reference guide 49
-
 1
1 -
2
-
3
-
4
-
5
-
6
-
7
-
8
-
9
-
10
-
11
-
12
-
13
-
14
-
15
-
16
-
17
-
18
-
19
-
20
-
21
-
22
-
23
-
24
-
25
-
26
-
27
-
28
-
29
-
30
-
31
-
32
-
33
-
34
-
35
-
36
-
37
-
38
-
39
-
40
-
41
-
42
-
43
-
44
-
45
-
46
-
47
-
48
-
49
-
50
-
51
-
52
-
53
-
 54
54 -
 55
55 -
 56
56 -
 57
57 -
 58
58 -
 59
59 -
 60
60 -
 61
61 -
 62
62 -
 63
63 -
 64
64 -
65
-
66
-
67
-
68
-
69
-
70
-
71
-
72
-
73
-
74
-
75
-
76
-
77
-
78
-
79
-
80
-
81
-
82
-
83
-
84
-
85
-
86
-
87
-
88
-
89
-
90
-
91
-
92
-
93
-
94
-
95
-
96
-
97
-
98
-
99
-
100
-
101
-
102
-
103
-
104
-
105
-
106
-
107
-
108
-
109
-
110
-
111
-
112
-
113
-
114
-
115
-
116
-
117
-
118
-
119
-
120
-
121
-
122
-
123
-
124
-
125
-
126
-
127
-
128
-
129
-
130
-
131
-
132
-
133
-
134
-
135
-
136
-
137
-
138
-
139
-
140
-
141
-
142
-
143
-
144
-
145
-
146
-
147
-
148
-
149
-
150
-
151
-
152
-
153
-
154
-
155
-
156
-
157
-
158
-
159
-
160
-
161
-
162
-
163
-
164
-
165
-
166
-
167
-
168
-
169
-
170
-
171
-
172
-
173
-
174
-
175
-
176
-
177
-
178
-
179
-
180
-
181
-
182
-
183
-
184
-
185
-
186
-
187
-
188
-
189
-
190
-
191
-
192
-
193
-
194
-
195
-
196
-
197
-
198
-
199
-
200
-
201
-
202
-
203
-
204
-
205
-
206
-
207
-
208
-
209
-
210
-
211
-
212
-
213
-
214
-
215
-
216
-
217
-
218
-
219
-
220
-
221
-
222
-
223
-
224
-
225
-
226
-
227
-
228
-
229
-
230
-
231
-
232
-
233
-
234
-
235
-
236
-
237
-
238
-
239
-
240
-
241
-
242
-
243
-
244
-
245
-
246
 |
 |
