HP PSC 2500 HP PSC 2500 series All-in-One - (English) Reference Guide - Page 65
HP Instant Share, Mom E-mail
 |
View all HP PSC 2500 manuals
Add to My Manuals
Save this manual to your list of manuals |
Page 65 highlights
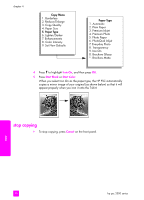
use the scan features to save your scan to an hp instant share destination 1 Load your original face down on the right front corner of the glass. 2 Press Scan, if it is not already lit. A Scan Menu appears, listing destinations that are set up to scan to. If your HP PSC is connected to computers over a network, the first option in the menu is Select Computer, as shown below. Scan Menu 1. Select Computer 2. HP Instant Share 3. Memory Card Note: If the first option in the Scan Menu is HP Photo & Imaging Gallery, your HP PSC is not set up on a network. You will be unable to share the scanned photo as described here. If your HP PSC is connected directly to a Windows PC, you will have to access HP Instant Share manually, through the HP Gallery. If the HP PSC is connected directly to a Macintosh, you can only share photos through e-mail. 3 Press 2 to select HP Instant Share. The Share Menu appears. It contains a list of the share destinations that you set up for the HP PSC. Note: The destinations in the Share Menu are listed by the Destination Name you gave them when you configured them online. In order to prevent mistakes, be sure to use names that help you easily identify where you will be sending the scan when you choose a specific destination, such as "Mom E-mail," "Family Album 2003," and so on, as shown below. Share Menu 1. Mom E-mail 2. Family Album 2003 3. Baby Pictures 4. HP Photo 4 Press to highlight the destination where you want to send the scan, and then press OK. 5 Press Start Black or Start Color. The HP PSC scans your photo, then sends it to the destination you selected. If the selected destination was an e-mail recipient (or group of e-mail recipients), HP Instant Share delivers an e-mail message containing a thumbnail preview of the image you scanned, with a link to the full-size image saved on the secure HP Instant Share server. scan reference guide 55
-
 1
1 -
2
-
3
-
4
-
5
-
6
-
7
-
8
-
9
-
10
-
11
-
12
-
13
-
14
-
15
-
16
-
17
-
18
-
19
-
20
-
21
-
22
-
23
-
24
-
25
-
26
-
27
-
28
-
29
-
30
-
31
-
32
-
33
-
34
-
35
-
36
-
37
-
38
-
39
-
40
-
41
-
42
-
43
-
44
-
45
-
46
-
47
-
48
-
49
-
50
-
51
-
52
-
53
-
54
-
55
-
56
-
57
-
58
-
59
-
 60
60 -
 61
61 -
 62
62 -
 63
63 -
 64
64 -
 65
65 -
 66
66 -
 67
67 -
 68
68 -
 69
69 -
 70
70 -
71
-
72
-
73
-
74
-
75
-
76
-
77
-
78
-
79
-
80
-
81
-
82
-
83
-
84
-
85
-
86
-
87
-
88
-
89
-
90
-
91
-
92
-
93
-
94
-
95
-
96
-
97
-
98
-
99
-
100
-
101
-
102
-
103
-
104
-
105
-
106
-
107
-
108
-
109
-
110
-
111
-
112
-
113
-
114
-
115
-
116
-
117
-
118
-
119
-
120
-
121
-
122
-
123
-
124
-
125
-
126
-
127
-
128
-
129
-
130
-
131
-
132
-
133
-
134
-
135
-
136
-
137
-
138
-
139
-
140
-
141
-
142
-
143
-
144
-
145
-
146
-
147
-
148
-
149
-
150
-
151
-
152
-
153
-
154
-
155
-
156
-
157
-
158
-
159
-
160
-
161
-
162
-
163
-
164
-
165
-
166
-
167
-
168
-
169
-
170
-
171
-
172
-
173
-
174
-
175
-
176
-
177
-
178
-
179
-
180
-
181
-
182
-
183
-
184
-
185
-
186
-
187
-
188
-
189
-
190
-
191
-
192
-
193
-
194
-
195
-
196
-
197
-
198
-
199
-
200
-
201
-
202
-
203
-
204
-
205
-
206
-
207
-
208
-
209
-
210
-
211
-
212
-
213
-
214
-
215
-
216
-
217
-
218
-
219
-
220
-
221
-
222
-
223
-
224
-
225
-
226
-
227
-
228
-
229
-
230
-
231
-
232
-
233
-
234
-
235
-
236
-
237
-
238
-
239
-
240
-
241
-
242
-
243
-
244
-
245
-
246
 |
 |
