HP PSC 2500 HP PSC 2500 series All-in-One - (English) Reference Guide - Page 63
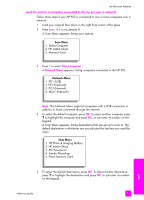
send the scan to a computer connected to the hp psc over a network, Select Computer, Network Menu
 |
View all HP PSC 2500 manuals
Add to My Manuals
Save this manual to your list of manuals |
Page 63 highlights
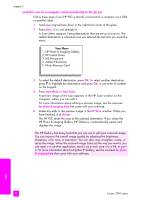
use the scan features send the scan to a computer connected to the hp psc over a network Follow these steps if your HP PSC is connected to one or more computers over a network. 1 Load your original face down in the right front corner of the glass. 2 Press Scan, if it is not already lit. A Scan Menu appears, listing your options. Scan Menu 1. Select Computer 2. HP Instant Share 3. Memory Card 3 Press 1 to select Select Computer. A Network Menu appears, listing computers connected to the HP PSC. Network Menu 1. PC1 (USB) 2. PC2 (Network) 3. PC3 (Network) 4. Mac1 (Network) Note: The Network Menu might list computers with a USB connection in addition to those connected through the network. 4 To select the default computer, press OK. To select another computer, press to highlight the computer and press OK, or just enter its number on the keypad. A Scan Menu appears, listing destinations that are set up to scan to. The default destination is whichever one you selected the last time you used this menu. Scan Menu 1. HP Photo & Imaging Gallery 2. HP Instant Share 3. MS Powerpoint 4. Adobe Photoshop 5. Photo Memory Card scan 5 To select the default destination, press OK. To select another destination, press to highlight the destination and press OK, or just enter its number on the keypad. reference guide 53
-
 1
1 -
2
-
3
-
4
-
5
-
6
-
7
-
8
-
9
-
10
-
11
-
12
-
13
-
14
-
15
-
16
-
17
-
18
-
19
-
20
-
21
-
22
-
23
-
24
-
25
-
26
-
27
-
28
-
29
-
30
-
31
-
32
-
33
-
34
-
35
-
36
-
37
-
38
-
39
-
40
-
41
-
42
-
43
-
44
-
45
-
46
-
47
-
48
-
49
-
50
-
51
-
52
-
53
-
54
-
55
-
56
-
57
-
 58
58 -
 59
59 -
 60
60 -
 61
61 -
 62
62 -
 63
63 -
 64
64 -
 65
65 -
 66
66 -
 67
67 -
 68
68 -
69
-
70
-
71
-
72
-
73
-
74
-
75
-
76
-
77
-
78
-
79
-
80
-
81
-
82
-
83
-
84
-
85
-
86
-
87
-
88
-
89
-
90
-
91
-
92
-
93
-
94
-
95
-
96
-
97
-
98
-
99
-
100
-
101
-
102
-
103
-
104
-
105
-
106
-
107
-
108
-
109
-
110
-
111
-
112
-
113
-
114
-
115
-
116
-
117
-
118
-
119
-
120
-
121
-
122
-
123
-
124
-
125
-
126
-
127
-
128
-
129
-
130
-
131
-
132
-
133
-
134
-
135
-
136
-
137
-
138
-
139
-
140
-
141
-
142
-
143
-
144
-
145
-
146
-
147
-
148
-
149
-
150
-
151
-
152
-
153
-
154
-
155
-
156
-
157
-
158
-
159
-
160
-
161
-
162
-
163
-
164
-
165
-
166
-
167
-
168
-
169
-
170
-
171
-
172
-
173
-
174
-
175
-
176
-
177
-
178
-
179
-
180
-
181
-
182
-
183
-
184
-
185
-
186
-
187
-
188
-
189
-
190
-
191
-
192
-
193
-
194
-
195
-
196
-
197
-
198
-
199
-
200
-
201
-
202
-
203
-
204
-
205
-
206
-
207
-
208
-
209
-
210
-
211
-
212
-
213
-
214
-
215
-
216
-
217
-
218
-
219
-
220
-
221
-
222
-
223
-
224
-
225
-
226
-
227
-
228
-
229
-
230
-
231
-
232
-
233
-
234
-
235
-
236
-
237
-
238
-
239
-
240
-
241
-
242
-
243
-
244
-
245
-
246
 |
 |
