HP Photosmart C4500 User Guide - Page 169
Scan errors, Memory is full, Scanner failure
 |
View all HP Photosmart C4500 manuals
Add to My Manuals
Save this manual to your list of manuals |
Page 169 highlights
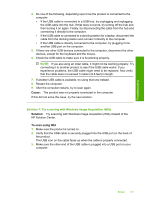
Troubleshooting Chapter 13 If prompted, choose your country/region, and then click Contact HP for information on calling for technical support. Cause: The revision number of the product firmware did not match the revision number of the software. Memory is full Solution: Try making fewer copies at a time. Cause: The document you were copying exceeded the memory of the product. Scanner failure Solution: Turn off the product and then turn it on again. Restart your computer and then try to scan again. If the problem persists, try plugging the power cord directly into a power outlet rather than a surge protector or power strip. If the problem continues, contact HP support. Go to www.hp.com/support. If prompted, choose your country/region, and then click Contact HP for information on calling for technical support. Cause: The product was busy or an unknown cause interrupted your scan. Scan errors Review this section if you receive an error such as one of the following: • An error occurred communicating with the scanning device. • The scanning device could not be initialized. • The scanning device could not be found. • An internal error has occurred. • The computer cannot communicate with the scanning device. NOTE: Before starting to troubleshoot, make a copy to verify that the hardware is functioning correctly. If you cannot make a copy, see "Troubleshooting" on page 99 for more troubleshooting information. Try each of the following solutions separately. After completing the steps for each solution, try to scan again. If the product still does not work, then go to the next solution. • Solution 1: Verify if the software is installed correctly • Solution 2: Refresh the Windows Device Manager • Solution 3: Verify if the Digital Imaging Monitor is running • Solution 4: Check the status of the product in the HP Solution Center • Solution 5: Check the power supply • Solution 6: Check the USB connection between the product and the computer • Solution 7: Try scanning with Windows Image Acquisition (WIA) • Solution 8: Disable the Lexbces service • Solution 9: Run the Scan Diagnostic Utility 166 Troubleshooting
-
 1
1 -
2
-
3
-
4
-
5
-
6
-
7
-
8
-
9
-
10
-
11
-
12
-
13
-
14
-
15
-
16
-
17
-
18
-
19
-
20
-
21
-
22
-
23
-
24
-
25
-
26
-
27
-
28
-
29
-
30
-
31
-
32
-
33
-
34
-
35
-
36
-
37
-
38
-
39
-
40
-
41
-
42
-
43
-
44
-
45
-
46
-
47
-
48
-
49
-
50
-
51
-
52
-
53
-
54
-
55
-
56
-
57
-
58
-
59
-
60
-
61
-
62
-
63
-
64
-
65
-
66
-
67
-
68
-
69
-
70
-
71
-
72
-
73
-
74
-
75
-
76
-
77
-
78
-
79
-
80
-
81
-
82
-
83
-
84
-
85
-
86
-
87
-
88
-
89
-
90
-
91
-
92
-
93
-
94
-
95
-
96
-
97
-
98
-
99
-
100
-
101
-
102
-
103
-
104
-
105
-
106
-
107
-
108
-
109
-
110
-
111
-
112
-
113
-
114
-
115
-
116
-
117
-
118
-
119
-
120
-
121
-
122
-
123
-
124
-
125
-
126
-
127
-
128
-
129
-
130
-
131
-
132
-
133
-
134
-
135
-
136
-
137
-
138
-
139
-
140
-
141
-
142
-
143
-
144
-
145
-
146
-
147
-
148
-
149
-
150
-
151
-
152
-
153
-
154
-
155
-
156
-
157
-
158
-
159
-
160
-
161
-
162
-
163
-
 164
164 -
 165
165 -
 166
166 -
 167
167 -
 168
168 -
 169
169 -
 170
170 -
 171
171 -
 172
172 -
 173
173 -
 174
174 -
175
-
176
-
177
-
178
-
179
-
180
-
181
-
182
-
183
-
184
-
185
-
186
-
187
-
188
-
189
-
190
-
191
-
192
-
193
-
194
-
195
-
196
-
197
-
198
-
199
-
200
-
201
-
202
-
203
-
204
-
205
-
206
-
207
-
208
-
209
-
210
-
211
-
212
-
213
-
214
-
215
-
216
-
217
-
218
-
219
-
220
-
221
-
222
-
223
-
224
-
225
-
226
-
227
-
228
-
229
-
230
-
231
-
232
-
233
-
234
-
235
-
236
-
237
-
238
-
239
-
240
-
241
-
242
-
243
-
244
-
245
-
246
-
247
-
248
-
249
-
250
-
251
-
252
-
253
-
254
-
255
-
256
-
257
-
258
-
259
-
260
-
261
 |
 |
