HP Photosmart C4500 User Guide - Page 219
Carriage stall, carriage area. Gently remove any paper that is stuck between the rollers, and then
 |
View all HP Photosmart C4500 manuals
Add to My Manuals
Save this manual to your list of manuals |
Page 219 highlights
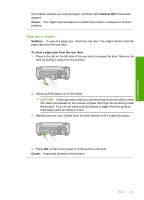
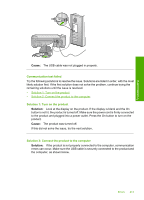
Troubleshooting Chapter 13 Carriage stall Try the following solutions to resolve the issue. Solutions are listed in order, with the most likely solution first. If the first solution does not solve the problem, continue trying the remaining solutions until the issue is resolved. • Solution 1: Clear the paper jam from the rear door • Solution 2: Clear the paper jam from the front • Solution 3: Make sure the print carriage can move freely • Solution 4: Verify that the product is properly connected to a power source • Solution 5: Print a self-test report • Solution 6: Reset the product • Solution 7: Contact HP support for service Solution 1: Clear the paper jam from the rear door Solution: Clear the paper jam from the rear door. For more information, see: "Clear paper jams" on page 114 Cause: The product had a paper jam. If this did not solve the issue, try the next solution. Solution 2: Clear the paper jam from the front Solution: Turn off the product and open the print cartridge door to access the print carriage area. Gently remove any paper that is stuck between the rollers, and then turn on the product again. If this did not solve the issue, try the next solution. Cause: Paper was stuck in the front rollers. If this did not solve the issue, try the next solution. Solution 3: Make sure the print carriage can move freely Solution: Unplug the power cable if it is not already unplugged. Check to see if the print cartridge carriage will move freely from one side of the printer to the other. Do not try to force it to move if it is hung up on something. 216 Troubleshooting
-
 1
1 -
2
-
3
-
4
-
5
-
6
-
7
-
8
-
9
-
10
-
11
-
12
-
13
-
14
-
15
-
16
-
17
-
18
-
19
-
20
-
21
-
22
-
23
-
24
-
25
-
26
-
27
-
28
-
29
-
30
-
31
-
32
-
33
-
34
-
35
-
36
-
37
-
38
-
39
-
40
-
41
-
42
-
43
-
44
-
45
-
46
-
47
-
48
-
49
-
50
-
51
-
52
-
53
-
54
-
55
-
56
-
57
-
58
-
59
-
60
-
61
-
62
-
63
-
64
-
65
-
66
-
67
-
68
-
69
-
70
-
71
-
72
-
73
-
74
-
75
-
76
-
77
-
78
-
79
-
80
-
81
-
82
-
83
-
84
-
85
-
86
-
87
-
88
-
89
-
90
-
91
-
92
-
93
-
94
-
95
-
96
-
97
-
98
-
99
-
100
-
101
-
102
-
103
-
104
-
105
-
106
-
107
-
108
-
109
-
110
-
111
-
112
-
113
-
114
-
115
-
116
-
117
-
118
-
119
-
120
-
121
-
122
-
123
-
124
-
125
-
126
-
127
-
128
-
129
-
130
-
131
-
132
-
133
-
134
-
135
-
136
-
137
-
138
-
139
-
140
-
141
-
142
-
143
-
144
-
145
-
146
-
147
-
148
-
149
-
150
-
151
-
152
-
153
-
154
-
155
-
156
-
157
-
158
-
159
-
160
-
161
-
162
-
163
-
164
-
165
-
166
-
167
-
168
-
169
-
170
-
171
-
172
-
173
-
174
-
175
-
176
-
177
-
178
-
179
-
180
-
181
-
182
-
183
-
184
-
185
-
186
-
187
-
188
-
189
-
190
-
191
-
192
-
193
-
194
-
195
-
196
-
197
-
198
-
199
-
200
-
201
-
202
-
203
-
204
-
205
-
206
-
207
-
208
-
209
-
210
-
211
-
212
-
213
-
 214
214 -
 215
215 -
 216
216 -
 217
217 -
 218
218 -
 219
219 -
 220
220 -
 221
221 -
 222
222 -
 223
223 -
 224
224 -
225
-
226
-
227
-
228
-
229
-
230
-
231
-
232
-
233
-
234
-
235
-
236
-
237
-
238
-
239
-
240
-
241
-
242
-
243
-
244
-
245
-
246
-
247
-
248
-
249
-
250
-
251
-
252
-
253
-
254
-
255
-
256
-
257
-
258
-
259
-
260
-
261
 |
 |