HP Photosmart C4500 User Guide - Page 21
Change the HP All-in-One from a USB connection to a network connection, Manage your network settings - printer
 |
View all HP Photosmart C4500 manuals
Add to My Manuals
Save this manual to your list of manuals |
Page 21 highlights
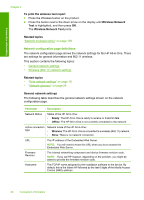
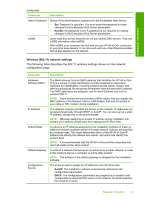
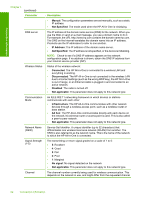
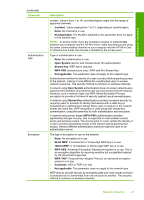
Connection information Chapter 4 5. On the Printer Found screen, verify that the printer description is correct. If more than one printer is found on the network, the Printers Found screen appears. Select the HP All-in-One you want to connect. 6. Follow the prompts to install the software. When you have finished installing the software, the HP All-in-One is ready for use. 7. If you disabled any virus detection software on your computer, make sure to enable it again. 8. To test your network connection, go to your computer and print a self-test report to the HP All-in-One. Related topics "Network troubleshooting" on page 109 Change the HP All-in-One from a USB connection to a network connection If you first install the HP All-in-One with a USB connection, you can later change to a wireless network connection. If you already understand how to connect to a network, you can use the general directions below. NOTE: For optimal performance and security in your wireless network, use an access point (such as a wireless router) to connect the HP All-in-One. To change a USB connection to an integrated wireless WLAN 802.11 connection 1. Unplug the USB connection from the back of the product. 2. Insert the product CD in the computer CD-ROM drive. 3. Follow the onscreen instructions for a wireless network installation. 4. When the installation is complete, open Printers and Faxes (or Printers) in the Control Panel and delete the printers for the USB installation. For more detailed instructions on connecting the HP All-in-One to a network, see: • "Set up the HP All-in-One on an integrated wireless (WLAN 802.11) network" on page 12 • "Connect to a wireless ad hoc network" on page 17 Manage your network settings You can manage network settings for the HP All-in-One through the HP All-in-One control panel. This section contains the following topics: • Change basic network settings from the control panel • Network configuration page definitions Change basic network settings from the control panel The HP All-in-One control panel enables you to perform a variety of network management tasks. This includes printing the network settings, restoring the network defaults, turning the wireless radio on and off, and printing a wireless network test. This section contains the following topics: 18 Connection information
-
 1
1 -
2
-
3
-
4
-
5
-
6
-
7
-
8
-
9
-
10
-
11
-
12
-
13
-
14
-
15
-
 16
16 -
 17
17 -
 18
18 -
 19
19 -
 20
20 -
 21
21 -
 22
22 -
 23
23 -
 24
24 -
 25
25 -
 26
26 -
27
-
28
-
29
-
30
-
31
-
32
-
33
-
34
-
35
-
36
-
37
-
38
-
39
-
40
-
41
-
42
-
43
-
44
-
45
-
46
-
47
-
48
-
49
-
50
-
51
-
52
-
53
-
54
-
55
-
56
-
57
-
58
-
59
-
60
-
61
-
62
-
63
-
64
-
65
-
66
-
67
-
68
-
69
-
70
-
71
-
72
-
73
-
74
-
75
-
76
-
77
-
78
-
79
-
80
-
81
-
82
-
83
-
84
-
85
-
86
-
87
-
88
-
89
-
90
-
91
-
92
-
93
-
94
-
95
-
96
-
97
-
98
-
99
-
100
-
101
-
102
-
103
-
104
-
105
-
106
-
107
-
108
-
109
-
110
-
111
-
112
-
113
-
114
-
115
-
116
-
117
-
118
-
119
-
120
-
121
-
122
-
123
-
124
-
125
-
126
-
127
-
128
-
129
-
130
-
131
-
132
-
133
-
134
-
135
-
136
-
137
-
138
-
139
-
140
-
141
-
142
-
143
-
144
-
145
-
146
-
147
-
148
-
149
-
150
-
151
-
152
-
153
-
154
-
155
-
156
-
157
-
158
-
159
-
160
-
161
-
162
-
163
-
164
-
165
-
166
-
167
-
168
-
169
-
170
-
171
-
172
-
173
-
174
-
175
-
176
-
177
-
178
-
179
-
180
-
181
-
182
-
183
-
184
-
185
-
186
-
187
-
188
-
189
-
190
-
191
-
192
-
193
-
194
-
195
-
196
-
197
-
198
-
199
-
200
-
201
-
202
-
203
-
204
-
205
-
206
-
207
-
208
-
209
-
210
-
211
-
212
-
213
-
214
-
215
-
216
-
217
-
218
-
219
-
220
-
221
-
222
-
223
-
224
-
225
-
226
-
227
-
228
-
229
-
230
-
231
-
232
-
233
-
234
-
235
-
236
-
237
-
238
-
239
-
240
-
241
-
242
-
243
-
244
-
245
-
246
-
247
-
248
-
249
-
250
-
251
-
252
-
253
-
254
-
255
-
256
-
257
-
258
-
259
-
260
-
261
 |
 |
