HP Photosmart C4500 User Guide - Page 56
Print using Maximum dpi, Print on both sides of
 |
View all HP Photosmart C4500 manuals
Add to My Manuals
Save this manual to your list of manuals |
Page 56 highlights
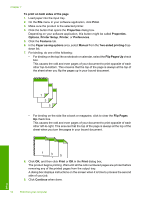
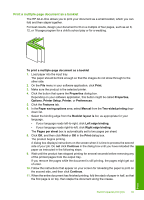
TIP: You can remove red-eye coloring in the photo when using the Off or Basic mode by selecting the Remove red eye check box. 12. Click OK, and then click Print or OK in the Print dialog box. NOTE: Do not leave unused photo paper in the input tray. The paper might start to curl, which could reduce the quality of your printout. Photo paper should be flat before printing. Print using Maximum dpi Use Maximum dpi mode to print high-quality, sharp images. To get the most benefit from Maximum dpi mode, use it to print high-quality images such as digital photographs. When you select the Maximum dpi setting, the printer software displays the optimized dots per inch (dpi) that the HP All-in-One will print. Printing in Maximum dpi takes longer than printing with other settings and requires a large amount of disk space. NOTE: If a photo print cartridge is also installed, the print quality is enhanced. A photo print cartridge can be purchased separately if it is not included with the HP Allin-One. To print in Maximum dpi mode 1. Make sure you have paper loaded in the input tray. 2. On the File menu in your software application, click Print. 3. Make sure the product is the selected printer. 4. Click the button that opens the Properties dialog box. Depending on your software application, this button might be called Properties, Options, Printer Setup, Printer, or Preferences. 5. Click the Advanced tab. 6. In the Features area, select the Enable maximum dpi setting check box. 7. Click the Features tab. 8. In the Paper Type drop-down list, click More, and then select the appropriate paper type. 9. In the Print Quality drop-down list, click Maximum dpi. NOTE: To find out what dpi the product will print based on the paper type and print quality settings you selected, click Resolution. 10. Select any other print settings that you want, and then click OK. Related topics "Use a photo print cartridge" on page 84 Print on both sides of the page You can print two-sided pages with the HP All-in-One manually. When printing two-sided pages, make sure to use paper that is thick enough so that images do not show through to the other side. Print Perform special print jobs 53
-
 1
1 -
2
-
3
-
4
-
5
-
6
-
7
-
8
-
9
-
10
-
11
-
12
-
13
-
14
-
15
-
16
-
17
-
18
-
19
-
20
-
21
-
22
-
23
-
24
-
25
-
26
-
27
-
28
-
29
-
30
-
31
-
32
-
33
-
34
-
35
-
36
-
37
-
38
-
39
-
40
-
41
-
42
-
43
-
44
-
45
-
46
-
47
-
48
-
49
-
50
-
 51
51 -
 52
52 -
 53
53 -
 54
54 -
 55
55 -
 56
56 -
 57
57 -
 58
58 -
 59
59 -
 60
60 -
 61
61 -
62
-
63
-
64
-
65
-
66
-
67
-
68
-
69
-
70
-
71
-
72
-
73
-
74
-
75
-
76
-
77
-
78
-
79
-
80
-
81
-
82
-
83
-
84
-
85
-
86
-
87
-
88
-
89
-
90
-
91
-
92
-
93
-
94
-
95
-
96
-
97
-
98
-
99
-
100
-
101
-
102
-
103
-
104
-
105
-
106
-
107
-
108
-
109
-
110
-
111
-
112
-
113
-
114
-
115
-
116
-
117
-
118
-
119
-
120
-
121
-
122
-
123
-
124
-
125
-
126
-
127
-
128
-
129
-
130
-
131
-
132
-
133
-
134
-
135
-
136
-
137
-
138
-
139
-
140
-
141
-
142
-
143
-
144
-
145
-
146
-
147
-
148
-
149
-
150
-
151
-
152
-
153
-
154
-
155
-
156
-
157
-
158
-
159
-
160
-
161
-
162
-
163
-
164
-
165
-
166
-
167
-
168
-
169
-
170
-
171
-
172
-
173
-
174
-
175
-
176
-
177
-
178
-
179
-
180
-
181
-
182
-
183
-
184
-
185
-
186
-
187
-
188
-
189
-
190
-
191
-
192
-
193
-
194
-
195
-
196
-
197
-
198
-
199
-
200
-
201
-
202
-
203
-
204
-
205
-
206
-
207
-
208
-
209
-
210
-
211
-
212
-
213
-
214
-
215
-
216
-
217
-
218
-
219
-
220
-
221
-
222
-
223
-
224
-
225
-
226
-
227
-
228
-
229
-
230
-
231
-
232
-
233
-
234
-
235
-
236
-
237
-
238
-
239
-
240
-
241
-
242
-
243
-
244
-
245
-
246
-
247
-
248
-
249
-
250
-
251
-
252
-
253
-
254
-
255
-
256
-
257
-
258
-
259
-
260
-
261
 |
 |