HP Portable 386 Compaq Portable 386 Personal Computer Maintenance and Service - Page 151
Compaq Enhanced Color Graphics Board Jumper and Switch Settings
 |
View all HP Portable 386 manuals
Add to My Manuals
Save this manual to your list of manuals |
Page 151 highlights
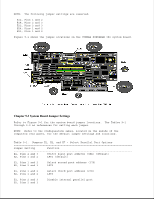
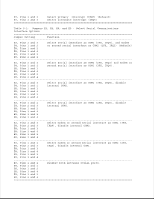
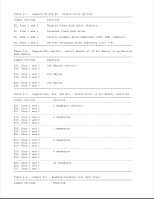
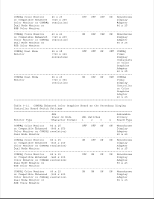
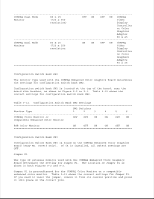
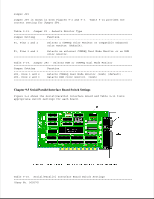
E19, Pins 1 and 2 Fail safe timer enabled (default). E19, Pins 2 and 3 Fail safe timer disabled. Table 9-7. Jumper E20 - Selects 20 MHz 80387 Coprocessor Installation Jumper Setting Function E20, Pins 2 and 3 Selects 20 MHz 80387 coprocessor not installed or Weitek 3167 coprocessor installed (default). E20, Pins 1 and 2 Selects 20 MHz 80387 coprocessor installed or Weitek 3167 coprocessor not installed. Table 9-8. Jumper E21 - Selects System Speed at Power On Jumper Setting Function E21, Pins 1 and 2 Selects power on in AUTO mode (20 MHz/8 MHz when accessing diskette drive) (default). E21, Pins 2 and 3 Selects power on in HIGH mode (always 20 MHz Table 9-9. Jumper E23 - Selects Plasma Display Mode at Power On Jumper Setting Function E23, Pins 1 and 2 Selects power on with plasma display in dual (CGA) mode (3DX, B800) (default). E23, Pins 2 and 3 Selects power on with plasma display in monochrome (MDA) mode (3BX, B000). Chapter 9.4 Compaq Enhanced Color Graphics Board Jumper and Switch Settings COMPAQ Enhanced Color Graphics Boards have two banks of configuration switches. Version 1 (Assy No. 000410), shown in Figure 9-2, has two jumpers that must be set for the board to work properly with the computer system. Version 2 (Assy No. 000471), shown in Figure 9-3, has three jumpers. The monitor used with either COMPAQ Enhanced Color Graphics Board determines the correct setting for one of the jumpers and one bank of configuration switches. The other configuration switch bank setting indicates whether the COMPAQ Enhanced Color Graphics Board is the primary (or only) display controller board or the secondary display controller board in the computer. This configuration switch bank also selects the power on mode and character format of the COMPAQ Enhanced Color Graphics Board when the computer is turned on or restarted. The following sections provide jumper and configuration switch locations and instructions on how to set them.
-
 1
1 -
2
-
3
-
4
-
5
-
6
-
7
-
8
-
9
-
10
-
11
-
12
-
13
-
14
-
15
-
16
-
17
-
18
-
19
-
20
-
21
-
22
-
23
-
24
-
25
-
26
-
27
-
28
-
29
-
30
-
31
-
32
-
33
-
34
-
35
-
36
-
37
-
38
-
39
-
40
-
41
-
42
-
43
-
44
-
45
-
46
-
47
-
48
-
49
-
50
-
51
-
52
-
53
-
54
-
55
-
56
-
57
-
58
-
59
-
60
-
61
-
62
-
63
-
64
-
65
-
66
-
67
-
68
-
69
-
70
-
71
-
72
-
73
-
74
-
75
-
76
-
77
-
78
-
79
-
80
-
81
-
82
-
83
-
84
-
85
-
86
-
87
-
88
-
89
-
90
-
91
-
92
-
93
-
94
-
95
-
96
-
97
-
98
-
99
-
100
-
101
-
102
-
103
-
104
-
105
-
106
-
107
-
108
-
109
-
110
-
111
-
112
-
113
-
114
-
115
-
116
-
117
-
118
-
119
-
120
-
121
-
122
-
123
-
124
-
125
-
126
-
127
-
128
-
129
-
130
-
131
-
132
-
133
-
134
-
135
-
136
-
137
-
138
-
139
-
140
-
141
-
142
-
143
-
144
-
145
-
 146
146 -
 147
147 -
 148
148 -
 149
149 -
 150
150 -
 151
151 -
 152
152 -
 153
153 -
 154
154 -
 155
155 -
 156
156 -
157
-
158
-
159
-
160
-
161
-
162
-
163
-
164
-
165
-
166
 |
 |