HP Portable 386 Compaq Portable 386 Personal Computer Maintenance and Service - Page 71
Rear Panel, Place the rear panel on the computer.
 |
View all HP Portable 386 manuals
Add to My Manuals
Save this manual to your list of manuals |
Page 71 highlights
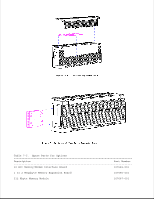
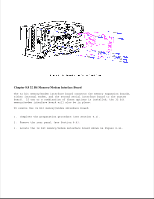
To replace the keyboard assembly, reverse steps 1 through 4. Chapter 8.4 Rear Panel To remove the rear panel: 1. Complete the preparation procedure (see Section 8.2). 2. Place the computer keyboard side down on a level surface with the rear panel facing upward. 3. Remove the six screws and washers that secure the rear panel to the computer (Figure 8-4). Note that the two screws you removed from the center position are shorter than the other four screws. 4. Carefully pull the rear panel away from the computer and set it aside. To replace the rear panel: 1. Place the rear panel on the computer. 2. Insert the two shorter screws and washers in the center holes. 3. Insert the four remaining screws and washers in the corner holes. 4. Start all six screws before completely tightening them. 5. Beginning with the center screws, tighten each screw.
-
 1
1 -
2
-
3
-
4
-
5
-
6
-
7
-
8
-
9
-
10
-
11
-
12
-
13
-
14
-
15
-
16
-
17
-
18
-
19
-
20
-
21
-
22
-
23
-
24
-
25
-
26
-
27
-
28
-
29
-
30
-
31
-
32
-
33
-
34
-
35
-
36
-
37
-
38
-
39
-
40
-
41
-
42
-
43
-
44
-
45
-
46
-
47
-
48
-
49
-
50
-
51
-
52
-
53
-
54
-
55
-
56
-
57
-
58
-
59
-
60
-
61
-
62
-
63
-
64
-
65
-
 66
66 -
 67
67 -
 68
68 -
 69
69 -
 70
70 -
 71
71 -
 72
72 -
 73
73 -
 74
74 -
 75
75 -
 76
76 -
77
-
78
-
79
-
80
-
81
-
82
-
83
-
84
-
85
-
86
-
87
-
88
-
89
-
90
-
91
-
92
-
93
-
94
-
95
-
96
-
97
-
98
-
99
-
100
-
101
-
102
-
103
-
104
-
105
-
106
-
107
-
108
-
109
-
110
-
111
-
112
-
113
-
114
-
115
-
116
-
117
-
118
-
119
-
120
-
121
-
122
-
123
-
124
-
125
-
126
-
127
-
128
-
129
-
130
-
131
-
132
-
133
-
134
-
135
-
136
-
137
-
138
-
139
-
140
-
141
-
142
-
143
-
144
-
145
-
146
-
147
-
148
-
149
-
150
-
151
-
152
-
153
-
154
-
155
-
156
-
157
-
158
-
159
-
160
-
161
-
162
-
163
-
164
-
165
-
166
 |
 |
