HP Vectra VE C/xxx 7 HP Vectra VE C/xxx Series 7 PC - Network Administration G - Page 26
ODI OS/2 Client Driver, Installing OS/2 Requester from NetWare Requester Disk, Installing OS/2
 |
View all HP Vectra VE C/xxx 7 manuals
Add to My Manuals
Save this manual to your list of manuals |
Page 26 highlights
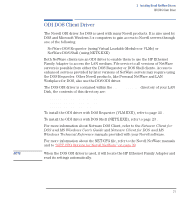
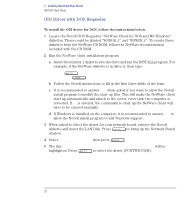
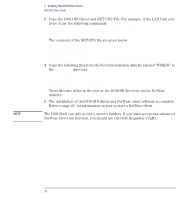
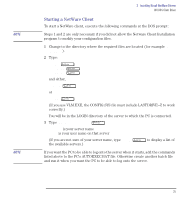
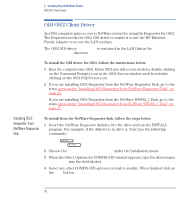
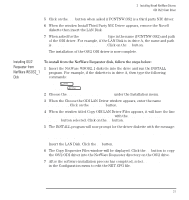
2 Installing Novell NetWare Drivers ODI OS/2 Client Driver ODI OS/2 Client Driver An OS/2 computer gains access to NetWare servers by using the Requester for OS/2. The Requester needs the OS/2 ODI driver to enable it to use the HP Ethernet Family Adapter to access the LAN medium. The OS/2 ODI driver PCNTNW.OS2 is contained in the LAN Disk in the \NOVELL\OS2CLNT directory. To install the ODI driver for OS/2, follow the instructions below: 1 Boot the computer into OS/2. Enter OS/2 into full screen mode by double-clicking on the Command Prompts icon in the OS/2 System window and then double clicking on the OS/2 Full Screen icon. 2 If you are installing OS/2 Requester from the NetWare Requester Disk, go to the steps given under "Installing OS/2 Requester from NetWare Requester Disk" on page 26. If you are installing OS/2 Requester from the NetWare WSOS2_1 Disk, go to the steps given under "Installing OS/2 Requester from NetWare WSOS2_1 Disk" on page 27. Installing OS/2 Requester from NetWare Requester Disk To install from the NetWare Requester disk, follow the steps below: 1 Insert the NetWare Requester diskette into the drive and run the INSTALL program. For example, if the diskette is in drive A, then type the following commands: A:\ INSTALL 2 Choose the Requester on Workstation under the Installation menu. 3 When the Select Options for CONFIG.SYS window appears, type the driver name PCNTNW.OS2 into the field labeled Network Interface Card driver. 4 Select any other CONFIG.SYS options you wish to modify. When finished click on the Save button. 26 English
-
 1
1 -
2
-
3
-
4
-
5
-
6
-
7
-
8
-
9
-
10
-
11
-
12
-
13
-
14
-
15
-
16
-
17
-
18
-
19
-
20
-
 21
21 -
 22
22 -
 23
23 -
 24
24 -
 25
25 -
 26
26 -
 27
27 -
 28
28 -
 29
29 -
 30
30 -
 31
31 -
32
-
33
-
34
-
35
-
36
-
37
-
38
-
39
-
40
-
41
-
42
-
43
-
44
-
45
-
46
-
47
-
48
-
49
-
50
-
51
-
52
-
53
-
54
-
55
-
56
-
57
-
58
-
59
-
60
-
61
-
62
-
63
-
64
-
65
-
66
-
67
-
68
-
69
-
70
-
71
-
72
-
73
-
74
-
75
-
76
-
77
-
78
-
79
-
80
-
81
-
82
-
83
-
84
-
85
-
86
-
87
-
88
-
89
-
90
-
91
-
92
-
93
-
94
-
95
-
96
-
97
-
98
-
99
-
100
-
101
-
102
-
103
-
104
-
105
-
106
-
107
-
108
-
109
-
110
-
111
-
112
 |
 |
