HP Vectra VE C/xxx 7 HP Vectra VE C/xxx Series 7 PC - Network Administration G - Page 70
NDIS 2.01 Driver with IBM Warp Connect, In the OS/2 System folder
 |
View all HP Vectra VE C/xxx 7 manuals
Add to My Manuals
Save this manual to your list of manuals |
Page 70 highlights
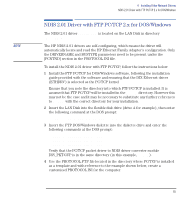
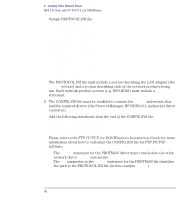
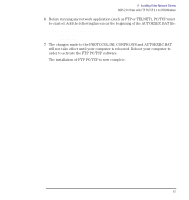
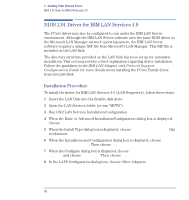
4 Installing Other Network Drivers NDIS 2.01 Driver with IBM Warp Connect NDIS 2.01 Driver with IBM Warp Connect To install the NDIS 2.01 driver under IBM Warp Connect, follow the instructions below: 1 When you install IBM Warp Connect, you are asked whether you want to install network support. If you have already installed Warp Connect without network support, continue with step 2. If you are installing Warp Connect now, reply Yes to install network support, and go directly to step 6. 2 In the OS/2 System folder, open the OS/2 Warp Connect Install/Remove folder. 3 Click on Warp Connect Selective Install for Networking. 4 Choose Install the product on this workstation (local install). 5 Select Easy Installation. 6 Follow the instructions. You will be offered various network configuration options; consult the Warp Connect User's Guide for information and continue installation. 7 In the Select Network Adapter window, click on the Other Adapter window. 8 When asked for the file location, enter A:\IBM and insert the LAN Disk into the flexible drive. Click OK. 9 The HP Ethernet Family Adapter driver will be shown in the Drivers Found window. Select Ethernet as Type of LAN. You should now see the HP Ethernet Family Adapter highlighted in the list of adapters in the Select Network Adapter window. 10 Insert the Warp Connect CD-ROM. Then click OK. 11 Click OK in the Select Network Adapter window to accept the adapter. 12 Click OK again and then click OK a second time in the configuration window. 70 English
-
 1
1 -
2
-
3
-
4
-
5
-
6
-
7
-
8
-
9
-
10
-
11
-
12
-
13
-
14
-
15
-
16
-
17
-
18
-
19
-
20
-
21
-
22
-
23
-
24
-
25
-
26
-
27
-
28
-
29
-
30
-
31
-
32
-
33
-
34
-
35
-
36
-
37
-
38
-
39
-
40
-
41
-
42
-
43
-
44
-
45
-
46
-
47
-
48
-
49
-
50
-
51
-
52
-
53
-
54
-
55
-
56
-
57
-
58
-
59
-
60
-
61
-
62
-
63
-
64
-
 65
65 -
 66
66 -
 67
67 -
 68
68 -
 69
69 -
 70
70 -
 71
71 -
 72
72 -
 73
73 -
 74
74 -
 75
75 -
76
-
77
-
78
-
79
-
80
-
81
-
82
-
83
-
84
-
85
-
86
-
87
-
88
-
89
-
90
-
91
-
92
-
93
-
94
-
95
-
96
-
97
-
98
-
99
-
100
-
101
-
102
-
103
-
104
-
105
-
106
-
107
-
108
-
109
-
110
-
111
-
112
 |
 |
