HP Xw4600 HP xw4600 Workstation - Service and Technical Reference Guide - Page 113
Installing the processor heatsink, System processor, Removing a system processor
 |
UPC - 883585516483
View all HP Xw4600 manuals
Add to My Manuals
Save this manual to your list of manuals |
Page 113 highlights
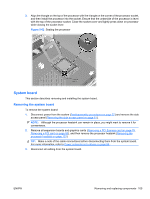
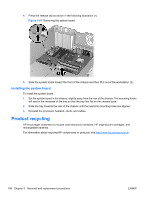
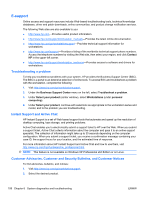
Installing the processor heatsink To install a heatsink: 1. Disconnect power from the system (Predisassembly procedures on page 57), remove the side access panel (Removing the side access panel on page 61). and then remove the processor heatsink (Removing the processor heatsink on page 101). 2. If reusing the original heatsink, apply thermal grease to the center of the processor top surface. If using a new processor heatsink, do not apply thermal grease to the processor; the a new heat sink will have grease already applied to the heatsink surface. In this case, discard the thermal grease protective liner from the bottom of the new heatsink before installing. 3. Carefully seat the processor heatsink onto the system board. CAUTION: Do not overtighten the heatsink screws. If you overtighten them, you might strip the threads in the system board tray. 4. Carefully tighten the four screws a little at a time, that is, do not fully tighten one screw and move onto the next. If you have a torque-limited driver available, tighten the screws to 6 in-lbs. CAUTION: Ensure that the processor remains level as you tighten the screws. System processor This section describes how to remove and install a system processor. Removing a system processor 1. Disconnect power from the system (Predisassembly procedures on page 57), remove the side access panel (Removing the side access panel on page 61), and then remove the processor heatsink (Removing the processor heatsink on page 101). ENWW Removing and replacing components 103
-
 1
1 -
2
-
3
-
4
-
5
-
6
-
7
-
8
-
9
-
10
-
11
-
12
-
13
-
14
-
15
-
16
-
17
-
18
-
19
-
20
-
21
-
22
-
23
-
24
-
25
-
26
-
27
-
28
-
29
-
30
-
31
-
32
-
33
-
34
-
35
-
36
-
37
-
38
-
39
-
40
-
41
-
42
-
43
-
44
-
45
-
46
-
47
-
48
-
49
-
50
-
51
-
52
-
53
-
54
-
55
-
56
-
57
-
58
-
59
-
60
-
61
-
62
-
63
-
64
-
65
-
66
-
67
-
68
-
69
-
70
-
71
-
72
-
73
-
74
-
75
-
76
-
77
-
78
-
79
-
80
-
81
-
82
-
83
-
84
-
85
-
86
-
87
-
88
-
89
-
90
-
91
-
92
-
93
-
94
-
95
-
96
-
97
-
98
-
99
-
100
-
101
-
102
-
103
-
104
-
105
-
106
-
107
-
 108
108 -
 109
109 -
 110
110 -
 111
111 -
 112
112 -
 113
113 -
 114
114 -
 115
115 -
 116
116 -
 117
117 -
 118
118 -
119
-
120
-
121
-
122
-
123
-
124
-
125
-
126
-
127
-
128
-
129
-
130
-
131
-
132
-
133
-
134
-
135
-
136
-
137
-
138
-
139
-
140
-
141
-
142
-
143
-
144
-
145
-
146
-
147
-
148
-
149
-
150
-
151
-
152
-
153
-
154
-
155
-
156
-
157
-
158
-
159
-
160
-
161
-
162
-
163
-
164
-
165
-
166
-
167
-
168
-
169
-
170
-
171
-
172
-
173
-
174
-
175
-
176
-
177
-
178
-
179
-
180
-
181
 |
 |
