HP Xw4600 HP xw4600 Workstation - Service and Technical Reference Guide - Page 73
Hood Sensor (Smart Cover Sensor) (optional), Removing the Hood Sensor
 |
UPC - 883585516483
View all HP Xw4600 manuals
Add to My Manuals
Save this manual to your list of manuals |
Page 73 highlights
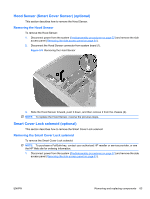
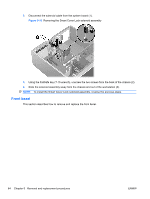
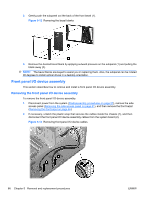
Hood Sensor (Smart Cover Sensor) (optional) This section describes how to remove the Hood Sensor. Removing the Hood Sensor To remove the Hood Sensor: 1. Disconnect power from the system (Predisassembly procedures on page 57) and remove the side access panel (Removing the side access panel on page 61). 2. Disconnect the Hood Sensor connector from system board (1). Figure 5-9 Removing the Hood Sensor 3. Slide the Hood Sensor forward, push it down, and then remove it from the chassis (2). NOTE: To replace the Hood Sensor, reverse the previous steps. Smart Cover Lock solenoid (optional) This section describes how to remove the Smart Cover Lock solenoid Removing the Smart Cover Lock solenoid To remove the Smart Cover Lock solenoid: NOTE: To purchase a FailSafe key, contact your authorized HP reseller or service provider, or see the HP Web site for ordering information. 1. Disconnect power from the system (Predisassembly procedures on page 57) and remove the side access panel (Removing the side access panel on page 61). ENWW Removing and replacing components 63
-
 1
1 -
2
-
3
-
4
-
5
-
6
-
7
-
8
-
9
-
10
-
11
-
12
-
13
-
14
-
15
-
16
-
17
-
18
-
19
-
20
-
21
-
22
-
23
-
24
-
25
-
26
-
27
-
28
-
29
-
30
-
31
-
32
-
33
-
34
-
35
-
36
-
37
-
38
-
39
-
40
-
41
-
42
-
43
-
44
-
45
-
46
-
47
-
48
-
49
-
50
-
51
-
52
-
53
-
54
-
55
-
56
-
57
-
58
-
59
-
60
-
61
-
62
-
63
-
64
-
65
-
66
-
67
-
 68
68 -
 69
69 -
 70
70 -
 71
71 -
 72
72 -
 73
73 -
 74
74 -
 75
75 -
 76
76 -
 77
77 -
 78
78 -
79
-
80
-
81
-
82
-
83
-
84
-
85
-
86
-
87
-
88
-
89
-
90
-
91
-
92
-
93
-
94
-
95
-
96
-
97
-
98
-
99
-
100
-
101
-
102
-
103
-
104
-
105
-
106
-
107
-
108
-
109
-
110
-
111
-
112
-
113
-
114
-
115
-
116
-
117
-
118
-
119
-
120
-
121
-
122
-
123
-
124
-
125
-
126
-
127
-
128
-
129
-
130
-
131
-
132
-
133
-
134
-
135
-
136
-
137
-
138
-
139
-
140
-
141
-
142
-
143
-
144
-
145
-
146
-
147
-
148
-
149
-
150
-
151
-
152
-
153
-
154
-
155
-
156
-
157
-
158
-
159
-
160
-
161
-
162
-
163
-
164
-
165
-
166
-
167
-
168
-
169
-
170
-
171
-
172
-
173
-
174
-
175
-
176
-
177
-
178
-
179
-
180
-
181
 |
 |
