HP Xw4600 HP xw4600 Workstation - Service and Technical Reference Guide - Page 58
Hood Sensor (Smart Cover Sensor) (optional), Setting the Hood Sensor protection level
 |
UPC - 883585516483
View all HP Xw4600 manuals
Add to My Manuals
Save this manual to your list of manuals |
Page 58 highlights
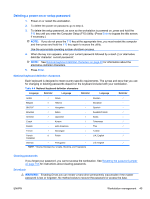
Hood Sensor (Smart Cover Sensor) (optional) The optional Hood Sensor is a combination of hardware and software technology that can alert you when the workstation side access panel has been removed (if the sensor has been properly configured in the Computer Setup (F10) Utility). There are three levels of Hood Sensor protection: Table 4-5 Hood Sensor protection levels Level Setting Description Level 0 Disabled Hood Sensor is disabled (default). Level 1 Notify User When the workstation restarts, a message is displayed indicating that the workstation side access panel has been removed. Level 2 Setup Password When the workstation is restarted, a message is displayed indicating that the workstation side access panel has been removed. You must enter the setup password to continue. Hood Sensor settings can be changed using the Computer Setup (F10) Utility. Setting the Hood Sensor protection level 1. Power on or restart the workstation. 2. As soon as the workstation is powered on, press and hold the F10 key until you enter the Computer Setup (F10) Utility. Press Enter to bypass the title screen, if necessary. NOTE: If you do not press the F10 key at the appropriate time, you must restart the computer, and then press and hold the F10 key again to access the Computer Setup (F10) Utility. If you are using a PS 2 keyboard, you might see a keyboard error message-disregard it. 3. Select Security>Smart Cover>Cover Removal Sensor, and follow the onscreen instructions. 4. Before exiting, select File>Save Changes, and then select Exit. Hood Lock (Smart Cover Lock) (optional) The is an optional solenoid that secures the workstation access cover to the chassis. It is controlled by a BIOS password. When installed, the Hood Lock can prevent unauthorized access to the internal workstation components. CAUTION: For maximum cover lock security, be sure to establish a setup password. The setup password prevents unauthorized access to the Computer Setup utility. Locking the Hood Lock 1. Power on or restart the workstation. 2. As soon as the workstation is powered on, press and hold the F10 key until you enter the Computer Setup (F10) Utility. Press Enter to bypass the title screen, if necessary. NOTE: If you do not press the F10 key at the appropriate time, you must restart the workstation and press and hold the F10 key again to access the utility. If you are using a PS2 keyboard, you might see a keyboard error message-disregard it. 3. Select Security>Smart Cover>Cover Lock>Lock. 4. Select Fire>Save Changes and Exit. 48 Chapter 4 System management ENWW
-
 1
1 -
2
-
3
-
4
-
5
-
6
-
7
-
8
-
9
-
10
-
11
-
12
-
13
-
14
-
15
-
16
-
17
-
18
-
19
-
20
-
21
-
22
-
23
-
24
-
25
-
26
-
27
-
28
-
29
-
30
-
31
-
32
-
33
-
34
-
35
-
36
-
37
-
38
-
39
-
40
-
41
-
42
-
43
-
44
-
45
-
46
-
47
-
48
-
49
-
50
-
51
-
52
-
 53
53 -
 54
54 -
 55
55 -
 56
56 -
 57
57 -
 58
58 -
 59
59 -
 60
60 -
 61
61 -
 62
62 -
 63
63 -
64
-
65
-
66
-
67
-
68
-
69
-
70
-
71
-
72
-
73
-
74
-
75
-
76
-
77
-
78
-
79
-
80
-
81
-
82
-
83
-
84
-
85
-
86
-
87
-
88
-
89
-
90
-
91
-
92
-
93
-
94
-
95
-
96
-
97
-
98
-
99
-
100
-
101
-
102
-
103
-
104
-
105
-
106
-
107
-
108
-
109
-
110
-
111
-
112
-
113
-
114
-
115
-
116
-
117
-
118
-
119
-
120
-
121
-
122
-
123
-
124
-
125
-
126
-
127
-
128
-
129
-
130
-
131
-
132
-
133
-
134
-
135
-
136
-
137
-
138
-
139
-
140
-
141
-
142
-
143
-
144
-
145
-
146
-
147
-
148
-
149
-
150
-
151
-
152
-
153
-
154
-
155
-
156
-
157
-
158
-
159
-
160
-
161
-
162
-
163
-
164
-
165
-
166
-
167
-
168
-
169
-
170
-
171
-
172
-
173
-
174
-
175
-
176
-
177
-
178
-
179
-
180
-
181
 |
 |
